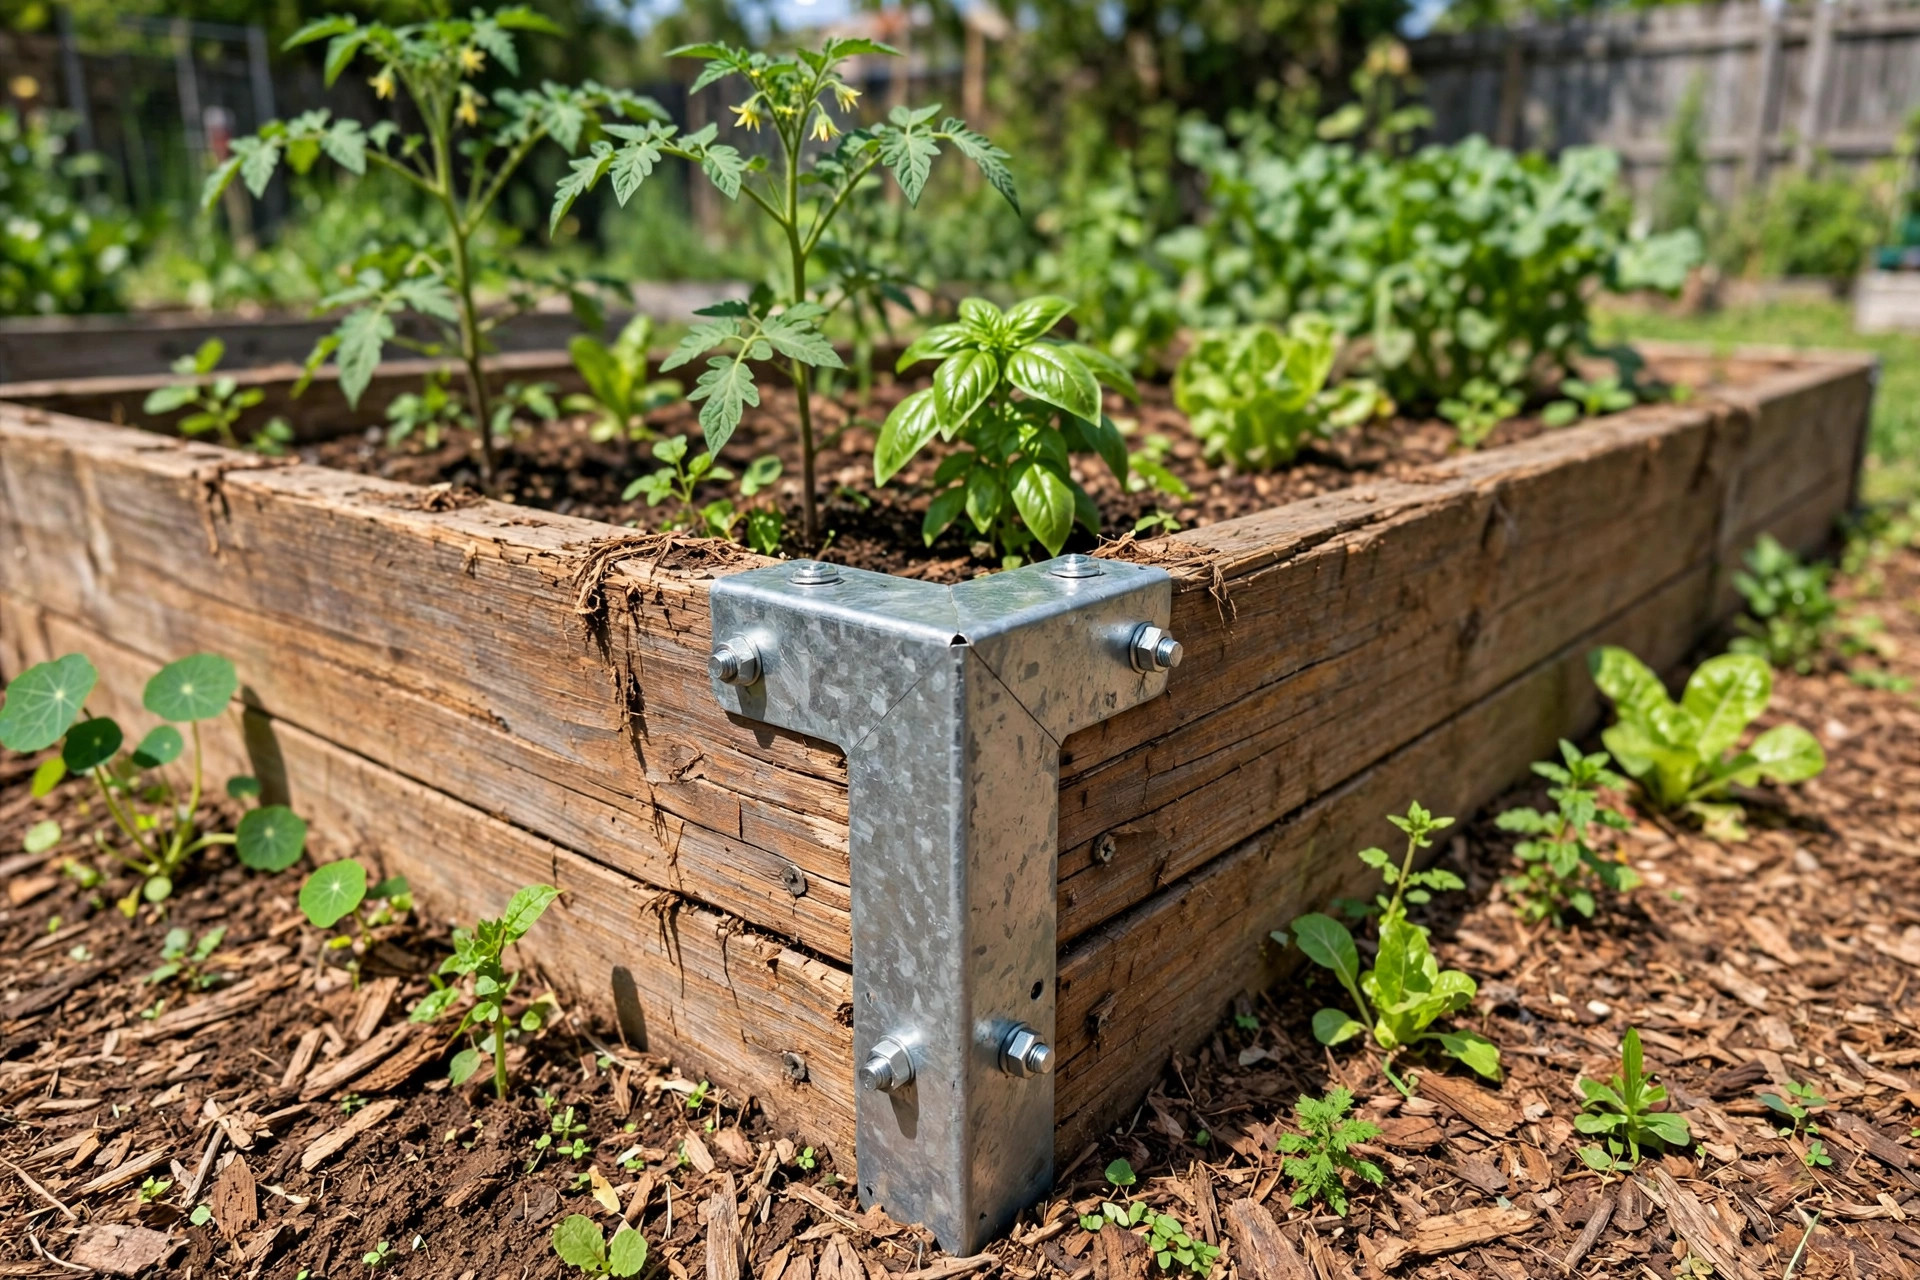

Raised bed corners for easy assembly have changed the way home gardeners build growing beds. For years, the only way to build a raised bed was to cut boards, drill pilot holes, and drive long screws into end grain. Many gardeners lacked the tools or the skill for that work. Corner brackets solved the problem. These small metal or plastic joints join four boards into a firm frame with no drilling and no screws. A person with no building skill can put a bed together in twenty minutes.
The idea is simple. Each corner holds two boards at a right angle. The boards slide into slots or are held by pins. The result is a square frame that can be filled with soil. Because the joints do the hard work, the frame stays strong through years of rain, heat, and frost. This article explains why these corners matter, what to look for, the main types, the cost, how to put a bed together, how to care for it, and how to stay safe.
Why It Matters
A raised bed lifts plants above poor native soil. Gardeners in areas with clay, rock, or sand can fill a frame with a rich mix and grow vegetables with no struggle. The bed warms up sooner in spring. It drains better than flat ground. It also saves the back, because the gardener works at a higher level.
Before raised bed corners for easy assembly became common, building a bed was a real project. The gardener needed a saw, a drill, and screws. Joints in wet soil rotted or split. Corner brackets changed that. They take the tools out of the job. They also make beds that can be taken apart and moved, which matters for renters and for gardeners who like to change a layout each season.
The corners matter for strength as well. Soil is heavy. A bed four feet by eight feet and ten inches deep holds hundreds of pounds of wet soil. That soil pushes outward on the boards. Good corner joints resist that push. Cheap or loose joints let the boards bow or pull apart. A solid corner keeps the frame square for many seasons. Guides at The Spruce describe raised bed basics that pair well with this hardware.
What to Look for When Choosing Corners: Raised Bed Corners for Easy Assembly
A few points decide which corners are right for a given project.
Board size. Most corners fit standard lumber such as two by six or two by eight boards. Some fit two by four or two by ten boards as well. Check the product label before buying. A corner made for two by six boards will not grip a two by ten board.
Material. Steel corners with a rust-proof coating last the longest. Aluminum corners are light and will not rust. Plastic corners cost less but can crack in hard frost. In cold regions, metal is the better choice.
Join method. Some corners work by friction: the board slides into a tight slot. Others use pins that pass through holes in the board and the bracket. Pin types hold stronger in tall beds. Slot types are faster to put together.
Height. Many corners stack. Stacking lets the gardener build beds twelve or twenty inches tall from shorter boards. This is useful for root vegetables such as carrots, which need depth.
Finish. Powder-coated steel and galvanized steel both resist rust. Bare steel will rust in a season. Galvanized or coated metal is worth the extra cost.
Screw holes. Some corners include screw holes as a backup. The gardener can drive a screw through the bracket into the board for extra strength. This is a good feature for tall beds or for beds on slopes.
Shopping guides from Consumer Reports and Family Handyman give sound advice on how to judge the strength and finish of garden hardware.
Main Types and Options
Sliding slot corners. These are the simplest type. Each corner is a square bracket with two open slots. The gardener slides the end of each board into its slot. Friction holds the joint. Some models add a stake that pushes into the soil under the corner for extra hold. These corners suit beds one board high, usually about six inches.
Pin and hole corners. These brackets have holes. The gardener slides the board in, then pushes a metal pin through the bracket and the board. The pin locks the joint. These corners hold taller beds and resist frost heave. They take a few minutes longer to set up than slot corners.
Stackable corners. Stackable brackets lock one level of boards onto the next. The gardener can start with a six-inch bed and add a second level later in the same day or in a later season. This design suits gardeners who want to try raised beds at low cost and expand later.
Plastic snap corners. Made from molded plastic, these corners snap onto board ends. They are the cheapest type and the lightest. They work well for shallow beds of herbs or flowers. They are not the best choice for heavy soil loads or for beds left out all winter.
Steel corner kits with stakes. A kit often includes four corners and four stakes. The stakes anchor the corners to the ground. These kits suit beds built on slopes or in windy places where the frame might shift. Garden supply shops such as Gardener’s Supply and Home Depot stock a wide range of these kits.
Cost and Price
Corner brackets cost far less than a full wooden raised bed kit. Prices vary by material and design.
– Basic plastic corners: about two to four dollars per corner. – Steel slot corners: about four to eight dollars per corner. – Pin and hole steel corners: about six to twelve dollars per corner. – Stackable metal kits: about twenty to forty dollars for a set of four. – Full kits with stakes and corner pins: about twenty-five to fifty dollars.
Boards cost extra. Four eight-foot cedar two by six boards can cost sixty to one hundred dollars. Pressure-treated pine boards cost less, about forty to sixty dollars for the same set. Cedar lasts longer and has no chemical treatment, so many vegetable gardeners prefer it.
Total cost for one four by eight foot bed often falls between fifty and one hundred fifty dollars, depending on wood choice and corner type. That is less than most store-bought raised bed kits, which often sell for two hundred dollars or more. Price trackers at Lowe’s show current lumber costs that help with budgeting.
How to Put the Bed Together
One of the best traits of raised bed corners for easy assembly is that no saw and no drill are needed. Here is a simple method that works for most types.
Step one: pick a spot. Choose a level area with six or more hours of sun. Lay out the frame where it will stay, because a filled bed is too heavy to move.
Step two: cut or buy boards. Use four boards of equal height. For a four by eight bed, use two eight-foot boards and two four-foot boards. Ask the lumber yard to cut them to length if needed.
Step three: set the corners. Slide each board end into a corner bracket. Stand the frame on the ground and push the corners down until the boards rest flat. Check that the corners sit square. A carpenter’s square helps, but the eye is often enough.
Step four: anchor if needed. If the corners have stakes, push the stakes into the soil at each corner. In soft soil, step on them to drive them deep.
Step five: level the frame. Lay a level across the boards or pour water on the ground inside the frame to see where it runs. Dig out high spots or pack soil under low spots until the frame sits even.
Step six: add a weed barrier. Lay cardboard or landscape fabric on the ground inside the frame. This blocks weeds and grass from growing up into the bed.
Step seven: fill with soil. Fill the bed with a mix of topsoil, compost, and aeration material such as perlite. For the right blend, see this guide on raised garden bed soil mix recipes. A good best soil for raised vegetable beds mix gives plants a strong start. Water the filled bed well and let it settle for a day before planting.
Step eight: consider water. A simple watering line saves time all summer. A drip irrigation kit for raised beds can be laid on top of the soil in minutes.
Total build time for a first bed is usually under one hour, including filling. A second bed goes faster. Step-by-step building advice from Bob Vila covers the same ground in plain terms.
Care and Upkeep
Corner brackets need little care, but a few habits keep them strong.
Check the corners each spring. Push on each corner to feel for looseness. Soil settles over winter, and frost can lift boards. Tighten or reseat any corner that has worked loose.
Wash dirt and salt from metal corners at the end of the season. A garden hose is enough. If a steel corner shows a rust spot, scrub it with a wire brush and touch it up with outdoor paint.
Wood boards need more care than the corners. Cedar and redwood resist rot for years. Pine boards last fewer years. When a board rots, pull it from the corner slot and slide in a new one. This is one of the great gains of this system: the frame can be repaired one board at a time.
Do not leave plastic corners out in hard freezes if the label warns against it. Cold makes some plastics brittle. Bring plastic corners inside or wrap them with burlap in cold climates.
Tool makers such as Fiskars and Corona Tools publish seasonal maintenance guides that apply to all garden hardware.
Safety
Raised bed corners for easy assembly are safe, but a few rules protect the gardener.
Wear gloves when handling metal corners. Fresh-cut brackets can have sharp edges. Safety glasses help when cutting boards or driving stakes.
Choose safe wood for food beds. Untreated cedar, redwood, and cypress are the safest choices. Some gardeners use pressure-treated lumber. Modern pressure-treated wood is safer than old types, but gardeners who worry can line the inside of the bed with plastic sheeting to keep wood away from soil. Advice from Burpee on garden bed materials supports this practice.
Lift with care. A bag of soil mix can weigh forty pounds. Fill the bed with a wheelbarrow close at hand. Do not lift heavy bags over a tall frame.
Keep the work area clear of children and pets while building. Stakes and pins left on the ground are easy to step on.
Frequently Asked Questions
How long do corner brackets last? Galvanized or powder-coated steel corners often last ten to twenty years. Plastic corners last three to seven years, depending on sun and frost. The boards usually wear out before the corners do.
Can I stack beds taller with these corners? Yes, if the corners are the stackable type. Check the product label for a height limit. Most stackable corners support two or three levels, giving a bed twelve to eighteen inches deep. Taller beds need bracing on the long sides to stop bowing.
Do I need screws as well? Most corners work with no screws. Some models have screw holes for extra strength. Screws help in tall beds, on slopes, and in areas with heavy frost heave. They are not needed for a basic six-inch bed on level ground.
What board sizes work with these corners? Most fit two by six boards, which is the most common size for raised beds. Some fit two by four, two by eight, or two by ten boards. Always match the corner to the board size. A loose fit will let the joint shift.
Can I take the bed apart and move it? Yes. That is one of the main gains of this system. Pull the pins or slide the boards out, move the parts, and rebuild the frame in the new spot. This is handy for renters and for gardeners who redesign a yard.
Are plastic corners strong enough for vegetables? Plastic corners hold shallow beds of herbs, lettuce, and flowers well. For deep beds of tomatoes or root vegetables, steel corners are the safer choice. Heavy wet soil puts real force on the joints.
A Final Word
Raised bed corners for easy assembly take one of the hardest parts of gardening and make it simple. The gardener picks boards, slides them into corners, and fills the frame with soil. No saw, no drill, no long screws. The joints hold strong through wet seasons and dry ones. The frame can grow taller, move to a new spot, or be repaired one board at a time.
For a gardener who has put off raised beds because of the building work, these small brackets remove the last excuse. A sunny afternoon, four boards, four corners, and good soil are all it takes to start. The harvest that follows makes the small effort well worth it.
References
Bob Vila. (n.d.). Home improvement advice. https://www.bobvila.com Burpee. (n.d.). Seeds, plants, and gardening supplies. https://www.burpee.com Consumer Reports. (n.d.). Product reviews and ratings. https://www.consumerreports.org Corona Tools. (n.d.). Garden and landscape tools. https://www.corona-tools.com Family Handyman. (n.d.). DIY home repair and maintenance. https://www.familyhandyman.com Fiskars. (n.d.). Garden and cutting tools. https://www.fiskars.com Gardener’s Supply Company. (n.d.). Gardening tools and supplies. https://www.gardeners.com Lowe’s. (n.d.). Home improvement products. https://www.lowes.com The Home Depot. (n.d.). Home improvement products. https://www.homedepot.com The Spruce. (n.d.). Home and garden advice. https://www.thespruce.com
Was this guide helpful?

About Sarah Mitchell
The My Garden US editorial team writes practical, in-depth home and garden guides for American homeowners — tested advice, no fluff.
You May Also Like
Best Garden Tool Storage Rack Reviews: What Buyers Say
March 10, 2026 0 views
Best Garden Gloves for Wet Conditions: A Complete Guide
April 2, 2026 0 views
How to Grow Beans on Trellis: A Complete Guide
March 16, 2026 0 views