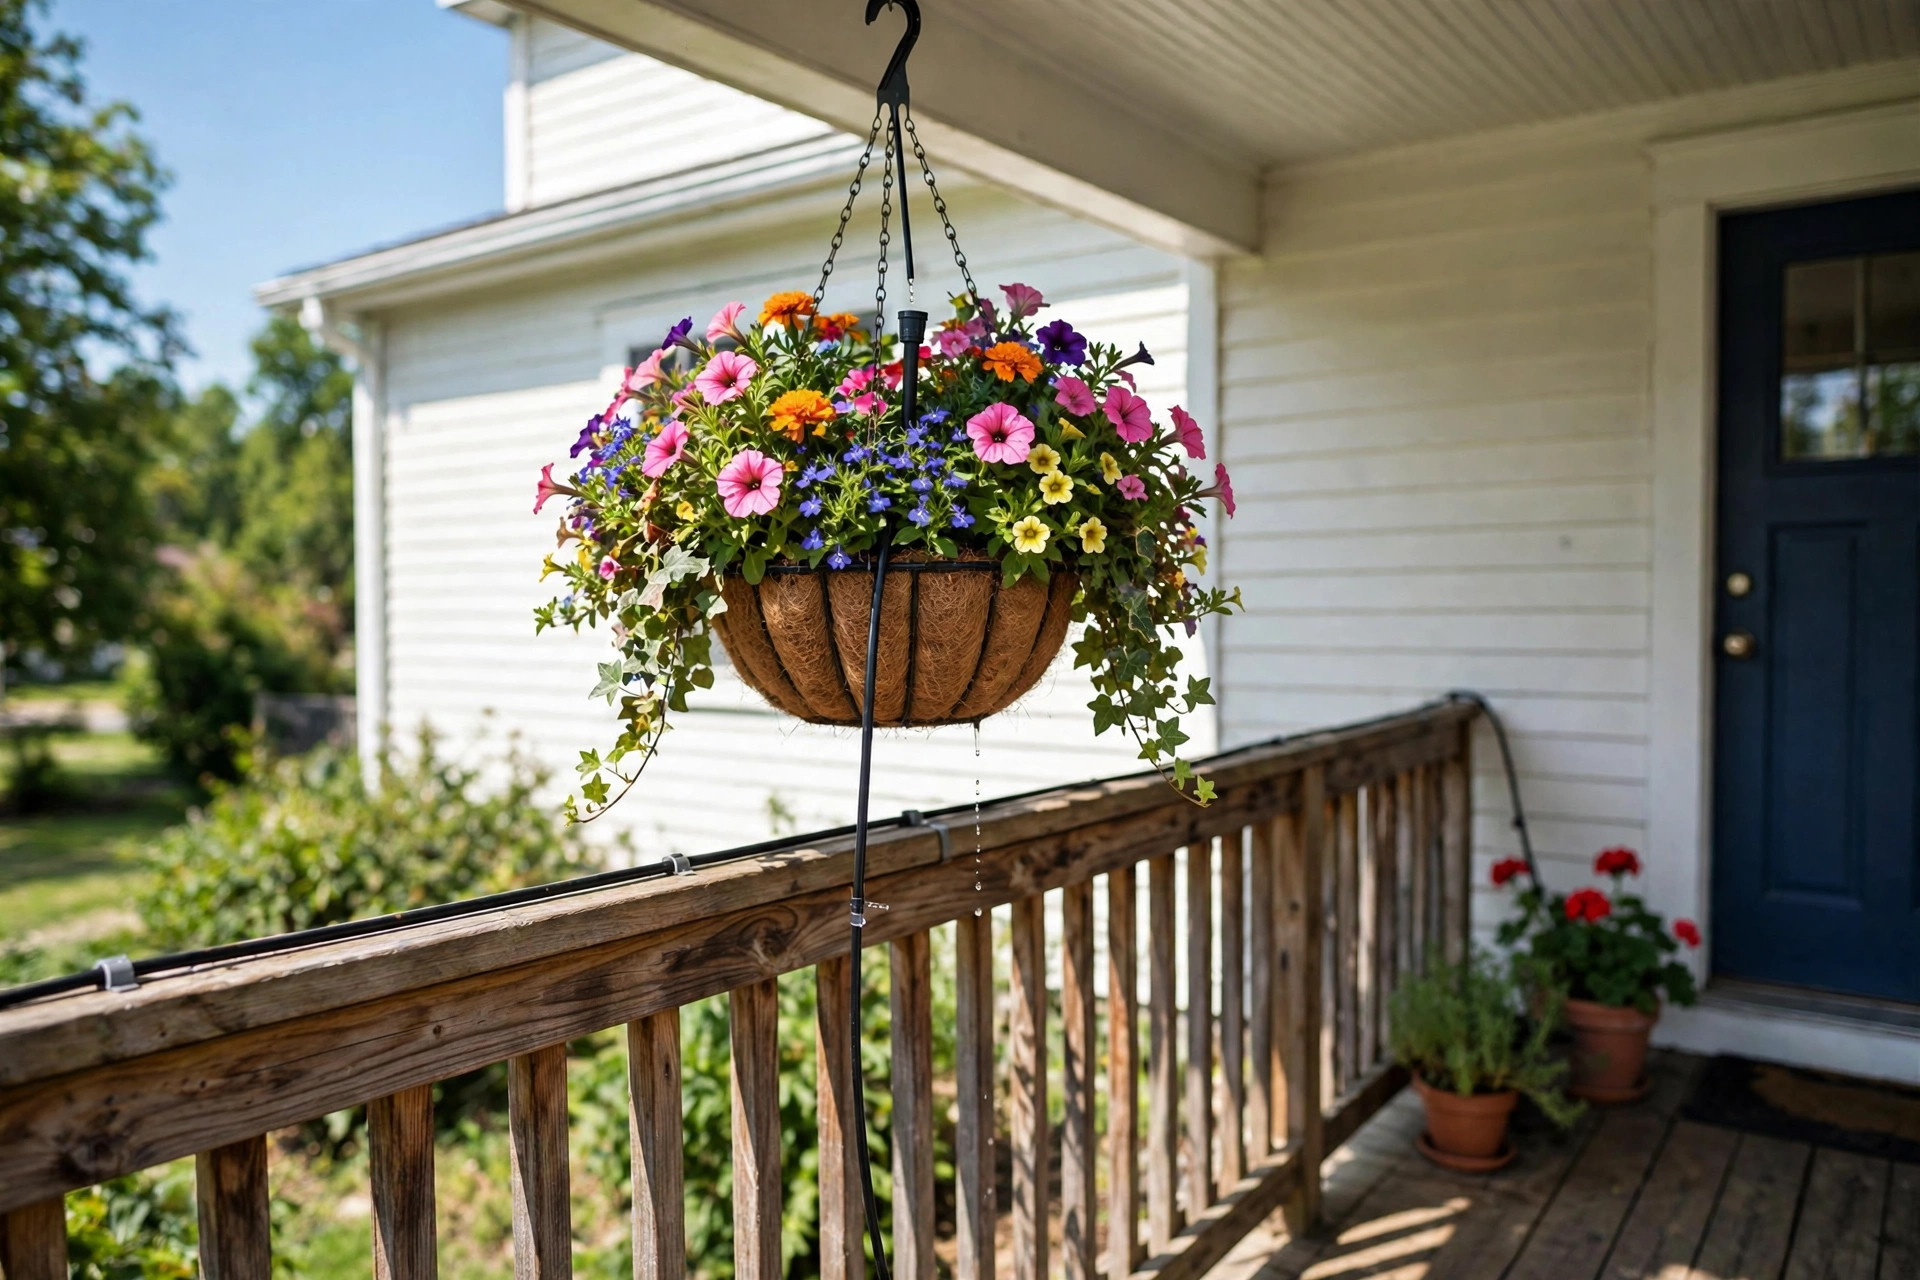

Hanging baskets dry out fast. The wind moves across them from every side. The sun hits them from the top and the sides at once. The small pot holds only a little soil, so it cannot store much water. Many gardeners find that a basket in full sun needs water two times a day in July. Drip irrigation for hanging baskets changes this chore. It gives each basket a slow, steady drink of water, right at the root zone, on a timer. The plants stay even and green. The gardener saves time and saves water.
A drip system for baskets is simple. A main line of small tubing runs along a porch rail or an eave. Small feeder tubes drop down into each basket. A tiny emitter at the end of each tube drips water into the soil. A small battery timer on the hose bib turns the water on and off at set times. The whole setup costs little and takes an afternoon to install. Once it runs, it waters your baskets while you are at work, on vacation, or simply enjoying the weekend.
Why It Matters
Water is the hardest part of basket care. A hanging basket can hold only so much soil. In hot weather that soil dries out in hours. Miss one watering and the plants wilt. Miss two and the flowers drop. Some plants bounce back. Others never fully recover, and the basket looks thin for the rest of the summer.
Drip watering fixes the ups and downs. It puts a small amount of water into the pot on a steady plan. The roots get a drink before the soil goes dry. The leaves stay full. The blooms keep coming. Gardeners who switch to drip often say their baskets look better in August than they did in June.
It also saves water. A hose or a watering can for indoor and outdoor plants pours more water than the small pot can hold. Much of it runs out the bottom and onto the ground. A drip emitter gives only what the soil can take. Drip systems use far less water than sprinklers or hand watering, according to many water studies. On a porch with six baskets, the savings add up over a summer.
It also saves time. The timer waters the baskets while you are at work or on vacation.
How It Works: Drip Irrigation for Hanging Baskets
The system has four parts. First is the water source. Most homes use an outdoor hose bib. Some gardeners run the system from a rain barrel for garden watering with a small pump. Either works if the pressure is steady.
Second is the timer. The timer screws onto the hose bib. It opens and shuts the water on a schedule you set. A simple battery timer costs little and does the job. You set it to run once or twice a day for a set number of minutes.
Third is the tubing. A half-inch main line runs past all the baskets. Quarter-inch feeder tubes branch off to each pot. The tubes can be held to a porch rail with small clips. They are thin and dark, so they fade into the background.
Fourth is the emitter. Each basket gets one or two small emitters. The emitter lets out a slow drip, often one gallon per hour or less. It sits on the soil near the middle of the basket. The water soaks down into the root zone. Some kits also use a small ring of drip line that circles the basket for an even spread.
Guides on home project sites explain these parts in more depth, and tool makers sell starter kits made for pots and baskets.
Types and Options
You can buy a ready-made kit or build your own from parts. Kits are sold at home centers such as Home Depot and Lowe’s. A basic kit made for hanging baskets holds a timer, tubing, emitters, and clips. It feeds four to twelve baskets. Kits are the easiest choice for a first-time user, and garden supply catalogs carry several starter options.
Building your own gives more control. You pick the timer, the tubing length, and the emitter size for each basket. This helps when baskets are spread across a wide porch or when some hang in full sun and others in shade. Sunny baskets need more water. Shady ones need less. With your own parts you can put two emitters in a sunny basket and one in a shady one.
Emitters come in several styles. Drip emitters give a single slow point of water. They are fine for small baskets. Drip rings or soaker circles spread water around the pot. They suit large baskets where roots fill the whole pot. Micro-sprayers shoot a fine mist over a small area. They work well, but they wet the leaves, which can lead to disease in some plants. Most basket growers favor simple drip emitters or rings.
Pressure matters too. Drip parts work best at low pressure. A pressure regulator keeps the water at the right level and stops tubes from popping off. Many kits include one. If you build your own, add one to the list.
Gardeners who already know how to use soaker hose effectively will find drip tubing familiar. The idea is the same: slow water at the root zone.
What to Look For When You Choose
Start with the timer. Look for one with at least two start times per day. In hot spells you may want a morning run and an evening run. A rain delay button is a nice extra. It lets you skip watering after a storm. Check the battery type. Common sizes are easier to replace.
Look at the tubing. Black tubing lasts longer in the sun than clear tubing. It also grows less algae inside. Half-inch tubing for the main line and quarter-inch for feeders is the common setup.
Check the emitters. Pick pressure-compensating emitters if your baskets sit at different heights. Baskets hang at different levels, and water pressure drops as the line rises. Pressure-compensating emitters give the same flow at each point. This keeps the top basket and the bottom basket equal.
Think about winter. In cold states you must drain the system before the first freeze. Look for kits with easy drain points, or plan to blow the lines out with a small compressor. Good gardening guides remind readers that frozen water splits tubes and timers.
Read reviews before you buy. Consumer Reports tests many home and garden products, and family project sites rate kits after real use. Buy from a store with a fair return policy in case a part does not fit your setup.
Setting It Up Step by Step
Plan first. Count your baskets. Note where each one hangs. Measure the distance from the hose bib to the farthest basket. This tells you how much tubing you need.
Screw the timer onto the hose bib. Add the pressure regulator and the filter. A small filter stops dirt from clogging the tiny emitters. It is a cheap part that saves much trouble.
Run the main line. Lay the half-inch tubing along the porch rail, the eave, or a fence top. Clip it in place every two feet. Keep it neat. Tuck it behind the rail where you can.
Branch to each basket. Punch a small hole in the main line at each basket spot with the punch tool. Push in a quarter-inch feeder tube. Run it up or down to the basket. Cut it to length with a pair of sharp garden shears for a clean edge, and add the emitter. Set the emitter on the soil near the center of the pot. Push it in just enough to stay put.
Test the system on manual for ten minutes. Watch each emitter and check for leaks. Push any loose joints in tighter.
Start with a short run time. Try ten minutes in the morning. Check the soil that evening. It should feel moist two inches down. If it is dry, add minutes. If water runs out the bottom, cut minutes. In cool spring weeks one short run may be enough. In hot August weeks you may need two runs a day.
Cost and Price
A starter kit for six to twelve baskets costs about twenty to sixty dollars. The timer is often the dearest part. Simple mechanical timers cost less. Battery timers with more settings cost more.
Parts for a build-your-own system cost about the same. A fifty-foot roll of half-inch tubing runs a few dollars. Emitters cost less than a dollar each when bought in packs. Clips, stakes, and connectors add a few dollars more.
The water bill may drop a little. Drip uses less water than hand watering with a hose. The bigger gain is plant health. Baskets that are watered well last the whole season. You buy fewer replacement plants. Many gardeners find the kit pays for itself in one summer.
Buy extra emitters and a few spare connectors. They are cheap, and they save a trip to the store when you add a basket mid-season. Keep a spare battery for the timer as well.
Care and Upkeep
Check the emitters once a month. Pull each one out and look at the drip. If one has slowed, it may be clogged. Soak it in vinegar for an hour, then rinse it. Replace emitters that stay weak.
Clean the filter. The small screen filter at the head of the system catches dirt. Rinse it at the start of the season and once mid-summer. A clean filter keeps the whole system flowing.
Watch the plants and adjust with the weather. After a week of rain, use the rain delay. During a heat wave, add a run. Yellow leaves can mean too much water. Evening wilt can mean too little.
In the fall, drain the system. Turn off the water at the bib. Open the end of the main line and let it drain. Take the timer inside for the winter. Store it in a dry spot. This takes twenty minutes and protects the parts for next year.
Safety
The work is simple, but a few cautions help. Turn off the water before you cut or punch tubing. Water under pressure can spray and startle you.
Keep electrical cords away from the drip lines. Many porches have string lights or fans near the baskets. Water and power must not mix. Route tubing away from outlets and cords.
Use a safe ladder or step stool when you reach high baskets. Do not stand on chairs. Have someone hold the ladder if you must reach far. Wet decks are slippery, so wear shoes with grip.
If you use fertilizer in the system, read the label first. Some liquid feeds are made for drip lines. Others can clog emitters or harm plants. Plain water is safest for most baskets.
Frequently Asked Questions
How long should drip irrigation run for hanging baskets each day? Start with ten minutes in the morning. Check the soil in the evening. In mild weather this is often enough. In hot weather add a second ten-minute run in the late afternoon. Small baskets dry faster than large ones, so watch each pot for the first week.
Can I run drip irrigation for hanging baskets from a rain barrel? Yes, but you need steady pressure. A rain barrel on a stand gives only a little pressure. A small pump made for drip systems fixes this. Make sure the barrel has a filter so bits of leaves do not clog the emitters. Guides at gardening supply stores show barrel setups.
How many emitters does each basket need? One emitter is enough for a basket up to twelve inches across. A larger basket does better with two emitters or a drip ring. Place emitters so water reaches the whole root zone, not just one spot.
Will drip irrigation work for baskets on a high porch? Yes. Run the main line up to the porch and branch to each basket. Use pressure-compensating emitters so every basket gets the same flow. Secure the tubing well so wind does not pull it loose.
Do I still need to fertilize with a drip system? Yes. Drip gives water, not food. Use a slow-release fertilizer mixed into the soil at planting time. Or feed with liquid fertilizer by hand every two weeks. Do not pour strong fertilizer through the drip lines unless the product label says it is safe for drip systems.
What should I do when I go on vacation? Check the timer battery and test the system a day before you leave. Make sure every emitter drips. Set the timer for the season’s weather. A neighbor who can glance at the baskets is still a good backup. Most trips of a week or less are fine with drip alone.
A Short Final Word
Drip irrigation for hanging baskets is one of the simplest upgrades a gardener can make. It costs little and takes an afternoon to set up. The baskets get a steady drink, the soil stays even, and the blooms last until frost.
Start small if you like. Put a kit on four baskets this season and watch how they grow.
References
Bob Vila. (n.d.). Home improvement advice. https://www.bobvila.com Burpee. (n.d.). Seeds, plants, and gardening supplies. https://www.burpee.com Consumer Reports. (n.d.). Product reviews and ratings. https://www.consumerreports.org Corona Tools. (n.d.). Garden and landscape tools. https://www.corona-tools.com Family Handyman. (n.d.). DIY home repair and maintenance. https://www.familyhandyman.com Fiskars. (n.d.). Garden and cutting tools. https://www.fiskars.com Gardener’s Supply Company. (n.d.). Gardening tools and supplies. https://www.gardeners.com Lowe’s. (n.d.). Home improvement products. https://www.lowes.com The Home Depot. (n.d.). Home improvement products. https://www.homedepot.com The Spruce. (n.d.). Home and garden advice. https://www.thespruce.com
Was this guide helpful?

About Emily Rodriguez
The My Garden US editorial team writes practical, in-depth home and garden guides for American homeowners — tested advice, no fluff.
You May Also Like
Raised Garden Bed on Legs Reviews: What Real Gardeners Say
January 20, 2026 0 views
How to Store Garden Seeds Long Term: A Simple Guide for Home Gardeners
September 30, 2026 0 views
Best Garden Tool Sharpener for Pruners: A Plain Guide
February 22, 2026 0 views