
A raised bed can be the most productive part of a home garden. The soil warms early, the drainage stays even, and the weeds are few. But a raised bed also dries out faster than open ground. Sun and wind pull moisture from every side. Hand watering takes time, and much of the water never reaches the roots. This is where drip irrigation for raised beds diy comes in. It is a simple system you can build yourself. Small tubes and emitters carry water right to the base of each plant. Nothing is wasted on paths or bare soil. With a weekend of work and a modest budget, most gardeners can set up a system that keeps their beds evenly watered all season long.
Why Drip Irrigation Matters for Raised Beds
Raised beds hold soil above ground level. That is their strength and their weakness. The loose, rich soil grows fine roots with ease. But the same looseness lets water drain through fast. On a hot summer day, a bed can go from moist to dry in a single afternoon. When plants face this cycle of feast and famine, growth slows. Tomatoes crack. Peppers drop their blossoms. Lettuce turns bitter.
Drip irrigation solves this problem at the source. Instead of soaking the whole surface at once, the system releases water slowly, drop by drop, at each plant. The soil around the roots stays evenly moist. The top of the bed stays fairly dry, which discourages weed seeds from sprouting and keeps leaves dry. Dry leaves matter because many plant diseases spread when foliage stays wet. Growers have known for years that watering the root zone is the most efficient method. A home-built system brings that same efficiency to the backyard.
There is also the matter of time. A gardener who waters by hand may spend twenty or thirty minutes each day dragging a hose and filling a can. A drip system with a simple battery timer does that work on its own. The gardener sets the schedule once and checks on it weekly. For a working person with a busy schedule, that saved time is worth a great deal.
How a Simple Drip System Works: Drip Irrigation for Raised Beds Diy
Every drip system has the same basic parts. A water source, usually an outdoor faucet, feeds a short lead tube. The water passes through a filter and a pressure regulator. From there, a main supply tube runs along the beds. Branch lines or drip tubing run into each bed. Emitters, small devices that release water at a slow rate, sit at the base of each plant. A timer at the faucet controls when the system runs.
In a drip irrigation for raised beds diy project, the runs are short. Most beds are four feet by eight feet, or smaller. That keeps the plumbing simple. One faucet can serve several beds with no loss of pressure. A beginner can lay out the whole plan on a sheet of paper before buying a single part.
What to Look for When You Choose Parts
The parts of a drip system must fit together and suit the pressure of your water supply. Most home faucets deliver more pressure than drip parts can handle. A pressure regulator fixes this. Look for one rated at 25 pounds per square inch. That is the standard for drip systems.
Tubing comes in two main sizes. Half-inch tubing serves as the main line that runs from bed to bed. Quarter-inch tubing serves as the branch line that runs through each bed. Both sizes are flexible and cut with a simple hand tool or a sharp knife. Buy tubing rated for outdoor use so it lasts in sun and rain.
Emitters are sold by flow rate, usually in gallons per hour. One gallon per hour is the most common size for vegetables. Half-gallon emitters suit herbs and small flowers. Two-gallon emitters suit thirsty plants such as tomatoes and squash. You can also buy drip tubing with emitters built in. This comes on a roll and is spaced at fixed distances, often every twelve inches. It is quick to lay out and suits row crops and closely spaced plants.
A filter keeps dirt and sand out of the emitters. A small screen filter at the faucet end of the line is enough for most home systems. Check and rinse it once a month during the season. A backflow preventer keeps garden water from flowing back into the house supply. Many faucet kits include one.
A timer is optional but strongly recommended. Battery timers screw onto the faucet and run one or more zones. Set the start time and the watering length, and the timer does the rest. This turns the whole setup into a true automatic system. For more on ready-made options, see our guide to a drip irrigation kit for raised beds, which lists starter sets that include most of these parts.
Types of Drip Layouts for Raised Beds
There are three common layouts, and each suits a different bed shape and planting style.
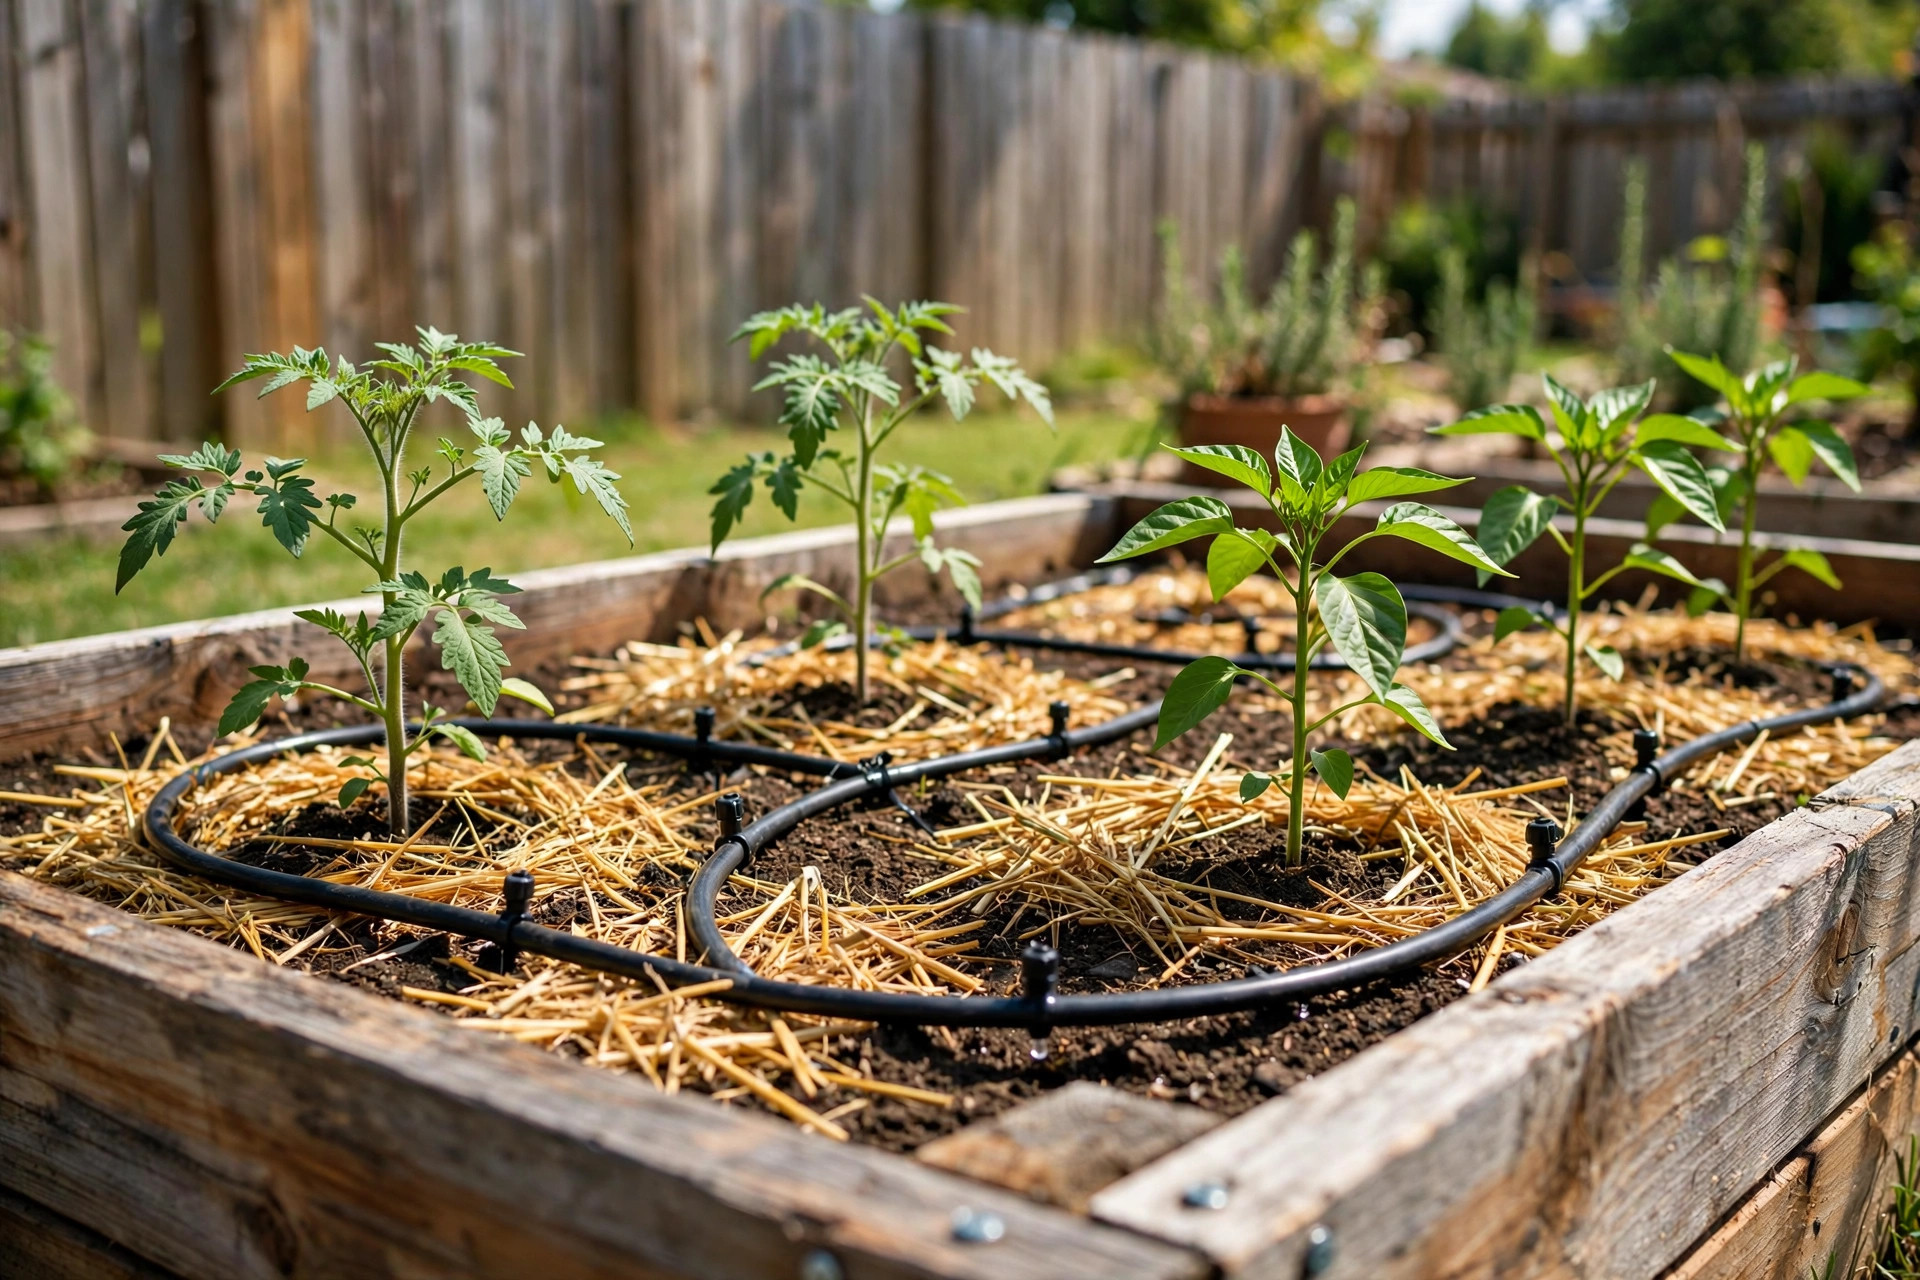
Emitter lines on quarter-inch tubing. This is the classic do-it-yourself layout. You run quarter-inch tubing through the bed in a serpentine pattern or in straight rows. You punch individual emitters into the tubing at each plant. This gives you full control. You can place one emitter at a tomato, two at a pepper row, and skip the space where herbs grow thick. It takes the most time to set up, but it uses water best.
Drip tubing with built-in emitters. This tubing has emitters molded into the wall at fixed spacing. You simply unroll it along the rows and connect it to the main line. It is fast and neat. The fixed spacing works well for lettuce, carrots, beans, and other crops planted in rows. It is less suited to mixed plantings where spacing varies.
Soaker lines as a low-cost start. A porous hose weeps water along its whole length. It is the cheapest way to drip water a bed, and some gardeners use it as a first step before building a full emitter system. It uses more water than true drip emitters, and the flow can be uneven on long runs. Still, it teaches the basic idea of slow root watering. If you already own one, read our notes on how to use soaker hose effectively to get the best results from it.
For most gardeners, the individual emitter layout is the best choice for mixed vegetable beds. The built-in emitter tubing is the best choice for long single-crop rows. Either one can be expanded later as you add more beds.
Cost and Price
A drip irrigation for raised beds diy system is one of the least costly garden improvements you can make. A basic kit that covers two to four beds often costs between forty and one hundred dollars. The kit usually includes tubing, emitters, a filter, a regulator, and connectors. A battery timer adds twenty to forty dollars. Stakes and extra fittings add a few dollars more.
Buying parts separately can cost a little more at first, but it lets you match the system to your exact bed sizes. A four-by-eight bed with individual emitters might need fifty feet of quarter-inch tubing, twelve to sixteen emitters, and a few connectors. That comes to roughly fifteen to twenty-five dollars per bed, plus a share of the timer and filter at the faucet.
Compare this with the cost of lost crops. A single tomato plant that fails in a dry spell can cost you more in lost fruit than the emitters that would have saved it. The system pays for itself in one season of better harvests.
Planning Your Layout Before You Buy
Good planning saves both money and time. Start with a tape measure. Measure each bed. Draw each bed on paper to scale. Mark where the faucet stands in relation to the beds. The main half-inch line should take the shortest path that reaches every bed.
Next, mark the plants. Count how many plants each bed will hold and note which plants need more water. Tomatoes, cucumbers, and squash are thirsty. Peppers and eggplant need a steady supply. Herbs such as thyme and oregano need less. Assign emitter flow rates to match: two gallons per hour for the thirsty plants, one gallon per hour for most vegetables, half a gallon for herbs.
Add up the flow rates of all emitters. A standard home faucet can supply several hundred gallons per hour, so a home system rarely runs short. But if you plan many beds on one line, keep the total under the rating of your regulator and timer. Split the beds into two zones if the numbers run high. A two-zone timer handles this with ease.
Make a list of every part and its count before you shop. A clear list keeps the trip to the store short and keeps the budget in check.
Step-by-Step Installation
With the plan in hand, installation is plain work that most people finish in a day.
Step one: connect the head assembly. Screw the timer onto the faucet if you use one. Then add the backflow preventer, the filter, and the pressure regulator in that order. Wrap pipe thread tape on each connection to stop leaks. Turn the water on for a moment and check for drips.
Step two: run the main line. Lay half-inch tubing from the faucet to the beds. Cut it with the proper tool so the ends stay square. Use elbows and tees to turn corners and branch to each bed. Push the fittings in firmly. Stake the line to the ground every few feet so it does not shift.
Step three: feed each bed. At each bed, connect a short run of half-inch or quarter-inch tubing into the bed. Many gardeners use a small valve at each bed so they can shut off one bed without stopping the rest. This is useful when one bed holds seedlings and another holds mature plants with different needs.
Step four: lay out the drip lines. Inside the bed, run quarter-inch tubing in the pattern you planned. Hold it in place with landscape stakes every two feet. At each plant spot, punch a hole with the punch tool and push in an emitter. Press each emitter into the soil so it stays upright.
Step five: flush and test. Before you finish, open the end of each line and run water through for a minute. This flushes out any dirt or plastic chips from cutting. Then close the ends with end caps or figure-eight closures. Turn the system on and walk the beds. Look at each emitter. Each one should show a steady drip or a small wet spot spreading in the soil. Fix any dry emitters by clearing or replacing them.
Step six: mulch and set the timer. Cover the tubing with two to three inches of mulch. Straw, shredded leaves, or wood chips all work. Mulch shades the tubing, holds soil moisture, and keeps the bed neat. Then program the timer. Start with thirty minutes every other day and adjust from there. For a fuller walkthrough of bed plumbing, see how to install raised bed irrigation.
Setting a Watering Schedule
Newly installed systems need a week of watching. Dig into the soil with a finger or a trowel a few hours after a watering cycle. The soil should be moist four to six inches down, not soggy at the surface. If the top is wet but the root zone is dry, run the cycle longer. If water pools or the soil stays muddy, shorten the cycle or water less often.
Sandy soil drains fast and may need shorter, more frequent cycles. Clay-heavy soil holds water long and may need one deep cycle every few days. Hot spells call for extra time. Cool, cloudy weeks call for less. A simple rain gauge or a glance at the weather report helps you adjust. Many gardeners keep a small notebook by the back door and jot down what they change. Over a season, those notes become a fine-tuned schedule for your own beds and your own soil.
Care and Upkeep Through the Season
A drip system asks for little care, but a few habits keep it running well. Check the filter once a month. Rinse the screen under the faucet. Walk the lines every week or two during the growing season. Look for chewed tubing, popped emitters, or dry spots in a bed. Rodents and curious pets sometimes gnaw on lines. A quick splice with a coupling fixes most damage.
In the fall, drain the system before the first hard freeze. Shut off the water and remove the timer. Bring the timer indoors for the winter. Open the end caps and let the lines drain. In mild climates, the tubing can stay in the beds all winter under the mulch. In cold climates, roll up the quarter-inch lines and store them in a shed. This takes an hour and adds years to the life of the parts.
Each spring, lay the lines out again and run a test cycle before planting. Replace any cracked tubing and any emitters that no longer drip. A system that is flushed and checked each year will serve for many seasons.
Safety Notes
Drip irrigation is safe, but a few points deserve care. Always use a backflow preventer at the faucet. It is a small, cheap device that protects your household drinking water. Never run fertilizer through the lines unless the product is labeled for drip use, and never mix chemicals near the faucet connection. Cut tubing with the proper tool or a sharp knife, and cut away from your hands. Keep the pressure regulator in place at all times. Without it, house pressure can burst fittings and flood a bed in minutes. When you store parts for winter, keep them out of reach of small children, as small emitters can be a choking hazard.
Frequently Asked Questions
How much water does a drip system use for a raised bed? A typical four-by-eight bed with vegetables uses about ten to twenty gallons per watering cycle, depending on plant size and weather. That is far less than a sprinkler would use on the same bed, because nearly all the water reaches the root zone.
Can I run drip irrigation from a rain barrel? Yes, but rain barrels give low pressure. Use gravity-rated drip parts or a small pump, and place the barrel on a stand at least two to three feet above the beds. Keep the runs short. Test the flow before you plant.
Do I need a timer, or can I water by hand? You can turn the system on and off by hand at the faucet. A timer simply does it for you on a set schedule. Most gardeners find the timer worth the price, since plants do best with steady, regular watering, even on days when no one is home.
Will emitters clog? They can, especially with hard water or fine silt. The filter at the head of the system stops most particles. Rinsing the filter monthly and flushing the lines in spring keeps clogs rare. If one emitter stops, pull it out and replace it. They are cheap.
How deep should the emitters sit? Place emitters on or just under the soil surface at the base of the plant, then cover the lines with mulch. The water spreads downward and outward through the soil to reach the roots. Do not bury emitters deep, as that makes them hard to check.
Can one faucet water several raised beds? Yes. Most home faucets supply enough flow for four to six beds on a single timer. Keep the total flow of all emitters within the rating of your timer and regulator, and split the beds into two zones if you need more.
A Final Word
A drip irrigation for raised beds diy project is one of those rare garden jobs that is cheap, simple, and pays back every single week. The parts are plain. The tools are few. The work is honest and can be done in a day. What you get in return is a bed that never dries out at noon, plants that grow without the stress of uneven watering, and a harvest that shows the difference. Plan it on paper, lay it out with care, and let the system do the daily work while you do the pleasant part: watching things grow.
For more background, see Lowe’s, Corona Tools, and Burpee. For more background, see The Spruce, Bob Vila, and Family Handyman. See Consumer Reports for more detail.
References
Bob Vila. (n.d.). Home improvement advice. https://www.bobvila.com Burpee. (n.d.). Seeds, plants, and gardening supplies. https://www.burpee.com Consumer Reports. (n.d.). Product reviews and ratings. https://www.consumerreports.org Corona Tools. (n.d.). Garden and landscape tools. https://www.corona-tools.com Family Handyman. (n.d.). DIY home repair and maintenance. https://www.familyhandyman.com Gardener’s Supply Company. (n.d.). Gardening tools and supplies. https://www.gardeners.com Lowe’s. (n.d.). Home improvement products. https://www.lowes.com The Spruce. (n.d.). Home and garden advice. https://www.thespruce.com
Was this guide helpful?

About David Wilson
The My Garden US editorial team writes practical, in-depth home and garden guides for American homeowners — tested advice, no fluff.
You May Also Like
How to Grow Peppers from Seed: A Complete Beginner’s Guide
January 15, 2026 0 views
Best Garden Apron With Pockets Reviews
July 12, 2026 0 views
Best Garden Hose Splitter Two Way: A Complete Guide
May 27, 2026 0 views