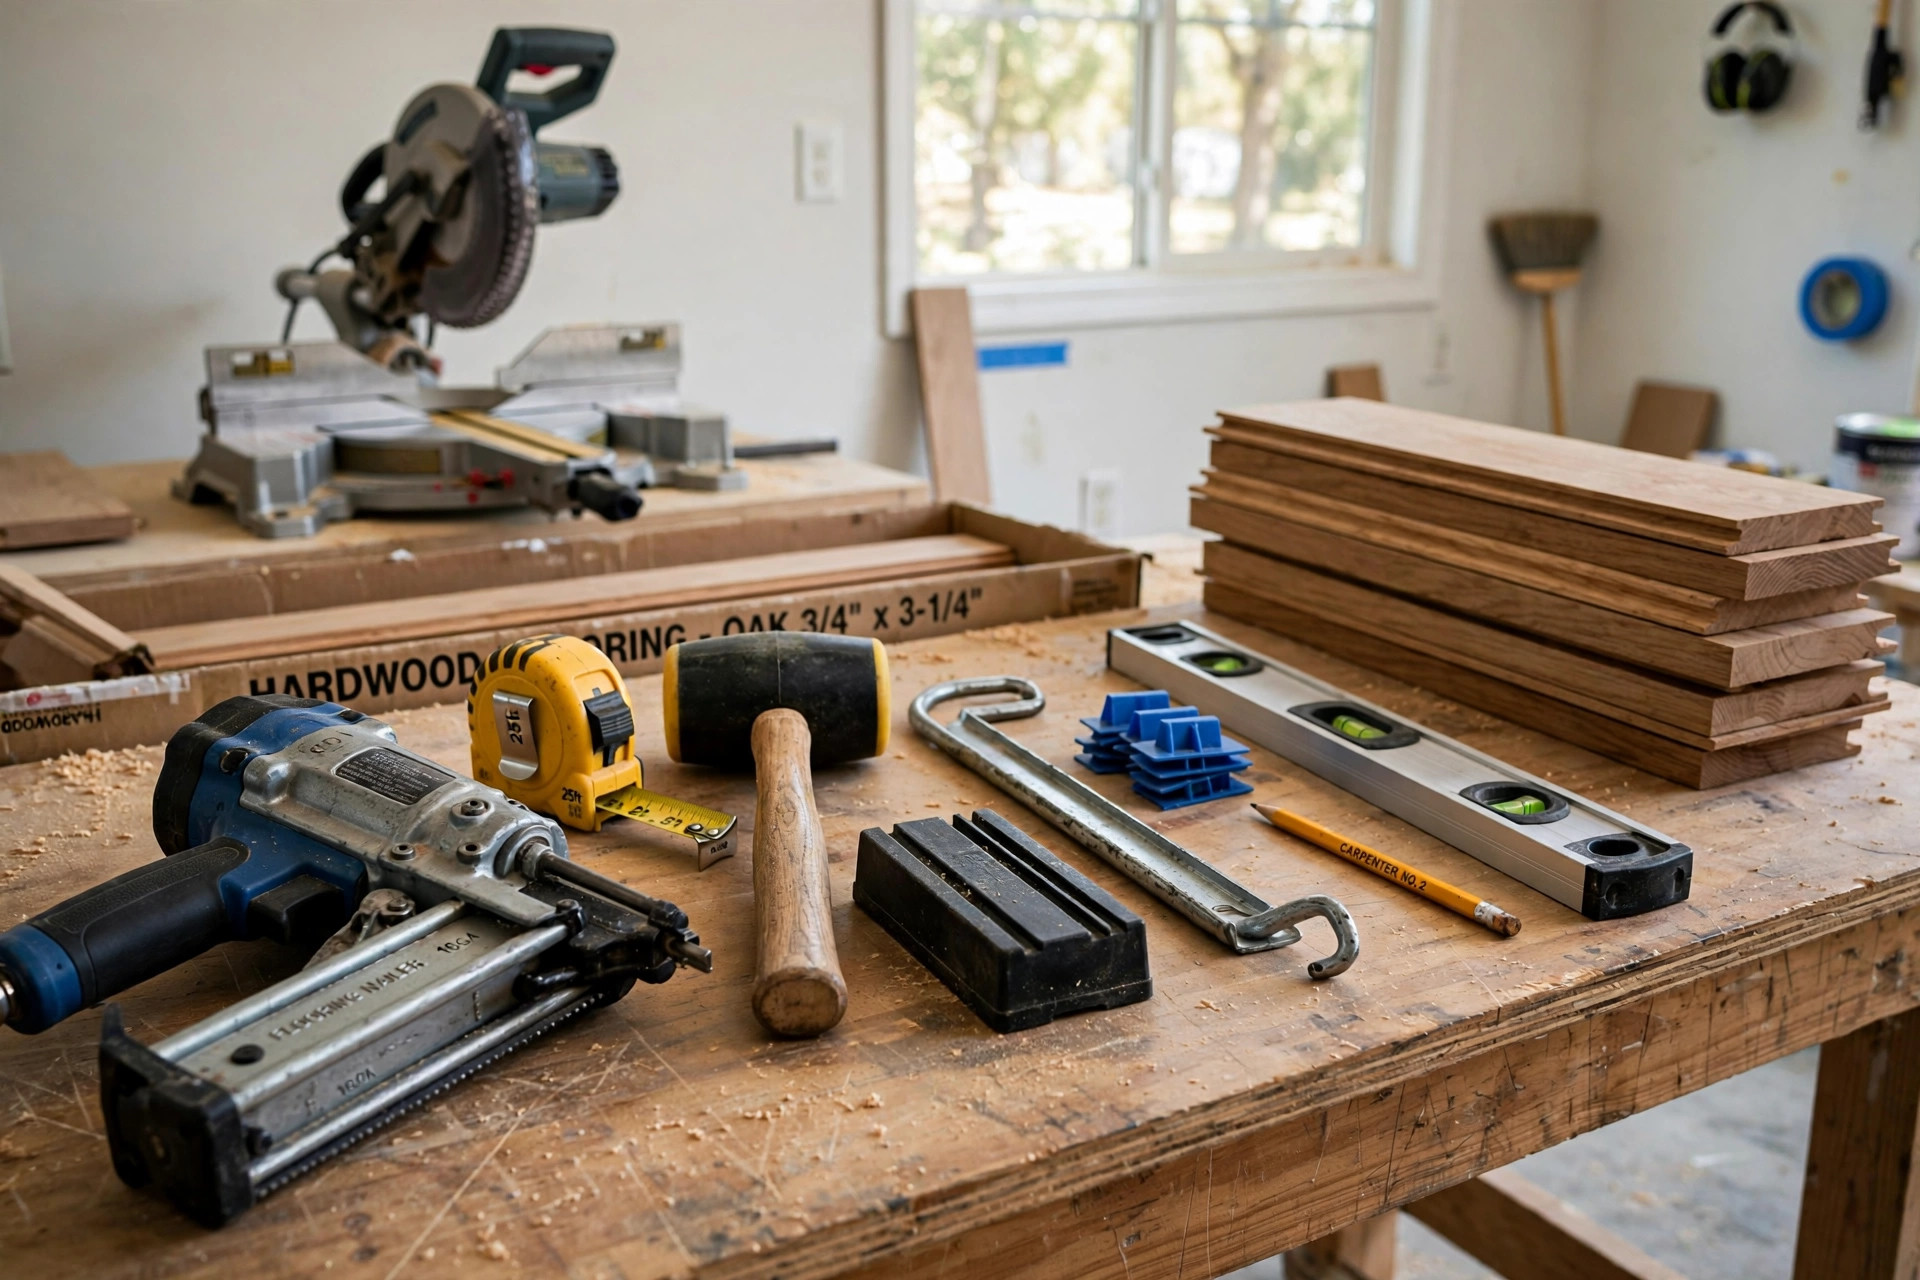

Many home owners dream of real wood floors. Few think first about the tools. That is a mistake. A complete DIY hardwood floor installation tools list is the difference between a smooth job and a costly mess. Wood flooring is not forgiving. Boards must be cut straight. Gaps must be tight. Nails must sit flush. Without the right tools, small errors grow into big problems. With the right tools, a first-time installer can get a clean, level floor that looks like a pro did it. This guide walks through every tool you need, why each one matters, what each costs, and how to keep them in good shape. It uses plain talk and simple steps. No jargon. No guesswork.
Why a Full Tools List Matters
Installing hardwood is a craft job. Each board has to lock tight to the next. The floor must be flat. The edges must be straight. One dull blade or one wrong nailer can ruin whole boards, and boards cost real money. A complete DIY hardwood floor installation tools list protects your budget. It saves you trips to the store in the middle of the job. It saves you from renting gear you could have bought cheap. It keeps the work moving at a steady pace.
A full list also helps you decide what to buy and what to rent. Some tools get used for one day only. Others earn a place in your garage for years. Knowing the full DIY hardwood floor installation tools list up front lets you make that call before you spend a dollar.
How to Choose Your Tools: Diy Hardwood Floor Installation Tools List
Start with the job, not the brand. A small bedroom needs fewer tools than a whole first floor. A simple plank layout needs less than a room with odd angles and vents. Match the tools to the work.
Think in three groups. First, tools you already own. A tape measure, a pencil, a hammer, and a level live in most homes. Second, tools worth buying. A good pull bar, a tapping block, and a stack of spacers cost little and save much. Third, tools worth renting. A floor nailer, a compressor, and a miter saw are pricey. For a one-room job, the rental counter at stores like Home Depot or Lowe’s is your friend.
Buy quality where it counts. Blades and bits do the real work. A cheap dull blade will chip your boards. A good carbide blade will cut them clean. Check reviews on sites such as Consumer Reports before you buy power tools. Read the flooring maker’s install guide too. Makers like Shaw Floors and Mohawk Flooring often list the exact nailers and blades their floors need. Follow that advice. It protects your warranty.
The Full DIY Hardwood Floor Installation Tools List
Measuring and Marking Tools
Every job starts with a tape measure. A 25-foot tape handles most rooms. Use it to measure length and width so you can plan board rows and buy the right amount of flooring. Add ten percent extra for cuts and waste.
A carpenter’s pencil marks cuts on dark wood where a regular pencil fades. A chalk line snaps long straight lines across the room. Use it to mark your starting line so the first row runs true. A combination square checks that crosscuts are square. A 4-foot level finds dips and bumps in the subfloor. A flat floor is a must.
A moisture meter is one tool many beginners skip. Do not skip it. Wood moves with moisture. If your boards and your subfloor are at different moisture levels, the floor can cup or gap later. Makers like LL Flooring stress acclimation for this reason. Test both the boards and the subfloor. Wait until the readings match the maker’s range.
Cutting Tools
A miter saw is the workhorse for crosscuts. It cuts board ends square and fast. For a single room, a 10-inch sliding miter saw is plenty. Rent one if you do not own it.
A circular saw handles rip cuts along the board’s length. You need them for the last row, which is almost never a full board wide. Fit it with a fine-tooth carbide blade made for wood flooring. A jigsaw cuts neat holes for heat vents and pipes. The Family Handyman site offers good walk-throughs of these cuts for first timers.
A jamb saw or an oscillating multi-tool cuts door casings and jambs. Boards slide under the trim for a clean look. The multi-tool also trims vents and handles tight spots. Keep extra blades on hand. They dull fast on hard trim.
Fastening Tools
A flooring nailer is the heart of the job. It drives cleats or staples through the board tongue at the right angle. Manual nailers are cheap but slow and tiring. Pneumatic floor nailers run off an air compressor and are far faster. For most do-it-yourself jobs, a rented pneumatic nailer is the sweet spot. Buy a box of the right cleats for your nailer and board thickness. The wrong length will punch through or fail to hold.
You also need an air compressor with a hose if your nailer is pneumatic. A small pancake compressor is enough. Set the pressure to the nailer’s spec. Too much pressure drives the cleat too deep. Too little leaves it proud.
A finish nailer or brad nailer handles the first and last rows. These rows sit too close to the wall for the floor nailer. Face-nail them with finish nails, then set the heads with a nail set and fill the holes with wood filler. A standard claw hammer works, but a rubber mallet is gentler on the tapping block. Never hit the board edge with a steel hammer. It will crush the tongue.
Fitting and Spacing Tools
Spacers are small plastic wedges that hold a gap between the flooring and the wall. Wood expands. Without that gap, the floor can buckle. Spacers cost almost nothing. Buy plenty. Pull them out after the floor is done and cover the gap with baseboard.
A tapping block fits against the board edge. Tap it with the mallet to close gaps between boards. Do not tap the board directly. A pull bar hooks the last board in each row and pulls it tight where the mallet cannot reach. A pry bar helps lift baseboards and remove old flooring. Keep a utility knife for opening boxes and trimming underlayment.
Knee pads are not a tool in the strict sense, but they belong on any DIY hardwood floor installation tools list. You will spend hours on your knees.
Underlayment and Prep Tools
Most hardwood goes over an underlayment or rosin paper. You need a broom or a shop vacuum to clean the subfloor first. Dust and grit under the boards can cause squeaks. A utility knife cuts the underlayment to size.
A belt sander can smooth high spots in a wood subfloor. A self-leveling compound kit handles dips in a concrete slab. Level the subfloor before the first board goes down. It is much harder to fix later.
If your project pairs wood with tile at a doorway, plan a transition strip. Guides at places like Daltile explain how wood-to-tile transitions work. You may want to check the tile installation cost per square foot too, if tile work is part of the same project.
Finishing and Cleanup Tools
A wood filler that matches your floor fills nail holes and small gaps. Apply it after the floor is nailed, then sand it flush with fine sandpaper. A soft broom and a damp mop handle the final cleanup. Never soak a new wood floor. A slightly damp mop is enough.
Cost and Price Guide
Tool costs swing wide. Here is what a typical American home owner can expect in 2026. Prices move with region and brand, so treat these as ranges.
Basic hand tools cost the least. A tape measure runs 10 to 25 dollars. A chalk line costs 8 to 15 dollars. Spacers, a tapping block, a pull bar, and a nail set together cost 30 to 60 dollars. Knee pads run 20 to 50 dollars. A moisture meter costs 30 to 80 dollars, and it is worth every cent.
Power tools cost more. A circular saw runs 80 to 200 dollars. An oscillating multi-tool runs 60 to 150 dollars. A miter saw costs 150 to 400 dollars to buy, or about 50 to 75 dollars a day to rent. A pneumatic flooring nailer costs 200 to 400 dollars to buy, or about 60 to 90 dollars a day to rent. A small compressor costs 100 to 200 dollars, or about 40 to 60 dollars a day to rent.
Add it up. If you own the basics and rent the big gear, a one-room job can cost 200 to 400 dollars in tools and rentals. Buying everything new can push past 1,000 dollars. Renting is the smart move for tools you may never use again. For a full-house job, buying the nailer starts to make sense.
The floor itself is the bigger cost. If you are still choosing material, look at the engineered hardwood flooring cost per square foot to budget the boards. And if money is tight, read our cheapest way to redo floors guide for ways to stretch every dollar.
Care and Upkeep of Your Tools
Good tools last decades if you treat them right. Clean blades after each job. Pitch and resin build up on saw teeth and make cuts rough. A simple blade cleaner and a stiff brush do the job. Store blades flat or in a case so the teeth do not chip.
Oil the moving parts of your nailer per the manual. Drain the compressor tank after each use. Water builds up inside and rusts the tank from within.
Keep hand tools dry. Wipe them down before they go back in the box. A light coat of oil on steel heads stops rust in damp garages. Store the moisture meter in its case with the cap on the pins. Bent pins give bad readings.
Safety First
Power tools demand respect. Wear safety glasses every time a saw runs. Chips fly fast and far. Wear hearing protection with the miter saw and the compressor. Sawdust is bad for lungs, so wear a dust mask, especially when sanding. The Spruce home guides remind readers that dust control is part of every flooring job, not an extra.
Keep the work area clear. Cutoffs on the floor cause trips. Coil cords and hoses out of the walk path.
Nailers are the top injury risk. Keep your free hand away from the nail path. Disconnect the air hose when you clear a jam. Read the nailer manual before the first shot. Test fire into scrap wood to set the depth. A cleat driven too deep splits the tongue. One driven too shallow leaves a lip that trips feet.
Lift smart. Boxes of hardwood are heavy. Bend at the knees and keep the load close. Take breaks. Tired workers make mistakes.
FAQ
Do I really need a flooring nailer, or can I use a regular nail gun? A flooring nailer is built for this job. It drives fasteners through the tongue at the correct angle and sets each board tight. You can face-nail the first and last rows with a finish nailer, but the field of the floor needs a true flooring nailer. Rent one for the job if you do not want to buy it.
What is the one tool beginners forget most often? The moisture meter. Beginners buy saws and nailers but skip the meter. Then the floor gaps or cups months later. Test the boards and the subfloor. Let the wood acclimate in the room for the time the maker states.
Can I install hardwood over my old floor? Sometimes. Many makers allow install over a flat, sound wood subfloor or over certain existing floors. You must check that the old surface is level, clean, and firmly attached. Rip up carpet and pad first. Test moisture. When in doubt, follow the flooring maker’s guide or ask at the store. A bad base ruins a good floor.
How many spacers do I need? More than you think. You need a spacer every 12 to 18 inches along every wall, plus at doorways and around pipes. A bag of 100 spacers is cheap and usually enough for a room. Buy the wedge style. They hold the gap firm and pull out easy when the job is done.
Should I buy or rent the miter saw? Rent it for one or two rooms. The rental cost is a fraction of the purchase price. Buy it if you plan more projects, like trim work or a deck, in the next year or two. A miter saw is one of the most useful tools a home owner can own. For a single flooring job, though, rental wins.
What blade should I use for cutting hardwood flooring? Use a fine-tooth carbide blade made for finish work. Look for 60 teeth or more on a 10-inch blade. Fine teeth cut the board face clean with little chipping. Keep the blade sharp. If you see burn marks or rough edges, the blade is dull. Change it before it ruins boards.
A Short Final Word
A DIY hardwood floor installation tools list is more than a shopping list. It is a plan. It turns a big, scary project into a set of small steps, each with the right tool in hand. Measure twice. Cut once. Nail straight. Keep the floor clean as you go. Take your time with the first row, because every row after it follows that line.
References
Consumer Reports. (n.d.). Product reviews and ratings. https://www.consumerreports.org Daltile. (n.d.). Ceramic and porcelain tile. https://www.daltile.com Family Handyman. (n.d.). DIY home repair and maintenance. https://www.familyhandyman.com LL Flooring. (n.d.). Hardwood, vinyl, and tile flooring. https://www.llflooring.com Lowe’s. (n.d.). Home improvement products. https://www.lowes.com Mohawk Flooring. (n.d.). Flooring products. https://www.mohawkflooring.com Shaw Floors. (n.d.). Flooring products. https://www.shawfloors.com The Home Depot. (n.d.). Home improvement products. https://www.homedepot.com The Spruce. (n.d.). Home and garden advice. https://www.thespruce.com
Was this guide helpful?

About Emily Rodriguez
The My Garden US editorial team writes practical, in-depth home and garden guides for American homeowners — tested advice, no fluff.
You May Also Like

Polished Concrete Floors Cost Residential USA: A Plain Guide
January 14, 2026 0 views
Horse Stall Mats for Home Gym Reviews: A Plain Guide to Tough Rubber Flooring
June 27, 2026 0 views
Best Grout Sealer for Bathroom Tile USA
August 26, 2026 0 views