
Many gardeners turn to a how to start seeds indoors guide when winter still holds the ground. Starting seeds inside the house is one of the oldest tricks in the gardener’s book. It gives plants a head start while the weather outside is too cold. It also saves money, since a packet of seed costs far less than a flat of young plants from the store. With a small set of tools and a little care, almost any home gardener can grow strong, healthy seedlings on a windowsill or a table.
Why Starting Seeds Indoors Matters
The main reason to start seeds indoors is time. Many vegetables and flowers need a long warm season to grow and ripen. Tomatoes, peppers, eggplant, and many herbs grow slowly from seed. If you wait for warm soil in spring, these plants may run out of summer before they give fruit. A tray of seedlings started six to eight weeks early solves the problem.
Starting seeds indoors also gives you choice. Seed racks hold hundreds of varieties, while garden centers carry only a few. You can grow old heirloom tomatoes, rare herbs, or flowers in colors the store never stocks. You also control what touches your plants, from the soil to the water.
A third gain is cost. One packet of seed can fill a whole garden. For a family that plants many beds, the savings are real. With care, the seedlings you raise at home can be as strong as any bought plant.
What You Need to Start Seeds Indoors: How to Start Seeds Indoors Guide
You do not need a greenhouse to begin. A simple kit fits on a kitchen table. Here are the basics.
Seed. Buy fresh seed from a trusted dealer. Seed packets carry a date. Seed from this year or last year gives the best results. Old seed may fail to sprout.
Containers. Any clean container with drainage holes will do. Many growers use plastic cell trays, small peat pots, or plain plastic cups. The cells should be about two inches wide. Wash used pots with soapy water before reuse to kill disease.
Seed starting mix. This is not the same as potting soil. A mix made for seeds is light, clean, and free of weed seed. It drains well but holds water. A wrong mix can rot seed before it sprouts. For a full comparison, see our guide to seed starting mix vs potting soil.
Water. Room temperature water works best. Cold water can shock small roots.
Light. A bright south window may do, but most homes need more. A simple shop light with cool white bulbs hung a few inches above the trays gives strong, even light.
Labels and a pencil. Mark every tray with the plant name and the date. Memory fails by March.
A plastic dome or a sheet of clear wrap over the tray holds moisture while seeds sprout. A small fan nearby will matter later, as strong air builds strong stems.
How to Choose Seeds and Timing
Read each seed packet before you plant. The back of the packet tells you how many weeks before the last frost to start. Count back from your frost date on a calendar. If your last frost falls on May 10 and the packet says start six weeks early, you plant near March 29.
Not every plant likes an indoor start. Peas, beans, corn, carrots, and beets grow best when sown straight in the garden. They dislike having their roots disturbed. Lettuce, spinach, tomatoes, peppers, broccoli, cabbage, and most flowers take well to trays.
Start simple in your first year. Tomatoes, marigolds, and basil sprout fast and forgive small mistakes. Leave slow or fussy seed for a later season.
Good seed dealers such as Burpee list germination rates and days to sprout on every packet. Buying from a known house gives you seed that has been tested for quality.
Step by Step: Starting Seeds Indoors
Step One: Fill the Trays
Moisten the seed starting mix before you fill the pots. The mix should feel like a wrung-out sponge. Fill each cell to the top, then press lightly to settle it. Fill to the same level in every cell so watering stays even.
Step Two: Plant the Seeds
Planting depth follows a plain rule: cover the seed with mix to about twice its width. Fine seed, such as petunias or snapdragons, needs no cover at all. Press it gently onto the surface so it touches the mix. Large seed, such as squash or cucumber, goes about half an inch deep. Drop two seeds per cell as insurance. You will thin to one later.
Step Three: Water Gently
Water from the bottom when you can. Set the tray in a shallow pan of water for a few minutes until the mix turns dark. This keeps seed in place. If you must water from the top, use a fine spray. A hard stream will wash small seed away.
Step Four: Cover and Warm
Cover the tray with a clear dome or plastic wrap to hold in moisture. Place it in a warm spot, near 70 to 75 degrees. The top of a refrigerator works well. Seeds do not need light to sprout. Check daily. The moment green tips appear, take off the cover.
Step Five: Give Strong Light
Move sprouted trays under the lights at once. Hang the bulbs just two or three inches above the tops of the plants. Raise the light as the plants grow. Keep the lights on fourteen to sixteen hours a day. Weak light makes tall, pale, floppy stems. Strong light makes short, stocky plants.
A bright window alone often fails. Winter days are short, and glass cuts much light. The cost of a plain two-tube shop light is small, and the gain is large. Reviewers at Consumer Reports often rate simple grow lights well for seed work.
Step Six: Feed and Water
When the first true leaves open, begin feeding. Use a mild liquid fertilizer at half strength once a week. Keep the mix damp but never soggy. Let the surface dry slightly between waterings. This teaches roots to grow deep.
Step Seven: Thin the Seedlings
Where two seeds sprouted, keep the stronger one. Snip the weaker stem at the soil line with small scissors. Do not pull it out, as pulling can disturb the roots of its neighbor.
Step Eight: Harden Off
A week or two before moving plants outside, begin hardening off. Set trays outdoors in shade for a few hours, then bring them in. Lengthen the time and the sun each day. This trains the plants for wind and sun. Our full guide to how to harden off seedlings before planting walks through the whole schedule.
Step Nine: Transplant
Move plants out after the last frost and after hardening. Water well first. Plant on a calm, cloudy day if you can. Set tomatoes deep, burying the lower stem. Give each plant the space the packet calls for. Water at once.
Types of Indoor Seed Starting Setups
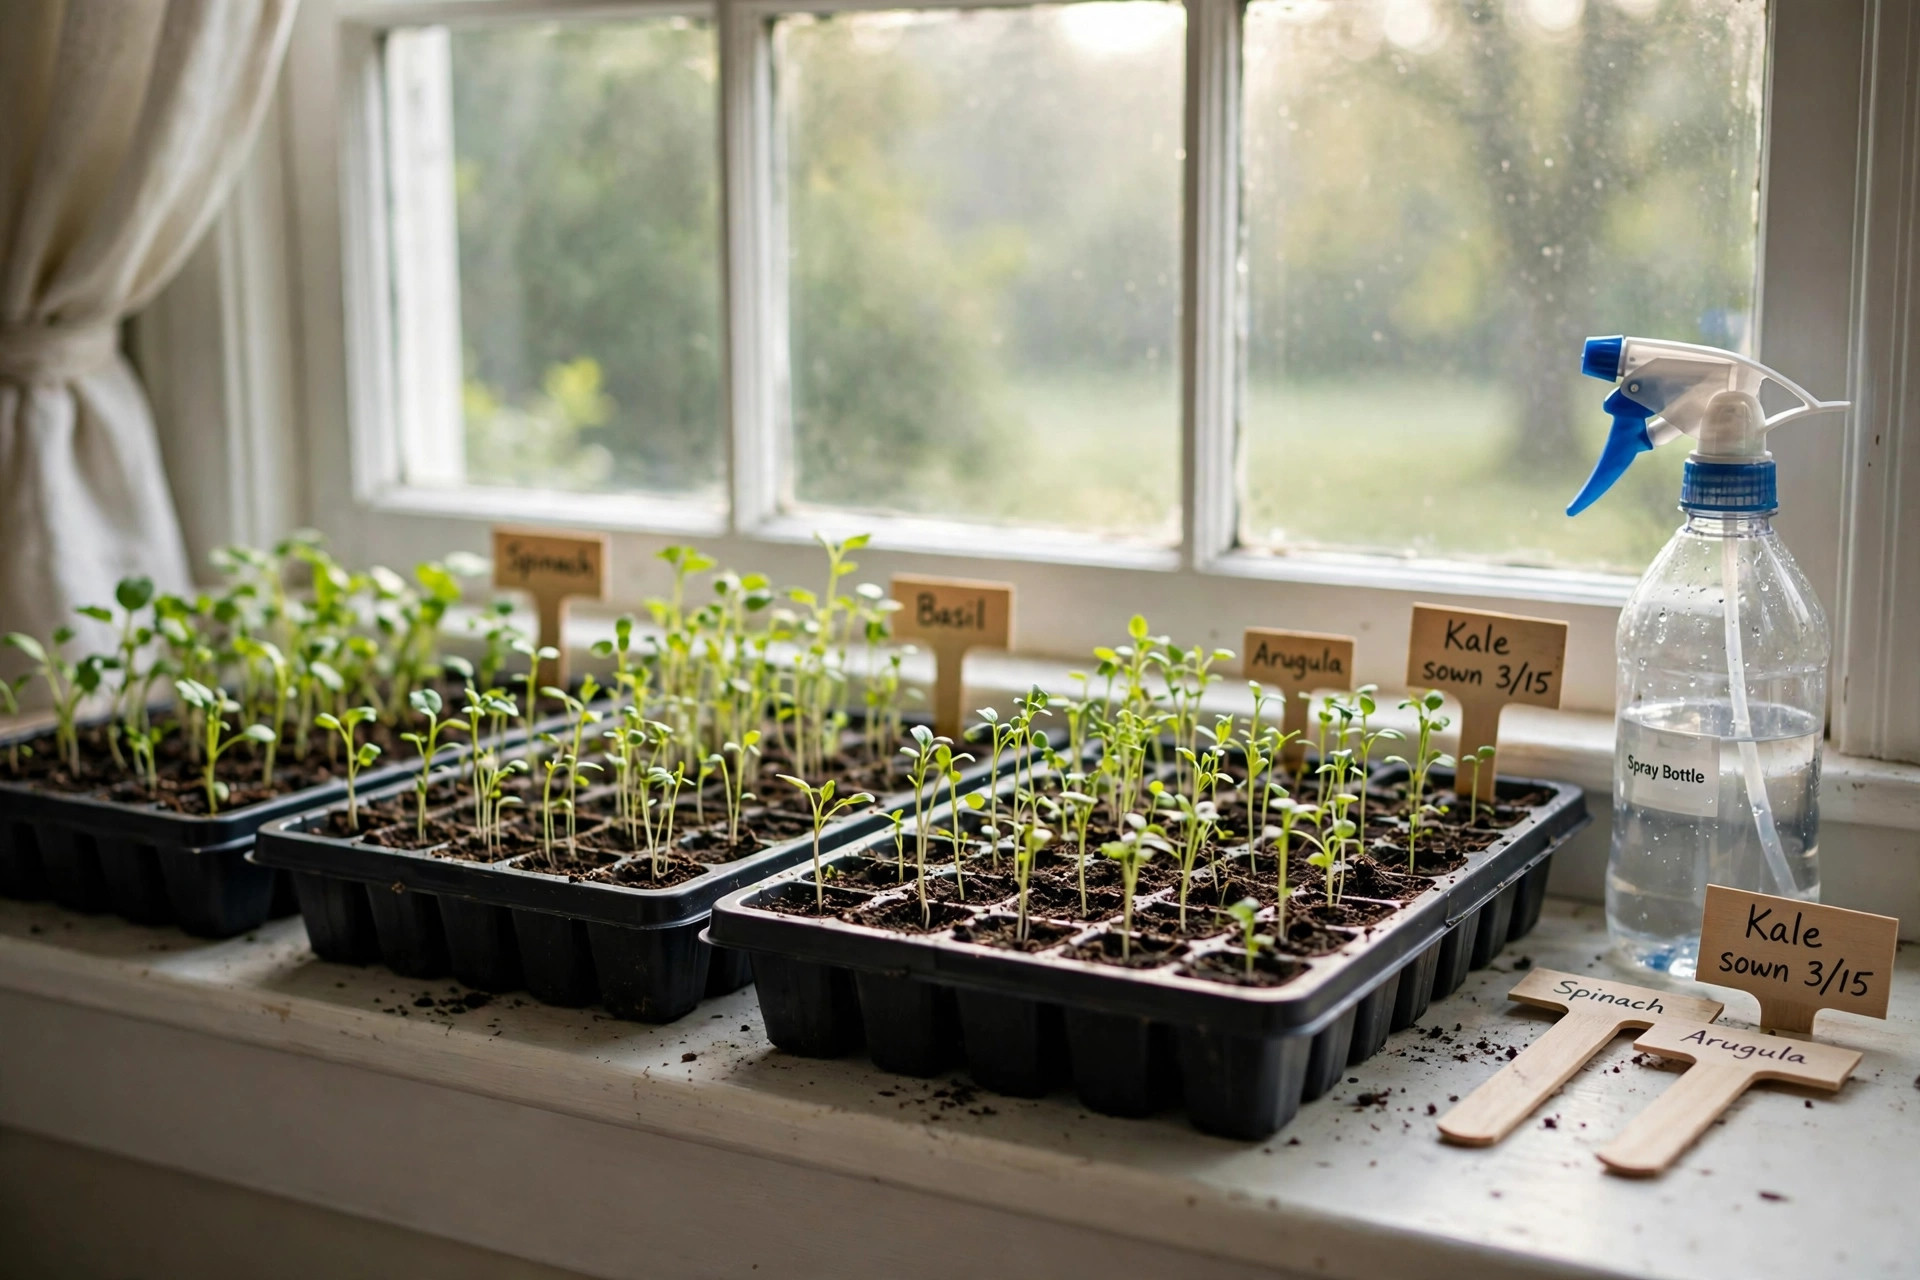
Windowsill trays. The simplest setup. A tray, a dome, and a sunny window. It works for a dozen or two plants. The risk is weak light and cold drafts at night.
Shelf with shop lights. Two or four shelves, each with a two-tube fixture on chains. This is the classic home setup. It can raise hundreds of seedlings for little money. Hardware stores such as Lowe’s and Home Depot carry the fixtures and bulbs.
Seed starting kits. Boxed kits hold a tray, a dome, peat or coir pellets, and sometimes a heat mat. Brands sold by Gardener’s Supply Company package all the parts together. Kits save shopping time but cost more per plant.
Heat mats. A mat under the tray warms the mix to about 75 degrees. Peppers, eggplant, and tomatoes sprout faster with bottom heat. Remove the mat once seeds sprout.
Mini greenhouse or cold frame. A small indoor greenhouse shelf gives extra warmth and humidity. When spring nears, a simple outdoor cold frame or a greenhouse for backyard beginners can shelter trays on mild days.
Hydroponic and self-watering trays. Some trays use wicks or water wells that feed the mix from below. These hold moisture steady and suit gardeners who travel.
Cost and Price of Seed Starting Supplies
Starting seeds indoors is a low-cost hobby. Here is what most growers spend in the first year.
– Seed packets: 3 to 5 dollars each. Six packets cost about 25 dollars. – Seed starting mix, one bag: 8 to 12 dollars. – Cell trays and domes, a set of five: 15 to 25 dollars. – Two-tube shop light fixture: 25 to 40 dollars. – Timer for the light: 10 to 15 dollars. – Heat mat, one standard size: 20 to 30 dollars. – Liquid fertilizer: 8 to 12 dollars.
A starter setup of about 100 dollars can raise several hundred seedlings. In the second year, trays and lights are reused, so the cost drops to seed and mix alone. Compared with buying 200 dollars of nursery plants, the savings are clear.
Shop around. Sales at garden centers in January and February often cut the price of trays and lights. Buying mix in larger bags also lowers the cost per tray.
Care and Upkeep of Indoor Seedlings
Daily care keeps seedlings strong. Check moisture each morning. Water from the bottom when the tray feels light. Pour off any standing water after half an hour. Roots need air as well as water.
Run a small fan near the trays for a few hours a day once stems stand up. The moving air pushes the stems, and the plants grow thicker in answer. This one trick turns floppy seedlings into sturdy ones.
Keep the room cool after sprouting. Most seedlings grow best near 60 to 65 degrees at night. Warm rooms make soft, fast, weak growth.
Watch for damping off, a disease that rots stems at the soil line. It strikes in wet, still air. Clean pots, fresh mix, bottom watering, and a fan are the best defense. If one seedling falls, pull it out at once so trouble does not spread.
Feed lightly. Too much fertilizer burns small roots. Half strength, once a week, is enough.
Label everything. In a room of green trays, tomato looks much like pepper. A date on the label also tells you which trays should sprout soon and which may be dead.
Guides at The Spruce and Family Handyman offer clear photo steps for potting up seedlings into larger pots when roots fill the cells.
Safety Notes for the Home Seed Starter
Seed starting is safe, but a few points matter.
Electricity and water. Lights hang over wet trays. Plug fixtures into a ground fault outlet. Keep cords dry and off the floor. A timer should sit where water cannot reach it.
Soil dust. Dry seed starting mix makes fine dust. People with asthma or dust allergies should wear a simple mask while filling trays. Work near an open door or a fan.
Fertilizer and pest products. Store all garden chemicals out of the reach of children and pets. Read every label. Never mix products unless the label says to.
Mold. Damp trays can grow surface mold. It is usually harmless to people but shows the mix is too wet. Scrape it off, cut back water, and run the fan.
Cold frames and glass. If you move trays to a glass cold frame, watch for hot sun. A closed cold frame can cook seedlings on a bright March day. Open the lid on sunny mornings.
Sharp tools. Hand pruners and knives used for thinning are sharp. Brands such as Fiskars and Corona make fine small tools, but keep them stored safely. Tips for safe cutting appear in many how-to pieces from Bob Vila.
Frequently Asked Questions
How early should I start seeds indoors?
Count back from your last spring frost. Most packets say how many weeks early to start. Tomatoes and peppers often need six to eight weeks. Fast flowers may need only four. Starting too early is a common fault. It gives you leggy plants that suffer at transplant.
What is the best temperature for seed germination?
Most seed sprouts best between 70 and 75 degrees. Peppers like it a bit warmer, near 80. Lettuce and spinach sprout in cooler soil, near 60 to 65. Once seeds sprout, move them to a cooler spot near 60 to 65 degrees for sturdy growth.
Do seeds need light to germinate?
Most do not. Seeds need warmth and moisture to sprout, not light. The moment green shows, light becomes urgent. Move trays under strong light the same day sprouts appear, or stems will stretch toward the window and grow weak.
Why are my seedlings tall and floppy?
The cause is almost always weak light. Move the light closer, keep it on fourteen to sixteen hours, and add a fan. Leggy seedlings rarely fully recover, so fix light early. Good light from day one is the heart of this how to start seeds indoors guide.
Can I reuse seed starting mix?
It is best to start fresh each year. Used mix can carry disease. If you must reuse it, some growers bake small batches to kill germs, but this smells and takes time. Fresh mix is cheap insurance.
How do I know when to transplant seedlings outdoors?
Wait for three signs. The last frost date has passed. Day temperatures stay above 50 degrees for warm crops. And the seedlings have been hardened off for a week or more. Plants with two to four sets of true leaves move best.
A Final Word
A how to start seeds indoors guide only works if you use it. Start with a few trays, good seed, and strong light. Keep notes on what sprouts and what fails. Each spring your trays will grow fuller and your plants stronger. By the time warm weather comes, your garden will already be weeks ahead, and it will have cost you little more than seed, mix, and care.
References
Bob Vila. (n.d.). Home improvement advice. https://www.bobvila.com Burpee. (n.d.). Seeds, plants, and gardening supplies. https://www.burpee.com Consumer Reports. (n.d.). Product reviews and ratings. https://www.consumerreports.org Corona Tools. (n.d.). Garden and landscape tools. https://www.corona-tools.com Family Handyman. (n.d.). DIY home repair and maintenance. https://www.familyhandyman.com Fiskars. (n.d.). Garden and cutting tools. https://www.fiskars.com Gardener’s Supply Company. (n.d.). Gardening tools and supplies. https://www.gardeners.com Lowe’s. (n.d.). Home improvement products. https://www.lowes.com The Home Depot. (n.d.). Home improvement products. https://www.homedepot.com The Spruce. (n.d.). Home and garden advice. https://www.thespruce.com
Was this guide helpful?

About Sarah Mitchell
The My Garden US editorial team writes practical, in-depth home and garden guides for American homeowners — tested advice, no fluff.
You May Also Like
Best Garden Tool Organizer for Garage: A Complete Buyer’s Guide
June 30, 2026 0 views
Vermicomposting Bin for Beginners Guide: How to Start a Worm Bin at Home
January 19, 2026 0 views
Best Garden Soil for Raised Beds: A Plain Guide
February 12, 2026 0 views