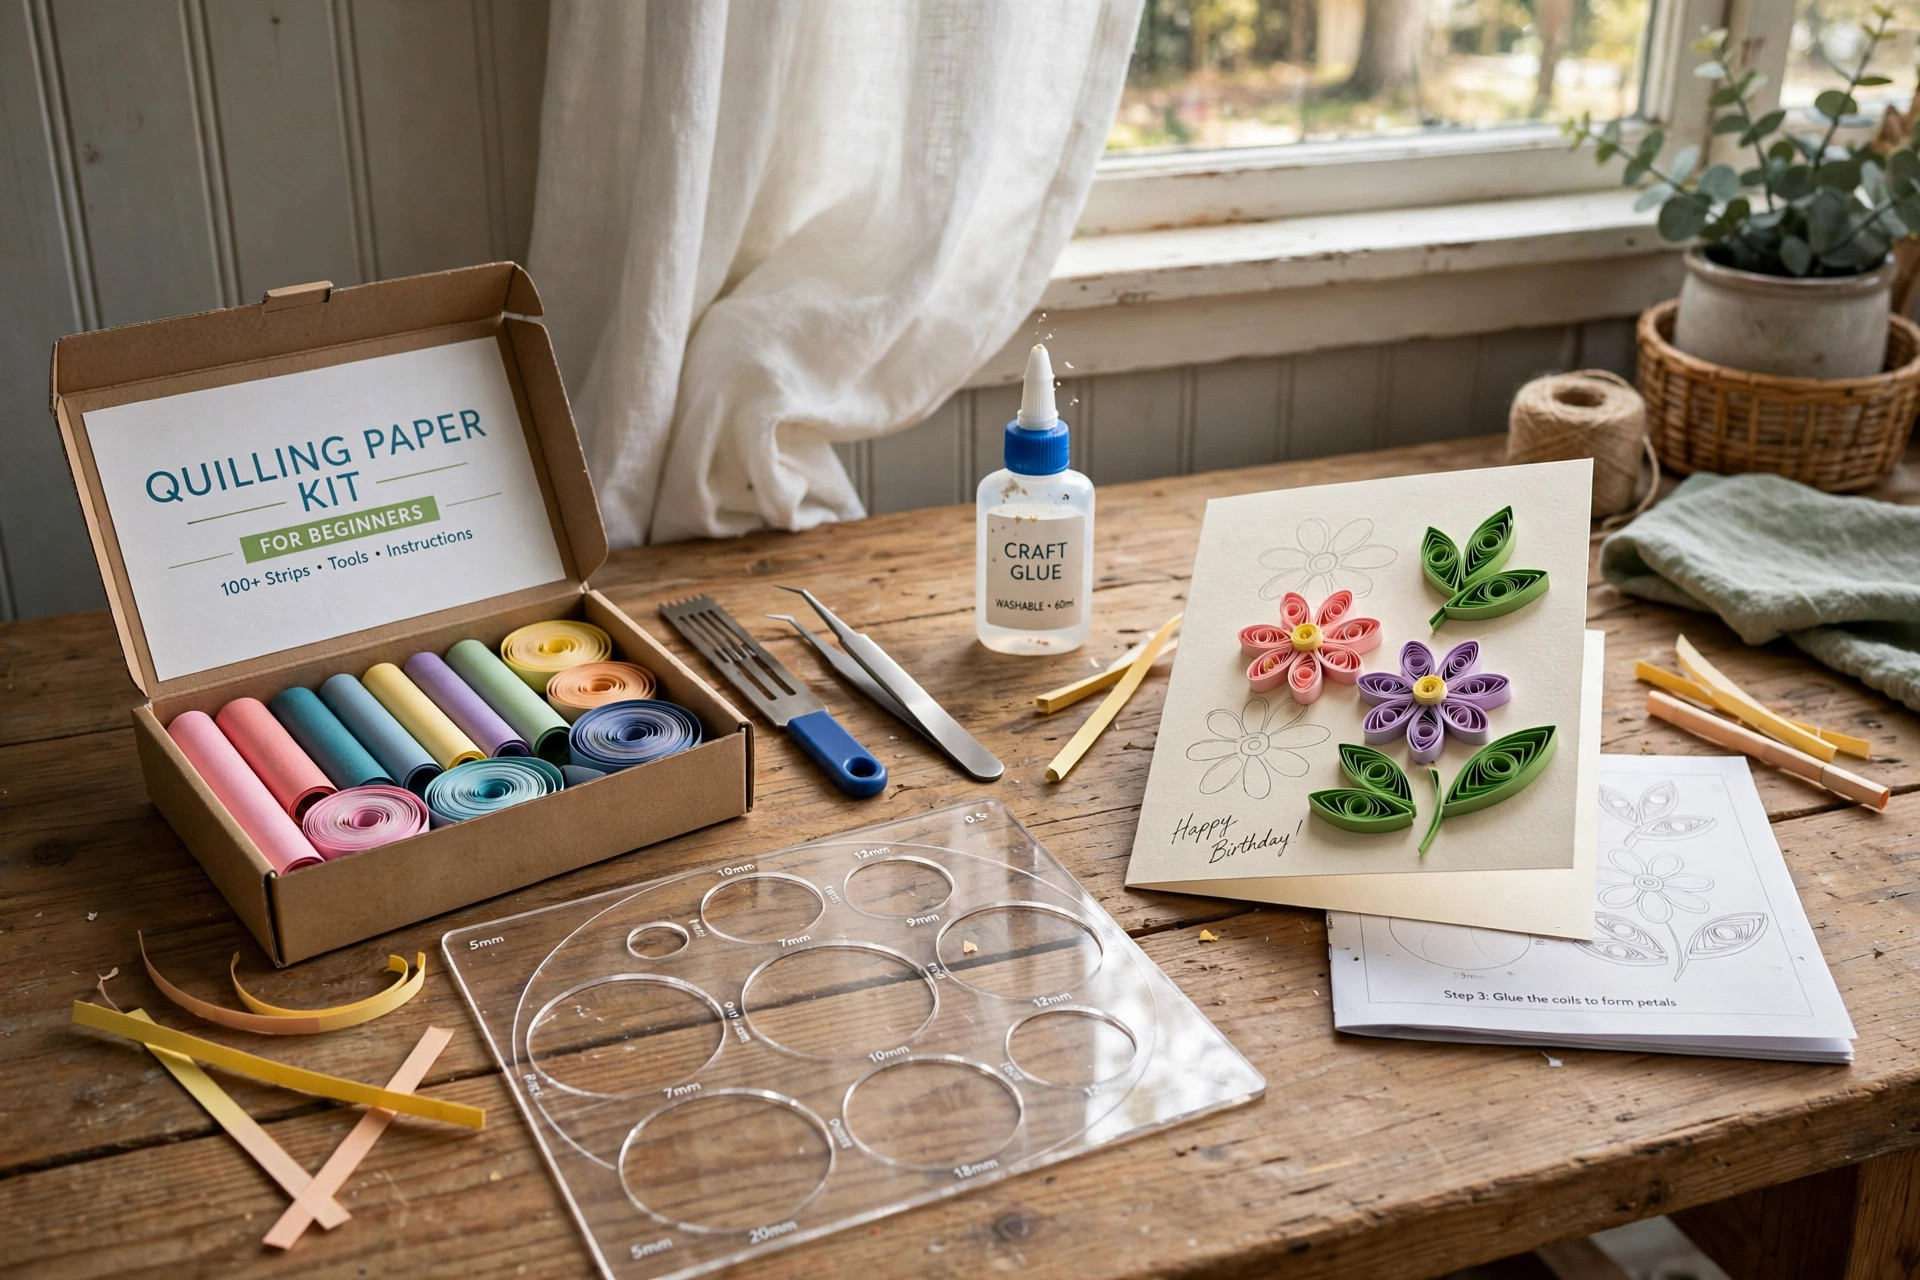

A quilling paper kit for beginners card making is a small box of joy. Inside it you will find thin strips of colored paper, a rolling tool, some glue, and often a board to pin your work. The idea is simple. You roll paper into tight coils. You pinch the coils into shapes like leaves, hearts, and petals. Then you glue the shapes onto a blank card. In less than an hour you can make a greeting card that looks like it came from a fine stationery shop.
Quilling is an old art. Monks and ladies of high society practiced it hundreds of years ago, using the cut edges of gilt books. Today it is a quiet hobby that anyone can learn. The paper strips are light. The tools are cheap. The basic moves take only an evening to learn. If you want to make your own birthday cards, thank-you notes, and holiday greetings, a starter kit is the right first buy.
Why a Starter Kit Makes Sense
A beginner kit saves you from guesswork. You could buy strips, glue, and tools one by one, but you would not know which weights and colors to choose. A good kit gives you a balanced mix. The strips are cut to the right width. The colors go well together. The tools fit the strips.
A kit also keeps the cost low. A single bottle of specialty glue from a craft store like Michaels can cost as much as a whole starter kit. With a kit, one price covers everything you need for your first ten or twenty cards. That makes the hobby easy to try and easy to put down if it is not for you.
There is another reason. Beginners do best with a project book or instruction card. Most kits include one. The small projects in the booklet teach the basic coils and shapes in a clear order. You learn by finishing real cards, not by practicing loose shapes that end up in a drawer.
What to Look For in a Kit: Quilling Paper Kit for Beginners Card Making
Paper Strip Quality
The strips are the heart of the kit. Look for strips that are cut clean and even. Rough edges will show on the finished card. Most starter kits use strips that are three millimeters wide. This width is easy to handle and looks neat on a card.
The paper should be colored all the way through, not just printed on the surface. When you roll a coil, the edge of the strip becomes the face of the shape. Paper that is white on the cut edge looks washed out. Kits sold by art supply houses such as Dick Blick often note the paper weight and dye quality in the description.
Color range matters too. A kit with ten or twelve colors gives you enough choice for flowers, borders, and lettering. Avoid kits where all the strips are pale pastels unless that is the style you want. A few deep colors, like navy, forest green, and burgundy, make cards look rich.
Tools Included
Every kit should include a slotted quilling tool. This is a short needle with a slot in the end. You slide the strip into the slot and turn to roll. Some kits also include a needle tool, which is a straight pin-like needle for rolling tight centers.
Tweezers are useful. Quilled shapes are small, and fingers can crush them. Look for tweezers with fine, straight tips. A circle template board is another good extra. It has holes of set sizes, and you drop a loose coil into a hole so it opens to an exact size. This keeps your petals uniform.
Glue matters more than most beginners expect. White craft glue works, but it must dry clear and set fast. Some kits include a small bottle with a fine tip. If not, buy a fine-tip bottle separately. A drop of glue the size of a pinhead is enough for most joints.
Board and Instructions
Many kits include a foam or cork work board. You pin your shapes to the board while the glue sets. This keeps the design flat and in place. If the kit has no board, you can use a piece of foam core from a home center such as Home Depot, but a real board with a grid printed on it is easier to use.
The instruction booklet should show the basic shapes with clear drawings. The five shapes to learn first are the tight coil, the loose coil, the teardrop, the eye or leaf, and the heart. A good booklet teaches each shape and then gives two or three card projects that use them.
Types of Kits and Options
Starter kits fall into a few groups. The most common is the general card-making kit. It has strips in many colors, the basic tools, and projects for greeting cards. This is the best choice for most beginners.
Some kits focus on one theme. A floral kit, for example, holds greens and flower colors with projects for roses and daisies. A holiday kit holds reds, greens, and golds with projects for Christmas cards. A themed kit is a fine second purchase once you know the basics.
There are also deluxe kits. These add extras like a fringing tool for flower centers, a crimper for wavy strips, and a mold for three-dimensional shapes. A deluxe kit costs more, but the extras open up new designs. Wait until you have finished at least five cards before you buy one. You will know by then which extras match your taste.
A few kits are sold with blank cards and envelopes. This is a real help. It saves a trip to the store, and the card stock is usually heavy enough to hold quilled designs. If your kit does not include them, buy blank cards from fabric and craft retailers like JOANN or other craft shops.
Cost and Price
A basic quilling paper kit for beginners card making costs between eight and twenty-five dollars in the United States. At the low end, you get a modest set of strips and one or two tools. These kits are fine for a first try. In the middle range, around fifteen dollars, you get more colors, better tools, and a real instruction book. This is the sweet spot for most buyers.
Deluxe kits run from twenty-five to fifty dollars. They add specialty tools and a larger strip collection. Refill strips are cheap. A pack of one hundred strips in assorted colors costs about five dollars. Glue and blank cards are the only other repeat costs, and both are modest.
Watch out for kits that look full but hold very few strips. Count the strips, not just the colors. One hundred strips is a fair minimum for a starter kit. Anything less will run out before your skills are set.
Seasonal sales bring the price down. Big-box stores like Target often mark craft kits down after the winter holidays. If you are not in a hurry, a January purchase can save you a few dollars.
How to Make Your First Card
Start with a simple design. A border of loose coils around the edge of the card is easy and looks clean. Roll ten coils of the same size using the circle template. Glue them end to end around the front of the card. Let them dry flat under a book.
Next, try a single flower. Roll five teardrop shapes in one color for the petals. Roll a tight coil in yellow for the center. Glue the petals in a circle around the center. Place the flower on the card with a dab of glue behind each petal. Add two green leaf shapes on the stem side.
Keep your first projects flat. Raised designs are pretty, but they make cards hard to mail. Flat designs fit in a standard envelope with a little extra postage at most. As your skill grows, you can try layered flowers and scrollwork.
Work in a clean, dry spot. Paper strips pick up dust and kitchen grease fast. A foldable craft table is not required, but any clear, flat surface works. Many crafters set up near a window, since good light helps when placing tiny shapes.
Care and Upkeep of Your Kit
Paper strips hate moisture. Store them in the box the kit came in, or move them to zip-top bags. A damp strip warps and will not roll into a clean coil. Keep the kit away from sunny windows too. Long sun exposure fades the colors, and faded strips make dull cards.
Your tools need almost no care. Wipe the slotted tool with a dry cloth when glue builds up in the slot. Keep tweezers closed in their case so the tips stay straight. A magnifier lamp for detailed work is a nice upgrade later, but it is not needed at the start.
Glue bottles dry out at the tip. After each session, wipe the tip and cap it tight. If the tip clogs, soak it in warm water for a minute. Never store the glue bottle on its side. A fine-tip bottle that leaks will ruin the strips stored next to it.
Finished cards need care as well. Quilled designs are delicate. Store finished cards flat in a box, with tissue paper between them. Keep them out of direct sun. A well-kept quilled card will hold its shape and color for years.
Safety Notes
Quilling is a safe hobby, but a few rules help. The tools are sharp. The needle tool and tweezers can prick fingers. Store them in the kit box, not loose in a drawer. If children use the kit, an adult should handle the sharp tools.
Craft glue is mild, but keep it away from eyes and mouth. Wash your hands after a session. Work in a room with fresh air. The glue gives off only a light odor, but good air is always wise with craft chemicals.
Paper cuts are the most common injury. Strips are thin and the edges can slice a fingertip. Slow down when pulling a strip through your fingers. If you cut yourself, wash the cut and cover it with a bandage before you keep working.
Good lighting protects your eyes. Small, close work strains the eyes over time. Take a short break every half hour. Look across the room to rest your focus. A magnifier lamp for detailed work reduces strain on long sessions, and DIY guides such as Bob Vila often note that task lighting matters for any close bench work.
Organizing Your Craft Space
As your strip collection grows, sorting helps. Keep colors in separate bags or small boxes. Label each bag with the color name and strip width. Mixed strips waste time. You will spend more time hunting for the right red than rolling it.
Storage drawers for small craft supplies work well for quilling extras. Beads, eye pins, and findings from other crafts fit in the same drawers, so one small unit can serve the whole hobby corner. Keep the drawers closed when you are not working. Dust settles on open craft supplies fast.
If you take classes, pack a small travel kit. A zip bag with twenty strips, the slotted tool, tweezers, and a small glue bottle is enough for a lesson. Many students learn new shapes faster with online craft classes at Craftsy, where teachers show hand positions up close.
FAQ
How long does it take to learn paper quilling?
Most people learn the basic coils and shapes in one evening. A first simple card takes about an hour. After five or six cards, your hands learn the rhythm and the work goes faster. Fine scrollwork and layered designs take a few weeks of steady practice.
What age is a quilling kit good for?
A starter kit suits ages ten and up with adult help. Younger children enjoy the colors but lack the fine motor control for tight coils. The sharp tools need an adult nearby. Many grandparents and grandchildren enjoy quilling together.
Can quilled cards be mailed?
Yes. Keep the design flat, under one-quarter inch thick. Use a padded envelope or place a sheet of cardboard inside a standard envelope. A flat quilled card mails with normal postage in most cases. Very thick or fragile designs are better hand-delivered.
Do I need special paper, or can I cut my own strips?
You can cut your own strips from colored paper with a paper trimmer. Many quillers do this to get exact shades. But kit strips are cut to even widths and dyed through, which gives cleaner results. Beginners should start with kit strips and try cutting their own later.
How do I keep quilled shapes from unrolling?
Use a tiny drop of glue at the end of the strip before you release the coil. Hold the coil for five seconds while the glue sets. For loose coils sized in a template board, glue the tail as soon as you lift the coil out. Fast-setting craft glue works best.
Where can I find more card project ideas?
Craft books at the library are a fine source. Project guides at This Old House and DIY sites like Family Handyman cover general craft bench setup, and seasonal craft magazines print quilling patterns each year. Card makers also share free patterns at local craft guild meetings.
A Final Word
A quilling paper kit for beginners card making is one of the gentlest ways into paper crafts. The cost is low. The tools are simple. The learning curve is kind. Your first cards will not be perfect, and that is fine. Handmade cards carry a warmth that store-bought cards cannot match. The small wobble in a petal is the mark of a human hand.
Start with one kit. Finish the projects in the booklet. Then make a card for someone you love. Watch their face when they see that you rolled every petal yourself. That moment is the whole point of the craft.
References
Blick Art Materials. (n.d.). Art and craft supplies. https://www.dickblick.com Bob Vila. (n.d.). Home improvement advice. https://www.bobvila.com Craftsy. (n.d.). Craft classes and supplies. https://www.craftsy.com Family Handyman. (n.d.). DIY home repair and maintenance. https://www.familyhandyman.com JOANN. (n.d.). Fabric and craft supplies. https://www.joann.com Michaels. (n.d.). Arts and crafts supplies. https://www.michaels.com Target. (n.d.). Retail store. https://www.target.com The Home Depot. (n.d.). Home improvement products. https://www.homedepot.com This Old House. (n.d.). Home renovation guidance. https://www.thisoldhouse.com
Was this guide helpful?

About Lisa Anderson
The My Garden US editorial team writes practical, in-depth home and garden guides for American homeowners — tested advice, no fluff.
You May Also Like
Wood Burning Pen Tips Replacement Set Crafts: A Plain Guide
May 8, 2026 1 views
DIY Lantern Kit for Patio Decor Crafts USA: A Simple Guide
January 21, 2026 0 views
Weaving Loom Kit for Beginners Wall Art: A Complete Guide
March 7, 2026 0 views