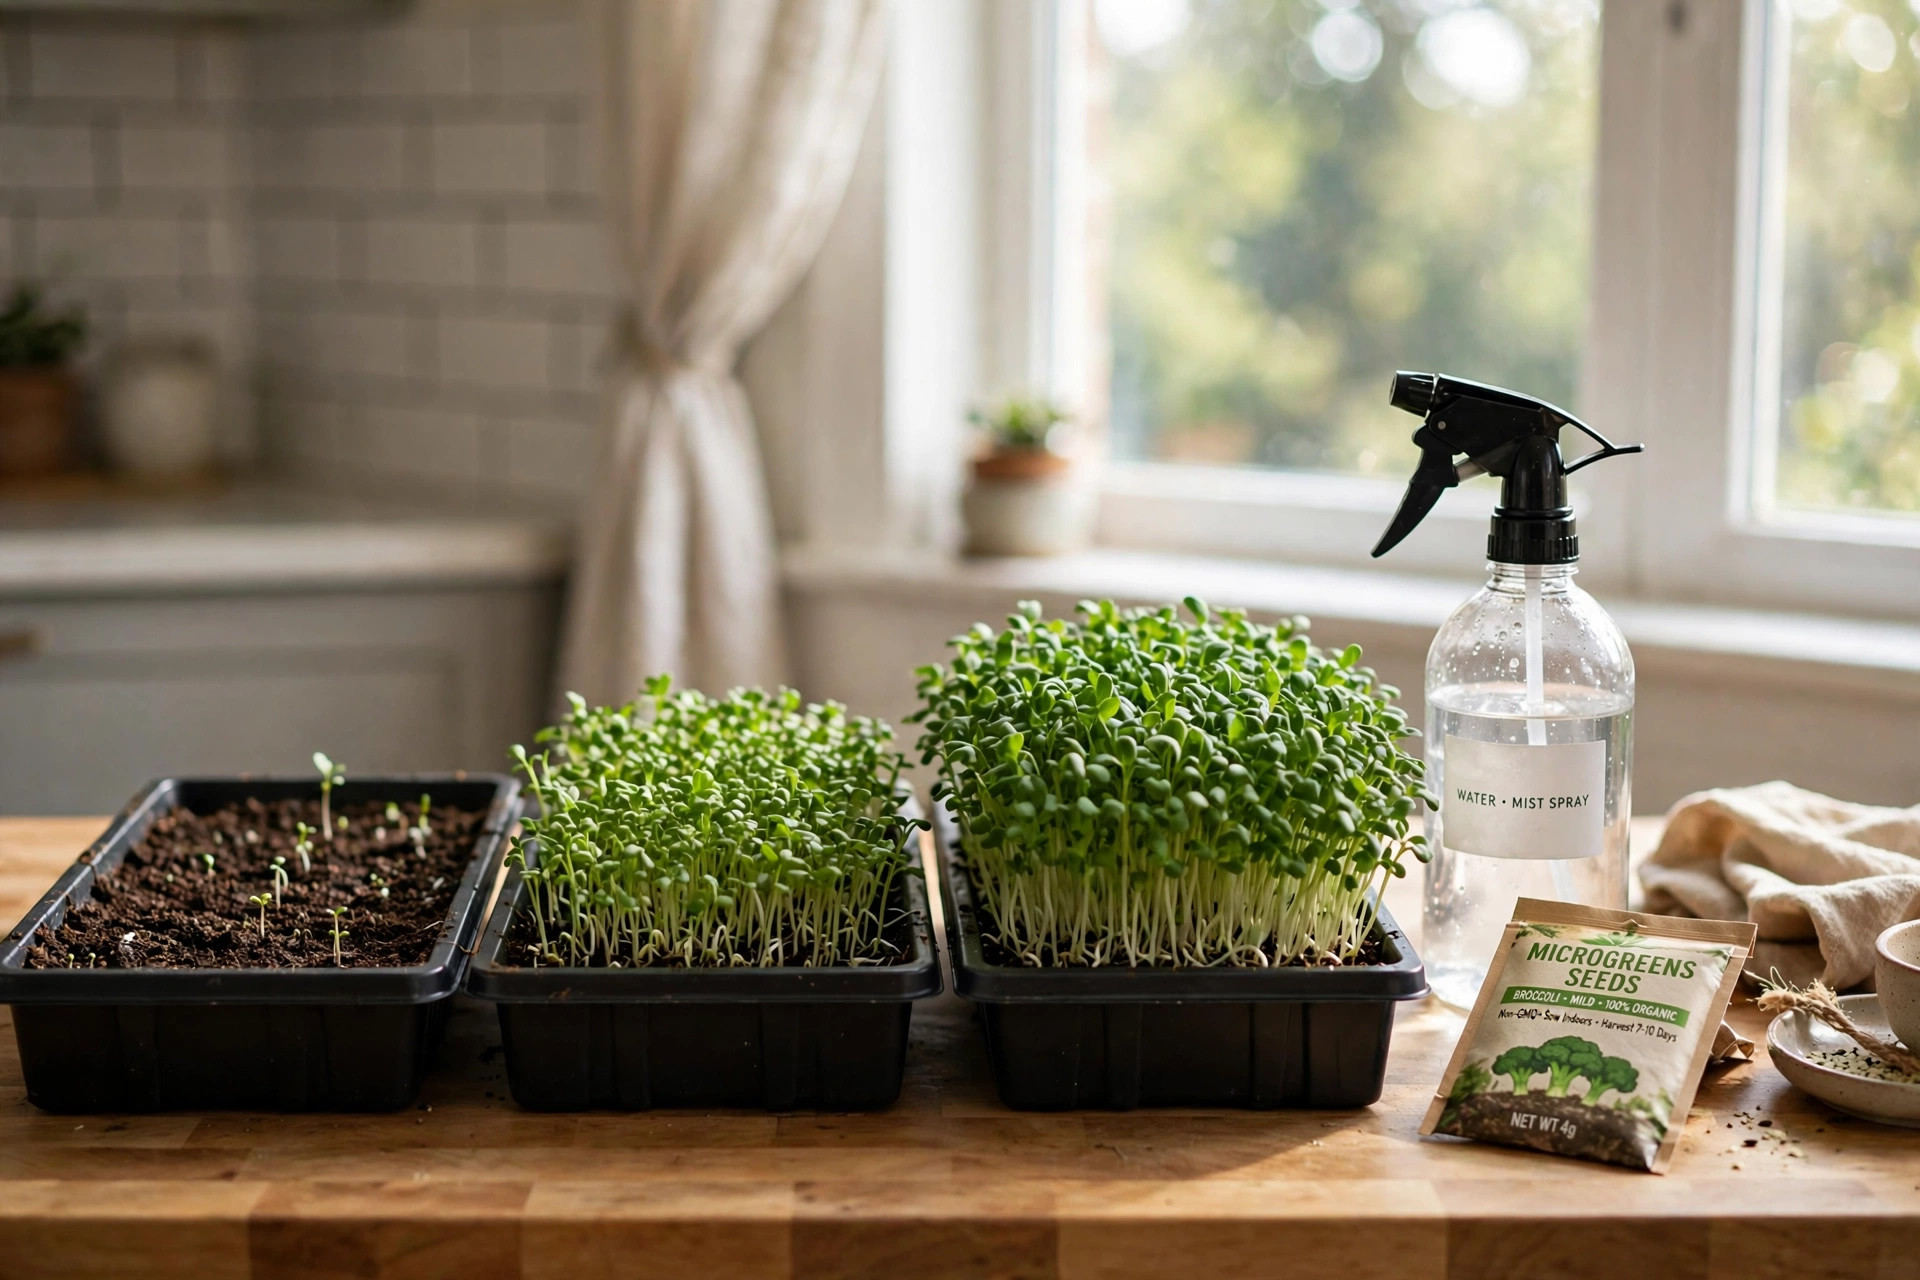

A home garden does not need a yard or much space. A sunny window ledge or a kitchen counter can hold a whole crop. If you want fresh greens in winter, or fresh greens in a small apartment, learning how to grow microgreens indoors kit style is one of the simplest paths in all of gardening.
Microgreens are young vegetable plants. They are cut and eaten when they are only one to three inches tall. They carry strong flavor and bright color. Many cooks use them in salads, on sandwiches, and as a garnish on hot dishes. They grow fast. Most kinds are ready to cut within seven to fourteen days of planting.
A kit takes the guesswork out of the start. It puts the tray, the soil, and the seed in one box. This guide will walk you through each part of the process. You will learn what matters when you choose a kit, how to set it up, how to keep it healthy, and how to cut your first harvest.
Why Grow Microgreens at Home
Fresh Food at Arm’s Reach
Store greens lose flavor with each day of travel. Greens cut in your own kitchen keep their taste and their crisp bite. A tray of radish or broccoli microgreens can turn a plain sandwich into something worth remembering. Fresh food tastes better, and there is pride in food you grew yourself.
Small Space, Short Time
Many gardens need months of work and rows of soil. Microgreens need neither. A single tray takes up less than one square foot of counter space. From seed to plate is about ten days. That speed makes the project friendly to beginners.
A Garden That Works in Winter
Cold weather stops most outdoor gardens. Microgreens do not care about the season. They grow indoors under normal room temperatures and a window or a simple light. Microgreens take that same indoor idea and make it year-round.
Good Nutrition in Small Bites
Research over the past decade has found that microgreens can hold high levels of vitamins and minerals for their size. They are simply a fresh, wholesome food. Adding a handful to a meal is an easy way to eat more greens. Sites such as The Spruce often note that home growing is one of the most direct ways to eat fresher produce.
What Is Included in a Microgreens Kit: How to Grow Microgreens Indoors Kit
A microgreens kit for beginners usually holds everything needed for the first one or two crops. Most kits include the following parts.
Growing Trays
Kits come with shallow plastic trays. Many use the standard ten-by-twenty-inch nursery flat, cut down or divided into smaller sections. Trays should have drainage holes. Water that cannot drain will drown young roots and invite mold.
Growing Medium
Instead of garden soil, kits use a fine growing medium. It may be coconut fiber, peat moss, or a seed-starting mix. The medium holds water and gives roots a light, open structure to grow through. Readers who want more detail on this topic may enjoy our guide on seed starting mix vs potting soil.
Seeds
The kit includes packets of microgreen seed. Common kinds are broccoli, radish, sunflower, pea, and mustard. The seeds are sold in larger amounts than garden packets, because microgreens are sown thickly. Suppliers such as Burpee sell seed sized for microgreen growing. A little goes a long way, but you use more seed per tray than you would in a garden row.
Extras
Many kits add a spray bottle for gentle watering and a clear humidity dome to hold moisture. Some include a grow light for homes with dark windows. These extras are helpful but not required. As Family Handyman often points out, simple tools used well beat fancy tools used poorly.
How to Choose the Right Kit
Look for Quality Seed
Seed quality decides the result. Look for seed labeled for microgreen use. It should be untreated and meant for sprouting or microgreen growing. Avoid seed treated with chemicals for field planting. Gardener’s Supply and other trusted sellers clearly mark seed that is safe for edible growing.
Check the Tray Size
Think about your counter or shelf space before you buy. A full ten-by-twenty tray is generous but heavy when wet. Smaller kits with several small trays let you grow different kinds at once and fit narrow windowsills. Measure your space with a tape before you order.
Growing Medium Matters
A good medium feels light and spongy when wet. Coconut fiber mats are clean and simple, and they avoid loose soil on the counter. Loose mix costs less per tray and holds more water. Either choice works. If you ever want to grow microgreens at home without a kit, the same media are sold separately at stores like The Home Depot and Lowe’s.
Lights and Location
A bright south-facing window is enough for most microgreens. If your home is dark in winter, a kit with a small LED grow light is worth the extra cost. Without enough light, the plants grow tall, pale, and weak. They will still be edible, but the flavor and color suffer.
Read Reviews
Kit quality varies. Read several reviews before you buy. Look for notes about germination rates and mold problems. Consumer Reports testing reminds buyers that a low price can hide poor seed or flimsy trays that crack after one use.
Step by Step: How to Grow Microgreens Indoors
Here is the full process, from box to first cutting. Follow it once, and the second tray will feel easy.
Step 1: Set Up Your Space
Pick a level surface near a bright window. Lay a waterproof mat or an old towel under the tray. Room temperature between sixty-five and seventy-five degrees is ideal. Keep the tray away from cold drafts and heating vents.
Step 2: Prepare the Tray
Fill the tray with growing medium about one inch deep. Press it down gently so the surface is flat. Water the medium until it is damp like a wrung-out sponge. It should not drip when you lift the tray.
Step 3: Sow the Seed
Scatter the seed evenly over the surface. Microgreens are sown much thicker than garden seeds. Aim for seeds nearly touching each other, in one even layer. Do not bury them deep. Most kinds want only a light covering of medium, or none at all. Larger seeds, like peas and sunflowers, do better with a thin cover.
Step 4: Water Gently
Use the spray bottle to mist the seed. A gentle mist keeps the seed from washing into piles. Heavier watering at this stage can push seed aside and leave bare spots. Many growers prefer a fine mist spray bottle for daily watering of young trays.
Step 5: Cover and Wait
Place the clear dome or an inverted tray over the seeded tray. The cover holds humidity and keeps the surface moist. Leave it on for two to four days, until most seeds have sprouted. Check daily. If the surface looks dry, mist it again.
Step 6: Add Light
Once the seeds sprout, remove the cover and move the tray into bright light. A window with four or more hours of sun works well. If you use a grow light, hang it two to four inches above the plants and raise it as they grow. Leave the light on for twelve to sixteen hours a day.
Step 7: Water Daily
Water once a day, from the bottom if possible. Pour water into the outer tray and let the medium soak it up. Bottom watering keeps the leaves dry and cuts the risk of mold. If the tray has no outer tray, mist the surface gently. Never let the medium dry out fully.
Step 8: Harvest
Cut the microgreens when the first true leaves appear, usually seven to fourteen days after sowing. Use clean scissors. Cut just above the soil line. Rinse the cuttings gently, pat them dry, and use them fresh. Most kinds do not regrow after cutting, so start a new tray for the next crop.
Types of Microgreens for Beginners
Some kinds forgive mistakes better than others. These are the safest first choices.
Radish
Radish microgreens grow in about a week. They have a peppery bite and bright green leaves, sometimes with red stems. They sprout fast and even, which makes them a favorite first crop.
Broccoli
Broccoli is mild, tender, and reliable. It takes ten to twelve days. The flavor is gentle, close to a young cabbage. It pairs well with almost any dish.
Sunflower
Sunflower microgreens grow thick, crunchy stems with a nutty taste. They take a little longer, about ten to fourteen days. The seed hulls sometimes stick to the leaves. A gentle rinse takes care of that.
Peas
Pea shoots are sweet and crisp. They grow tall, so they need a deeper tray or a taller dome. They take ten to fourteen days. The flavor reminds many people of fresh spring peas.
Mustard and Arugula
These carry a spicy kick. They grow fast, in about a week. A little goes a long way on a plate. Mix them with milder kinds for balance.
If you want to branch out after your first trays, our guide on how to start seeds indoors covers the wider world of indoor seed growing, from herbs to garden transplants.
Cost and Price
A basic kit costs between twenty and fifty dollars. It usually grows four to ten trays before the seed runs out. Compare that to store prices. A small box of microgreens at a market can cost four to six dollars and holds far less than one home tray.
After the first kit, refills are cheap. A bag of growing medium and a packet of seed cost a few dollars and supply many trays. Trays can be washed and reused for years if you clean them well between crops. Tool makers like Fiskars and Corona sell sturdy scissors and snips that make the harvest step quick and clean.
Electricity for a small LED light adds very little to a power bill. A window setup costs nothing beyond the kit.
Care and Upkeep
Daily Routine
Check the trays each morning. Water if the surface feels dry. Look for even growth and good color. The whole routine takes about two minutes. Consistent care matters more than perfect technique.
Preventing Mold
Mold is the most common problem. It grows in still, wet air. Three habits keep it away. First, do not overwater. Second, give the trays some air flow; a small fan on a low setting helps. Third, clean trays with soap and hot water between crops. Advice from Bob Vila on indoor growing stresses that air movement is the single best defense against damp-related problems.
Cleaning Trays
After harvest, dump the used medium into compost or the trash. Wash trays with hot soapy water. Rinse well. Let them dry fully in the sun or open air before the next use. Clean trays start each crop without old mold spores or salt buildup.
Storing Seed
Keep unused seed in a cool, dry place. A sealed jar in a cupboard works well. Good storage keeps germination rates high for a year or more. Write the date on the packet so you know how old it is.
Safety
Microgreens are safe food when grown with care. Still, a few simple rules protect you.
Buy seed meant for human food. Seed sold for field planting may carry chemical treatments. The packet should say the seed is for sprouting or microgreens.
Wash your hands before handling trays. Use clean tools. Cut with clean scissors. Rinse harvested greens before eating.
Watch for mold and discard any tray that smells sour or shows heavy fuzzy growth. A little white root hair is normal on young roots. Thick gray or black fuzz is not. When in doubt, throw the tray out and start fresh. Your health is worth more than one tray of greens.
Frequently Asked Questions
How long does it take to grow microgreens indoors?
Most kinds are ready in seven to fourteen days from sowing. Radish and mustard are among the fastest. Sunflower and peas take a little longer.
Do microgreens need sunlight or grow lights?
They need good light, but it does not have to be direct sun. A bright window works for most kinds. In dark rooms or in deep winter, a simple LED grow light gives better color and stronger stems. Without enough light, plants grow leggy and pale.
Can I reuse the soil after harvesting microgreens?
It is best to start each crop with fresh medium. Used medium holds old root matter that can carry mold. A fresh fill gives the new seeds a clean start. The used medium is fine for a compost pile.
Why are my microgreens falling over?
Falling over usually means too little light or too much water. The stems stretch toward weak light and grow soft. Move the tray to a brighter spot. Water from the bottom so the stems stay dry. A small fan nearby builds stronger stems.
Are microgreens the same as sprouts?
No. Sprouts are grown in water and eaten whole, roots and all, within a few days. Microgreens are grown in a medium and cut above the soil after one to two weeks. The two share a family resemblance, but the growing method and the harvest are different.
How much seed do I need per tray?
A ten-by-twenty tray takes about one to two ounces of small seed like broccoli or radish. Larger seeds like peas and sunflower need three to four ounces per tray. The exact amount depends on the kind. When the seed nearly covers the surface in one layer, you have enough.
A Final Word
A microgreens kit is a small box with a big promise. It turns a corner of your kitchen into a garden that pays off in ten days. The steps are simple. Damp medium, even seed, gentle water, good light, and a clean cut.
Start with one tray and one easy kind, like radish or broccoli. Watch it grow. Taste the first cutting. Then start the next tray. Within a month, the routine will feel like second nature, and fresh greens will be a regular part of your table.
References
Bob Vila. (n.d.). Home improvement advice. https://www.bobvila.com Burpee. (n.d.). Seeds, plants, and gardening supplies. https://www.burpee.com Consumer Reports. (n.d.). Product reviews and ratings. https://www.consumerreports.org Corona Tools. (n.d.). Garden and landscape tools. https://www.corona-tools.com Family Handyman. (n.d.). DIY home repair and maintenance. https://www.familyhandyman.com Fiskars. (n.d.). Garden and cutting tools. https://www.fiskars.com Gardener’s Supply Company. (n.d.). Gardening tools and supplies. https://www.gardeners.com Lowe’s. (n.d.). Home improvement products. https://www.lowes.com The Home Depot. (n.d.). Home improvement products. https://www.homedepot.com The Spruce. (n.d.). Home and garden advice. https://www.thespruce.com
Was this guide helpful?

About Lisa Anderson
The My Garden US editorial team writes practical, in-depth home and garden guides for American homeowners — tested advice, no fluff.
You May Also Like

How to Choose the Best Garden Hose for RV Use
May 20, 2026 0 views
Drip Irrigation for Fruit Trees Guide: How to Water Your Orchard the Right Way
July 25, 2026 0 views
Seed Starting Light Setup for Beginners: A Plain Guide to Strong Seedlings Indoors
August 30, 2026 0 views