
Every winter, cold air slips into walls, crawl spaces, and basements, and water pipes pay the price. These frozen pipe prevention tips for USA homes will help you keep water flowing when the temperature drops and save you from the mess of a burst pipe. Water expands as it freezes. Inside a pipe, that expansion builds pressure until the pipe cracks or bursts. A single burst line can release hundreds of gallons into walls and floors, and repair bills often run into the thousands of dollars. The good news is that most frozen pipes are preventable with cheap materials, a few habits, and one careful afternoon of work.
Why Frozen Pipes Are Such a Serious Problem
Pipes freeze because standing water loses heat to cold air. When the water turns to ice, it grows by about nine percent in volume. The pipe cannot stretch that far, so something gives. Copper, PVC, and plastic lines can all burst, though some materials fail sooner than others. When the ice plug forms, pressure builds between the plug and the closed faucet. That trapped pressure is what splits the pipe wall.
Bursts rarely happen at night when the ice forms. They happen in the morning when the ice thaws and the cracked section gives way. Many homeowners discover a burst pipe by finding a soaked ceiling or a flooded utility room. The Environmental Protection Agency offers plain guidance on household water care that pairs well with winter pipe work.
Homes at greatest risk include older houses with thin wall insulation, homes in the northern states where long freezes are common, and homes in the South where pipes often run through unheated attics. Vacation homes sit empty for weeks, and mobile homes often have exposed undersides.
Know Your Vulnerable Spots: Frozen Pipe Prevention Tips for Usa Homes
Before you buy a single supply, walk through the house and map the weak points. Start where pipes enter the home. Look at the basement, the crawl space, the garage, and any exterior wall that holds plumbing. Run your hand along the pipes on a cold morning. If the metal feels icy, that run needs help.
Common trouble spots include:
– Exterior walls. Kitchen and bathroom sinks set against outside walls hold pipes in the coldest part of the framing. – Attics and crawl spaces. These spaces track outdoor temperature closely and get no heat from the furnace. – Garages. Washer hookups and utility sinks in garages freeze fast when doors stay open. – Cabinet bases. Pipes inside vanities get no warm room air. – Hose bibbs and spigots. Outdoor faucets freeze from the outside in. – Vacation and rental homes. Empty houses cool fast because the thermostat is set low.
Mark each spot with a bit of tape. Your supply list will match this map.
Insulate Before the Cold Arrives
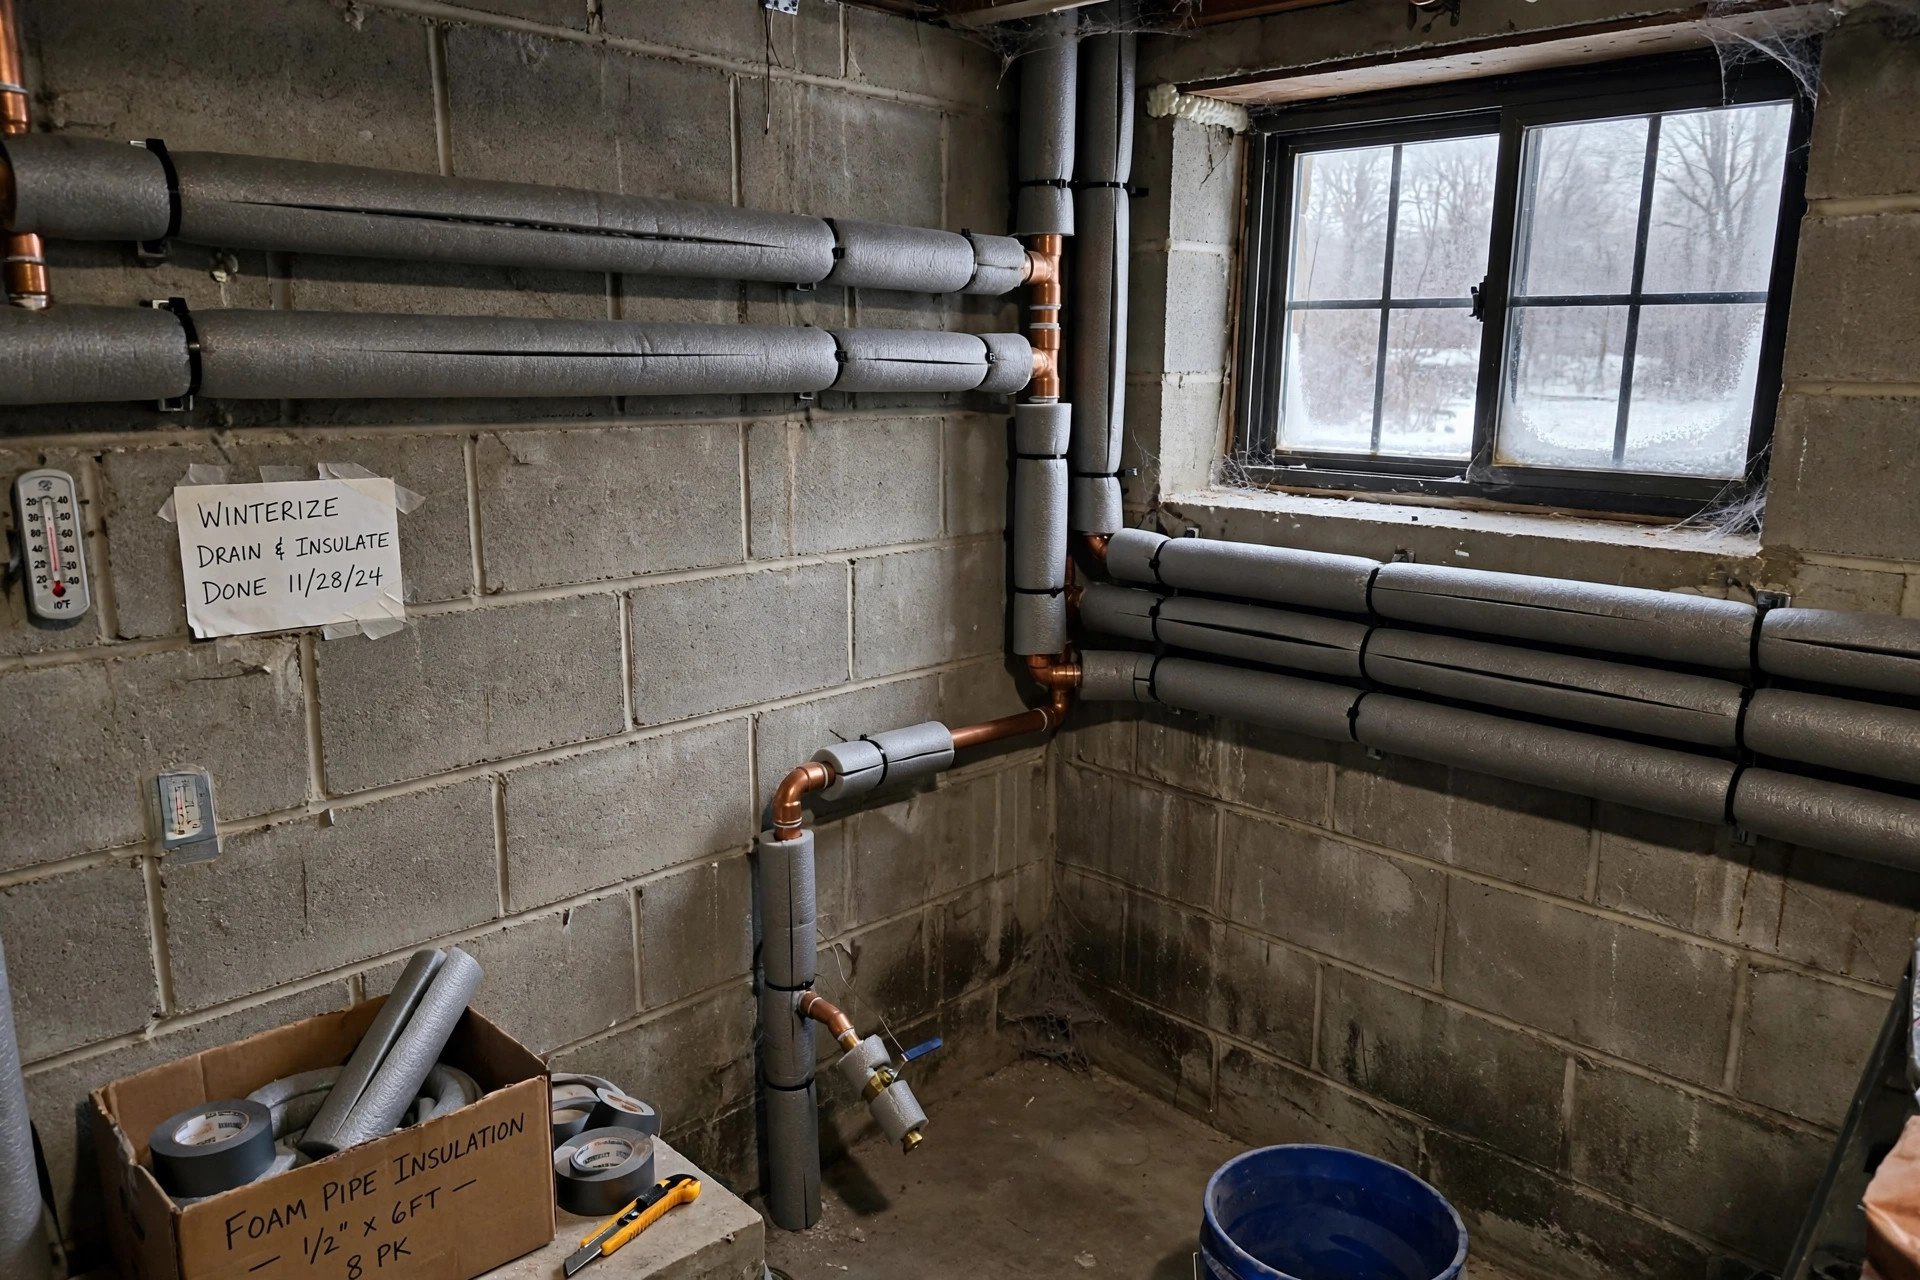
Insulation is the first and cheapest defense. Foam pipe sleeves cost little, cut with a knife, and press closed around the pipe. They slow heat loss enough to keep water above freezing on many nights.
How to Choose Insulation
Measure your pipe diameter before you shop. Sleeves come sized for common pipes, and a loose sleeve wastes its value.
Pick insulation thickness with your climate in mind. In mild states, half-inch foam is enough. In cold states, use thicker foam or wrap with fiberglass batts covered by a vapor barrier. Where pipes run through very cold spaces, pair insulation with heat tape, covered below.
Where Insulation Matters Most
Cover every exposed run in unheated spaces first. Then cover the sections inside exterior walls that you can reach from basements and crawl spaces. Do not skip elbows and tees. Heat escapes fastest at fittings, and many freezes start at an exposed elbow. For more detail, see our guide to best pipe insulation for cold climates.
Seal air leaks around the pipes too. Cold air blowing across a pipe defeats insulation fast. Use caulk or foam sealant around holes where pipes pass through walls, floors, and the foundation. Family Handyman publishes clear walk-throughs of these sealing jobs.
Let Faucets Drip on the Coldest Nights
A slow drip keeps water moving, and moving water is much harder to freeze than standing water. On nights well below freezing, let one faucet drip cold water slowly. A steady drip, not a stream, is enough. Open the faucet served by the longest and most exposed run of pipe.
The cost is small: a dripping faucet uses only a few gallons overnight. If your water comes from a well, make sure your pump and pressure tank can handle the extra flow.
Some plumbers suggest dripping both hot and cold sides when pipes run through an attic, since hot lines can freeze too. As a rule, the faucet farthest from where the water enters the house is the best one to drip. It forces water through the entire system.
Open Cabinets to Share Warm Air
Kitchen and bathroom pipes hide inside cabinets against exterior walls. On cold nights, open those cabinet doors. Warm room air then reaches the pipes and keeps them above freezing. This simple step costs nothing and helps a great deal.
Remove any cleaners or chemicals from under the sink first, especially if small children or pets live in the house. A small incandescent lamp near the pipes adds warmth, but keep it clear of everything and never leave it unattended.
Keep the Heat On, Even When You Leave
Set the thermostat to at least 55 degrees before you leave home in winter. Furnace heat costs money, but it is cheap insurance against a flood. Ask a neighbor to check the house if you will be gone more than a day or two. Have them run the taps and look under sinks.
For longer absences, consider shutting off the main water valve and draining the lines. Open the lowest faucet in the house and let the system drain. Pour a little non-toxic antifreeze made for plumbing into sink and tub drains so the traps do not freeze.
Use Heat Tape and Heat Cable
Heat tape, also called heat cable, is an electric ribbon that wraps around a pipe and warms it from the outside. It is made for pipes that insulation alone cannot protect, such as lines in drafty crawl spaces. You can compare heat tape models at big-box retailers. Our review of heat tape for water pipes covers the main types.
Buy tape that is listed by a recognized testing laboratory and made for your pipe material. Measure the length of pipe you need to cover and buy the right size. Never overlap heat tape on itself unless the maker allows it, because overlapped tape can overheat. Self-regulating cable is the safest choice for most homeowners. It adjusts its heat output with the temperature and is less likely to scorch.
Wrap the tape in a straight run or a loose spiral, following the maker’s spacing rules. Hold it in place with electrical tape, not metal clamps, which can damage the cable. Cover the whole job with pipe insulation to hold the warmth in. Plug the tape into a ground-fault outlet and test it before the first freeze. Check the tape each fall for cracked jackets and loose plugs, and replace any damaged cable, since a failing cable can become a fire risk.
Protect Outdoor Faucets and Hoses
Outdoor spigots freeze from the outside in, and the ice can push back into the wall pipe. Before the first hard freeze, disconnect every garden hose. A connected hose traps water in the faucet and guarantees a freeze. Drain the hoses, coil them, and store them in the garage.
Shut off the indoor valve that feeds each outdoor faucet, if your house has one. Then open the outdoor faucet to drain the line and leave it open through the winter so any trapped water has room to expand.
Cover each spigot with an insulated faucet cover. These foam caps cost a few dollars and slip on in seconds. Frost-free sillcocks from fixture makers add more protection, since their valves sit deep inside the warm wall. If you already face a frozen line, read our guide on how to thaw frozen pipes safely before you touch a torch or heat gun.
Seal Drafts and Close the Garage
Cold air is the enemy, so stop it at the door. Weatherstrip the garage door and keep it closed in winter. An open garage can drop the temperature around washer lines by twenty degrees in an hour.
Seal the holes where pipes, wires, and vents pass through exterior walls and the foundation. A tube of caulk and a can of expanding foam handle most of these gaps. In the attic, make sure insulation covers the tops of plumbing walls.
Check the foundation vents on older homes. Many have vents that can be closed for the winter. Closing them keeps the crawl space warmer and the pipes safer.
Install a Water Leak Detector
Even with good prevention, a small leak can start anywhere. Battery-powered leak detectors sit on the floor near water heaters, washing machines, and under sinks. They sound an alarm when they sense water. Smart models send a phone alert, which matters when you are away from home. Water shut-off and leak detection products from major fixture brands have made this gear simple to install.
Place detectors where water would pool first: under the dishwasher, behind the washing machine, beside the water heater, and at the low corner of the basement. Test the alarms each season when you test your smoke detectors.
For stronger protection, add an automatic shut-off valve on the main line. It closes the water when a sensor detects a leak. The device costs more than alarms, but it can stop a flood while you are at work or on vacation.
Act fast but stay calm if a pipe does freeze. First, open the faucet that the frozen pipe feeds, to give melting water somewhere to go. Then find the frozen section by feeling along the pipe for a very cold or frosty spot. Warm the pipe gently with a hair dryer, a heating pad, or warm towels, starting at the faucet end and working back toward the coldest spot. Never use a blowtorch or any open flame. Whole-house filtration and water equipment guides often include winter care notes worth reading alongside this work.
Keep warming until full water pressure returns, then check the whole run for leaks. If you cannot find the frozen section, or if water is already leaking, shut off the main valve and call a plumber. This Old House offers solid advice on when a job needs a professional.
Costs of Prevention Versus Repair
Prevention is cheap. Foam sleeves cost a few dollars per six-foot length, faucet covers cost less than a fast-food lunch, and a roll of heat cable for one exposed run costs far less than a single plumber visit.
Repairs are not cheap. Thawing a frozen pipe can cost a few hundred dollars if a plumber does it. Fixing a burst pipe inside a wall often runs from five hundred to several thousand dollars, depending on the damage, and water damage to floors and drywall pushes the total higher. Many policies cover sudden bursts but deny claims when the homeowner left the heat off or ignored clear warning signs.
A Simple Winter Checklist
Work through this list each fall before the first freeze:
1. Map every pipe in unheated spaces. 2. Insulate exposed runs, elbows, and tees. 3. Seal air leaks around pipes and the foundation. 4. Disconnect hoses and drain outdoor faucets. 5. Service or replace heat tape. 6. Open cabinet doors on cold nights. 7. Keep the thermostat at 55 degrees or higher. 8. Drip a faucet on the coldest nights. 9. Place leak detectors near risky appliances. 10. Learn where the main shut-off valve is.
Tape this list inside a utility closet door. When the first cold snap arrives, you will be ready instead of rushed.
Frequently Asked Questions
At what temperature do pipes freeze?
Most pipes start to freeze when the air around them stays at or below 20 degrees Fahrenheit for several hours. Pipes in unheated spaces can freeze when outdoor temperatures are in the 20s, especially if wind blows through gaps.
Should I drip hot or cold water?
Drip cold water in most cases, since cold lines freeze first. If your hot water lines also run through unheated spaces, drip both sides. Use the faucet farthest from the main water entry.
Is heat tape safe to leave plugged in all winter?
Self-regulating heat tape with a built-in thermostat is made for seasonal use and is safe when installed correctly. Check it each fall for damage.
Can pipes freeze in a heated house?
Yes. Pipes inside exterior walls, in cold corners, and in cabinets can freeze even when the rooms feel warm. Long cold snaps, strong winds, and power outages push wall cavities below freezing.
What should I do before a winter vacation?
Set the heat to at least 55 degrees and ask someone to check the house. For trips longer than a week in cold climates, shut off the main valve and drain the pipes, and add plumbing antifreeze to drain traps.
Does homeowners insurance cover frozen pipe damage?
Many policies cover sudden and accidental bursts, but they often exclude damage from neglect, such as leaving the heat off in winter. Read your policy before the season starts. Prevention not only protects the house but also protects your coverage.
A Final Word
Frozen pipes are a winter fact of life, but burst pipes do not have to be. A little insulation, a closed garage door, a dripping faucet, and a warm thermostat carry a house through the coldest months. Do the work in the fall, and check the weak spots after every deep freeze.
References
Aquasana. (n.d.). Water filtration systems. https://www.aquasana.com Delta Faucet. (n.d.). Kitchen and bathroom faucets. https://www.deltafaucet.com Family Handyman. (n.d.). DIY home repair and maintenance. https://www.familyhandyman.com Kohler. (n.d.). Bathroom and kitchen fixtures. https://www.kohler.com Lowe’s. (n.d.). Home improvement products. https://www.lowes.com Moen. (n.d.). Faucets and plumbing fixtures. https://www.moen.com The Home Depot. (n.d.). Home improvement products. https://www.homedepot.com This Old House. (n.d.). Home renovation guidance. https://www.thisoldhouse.com U.S. Environmental Protection Agency. (n.d.). Protecting human health and the environment. https://www.epa.gov
Was this guide helpful?

About Michael Thompson
The My Garden US editorial team writes practical, in-depth home and garden guides for American homeowners — tested advice, no fluff.
You May Also Like
RO System Remineralization Filter Reviews USA
July 7, 2026 0 views
The Best Water Test Kit for Well Water in the USA: A Homeowner’s Guide
January 19, 2026 0 views
Rain Barrel With Filter Kit Reviews USA: A Homeowner’s Guide
July 6, 2026 0 views