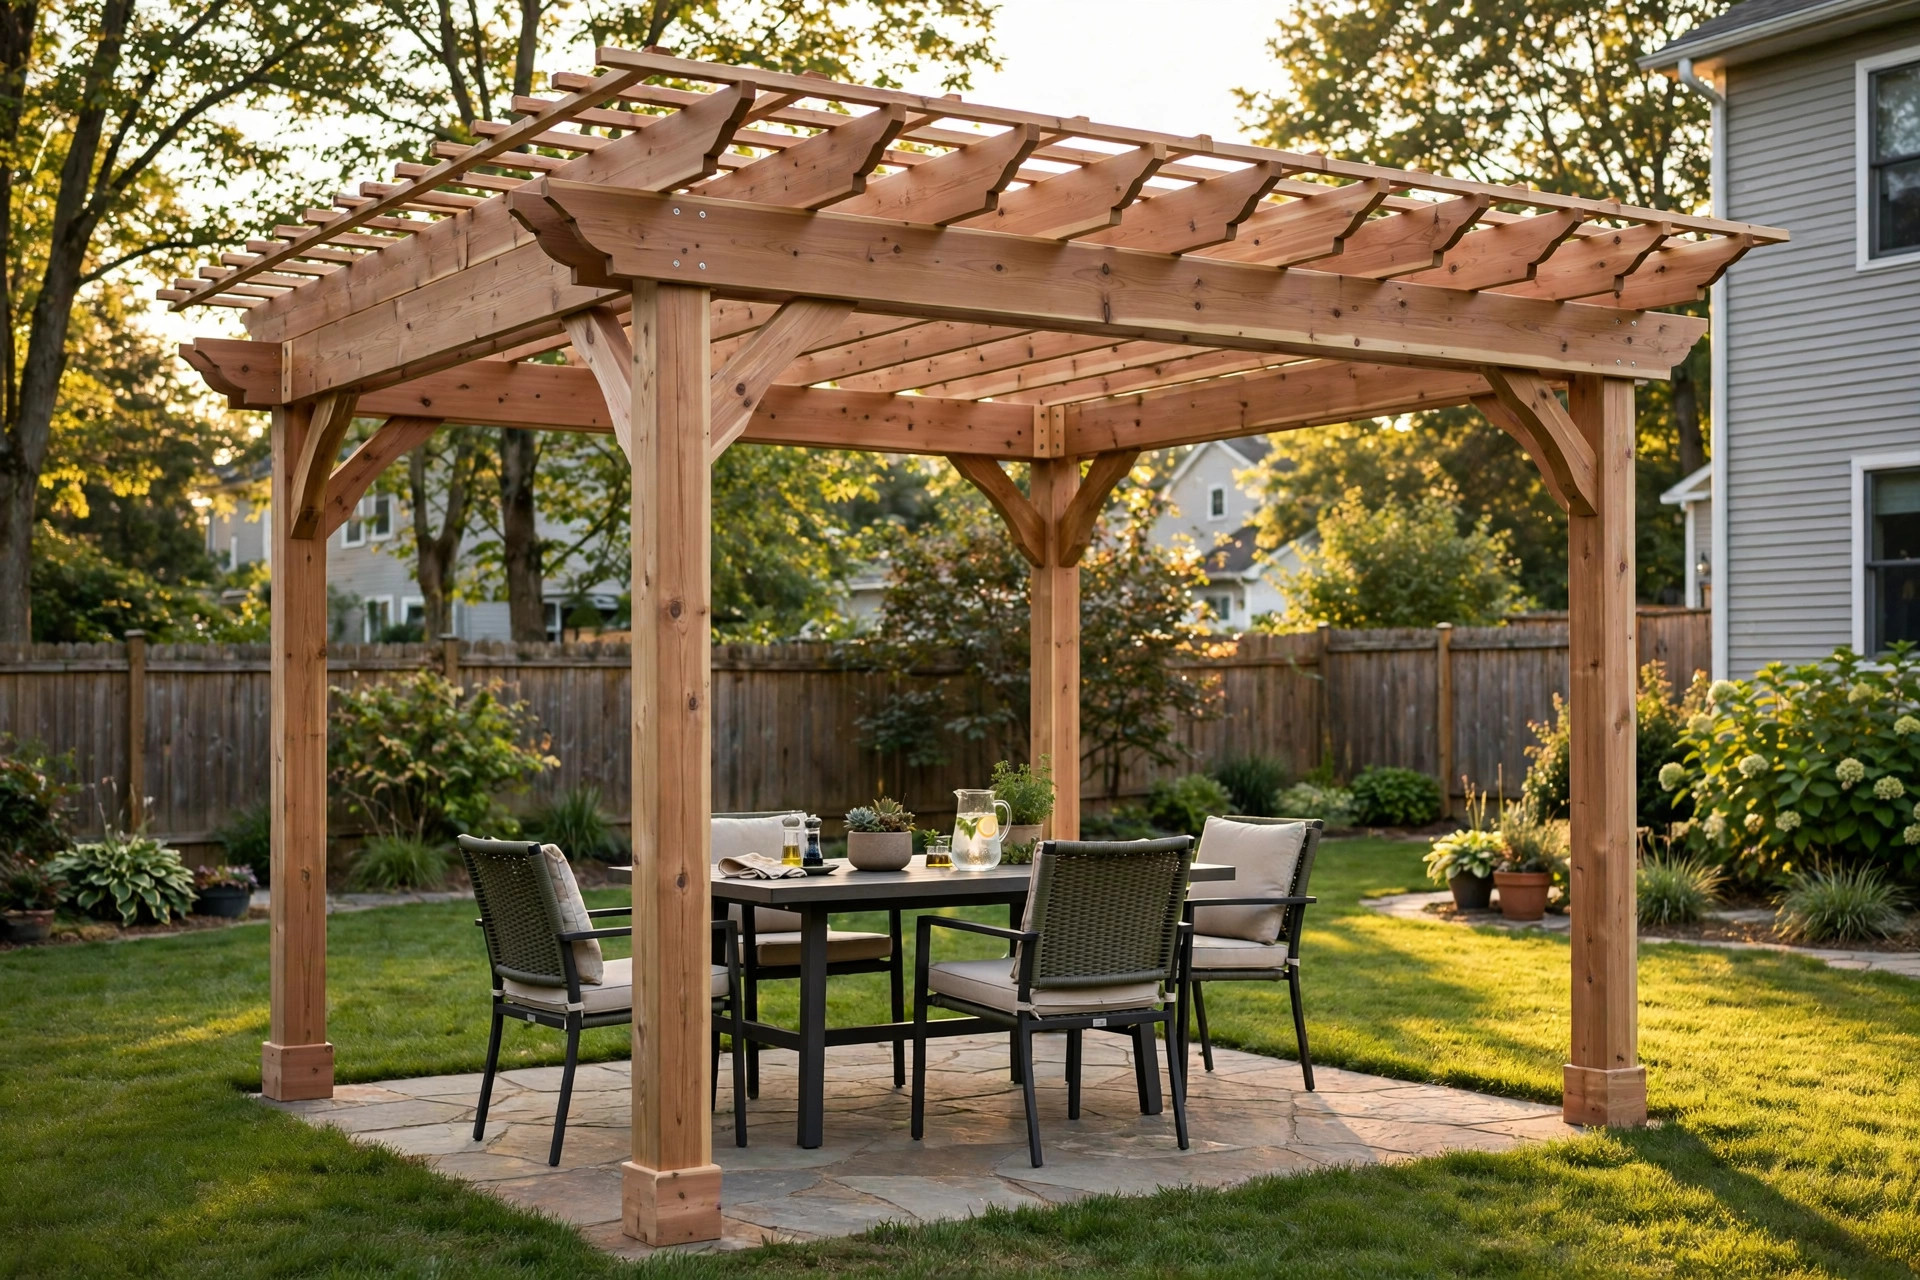

A pergola is a simple garden structure with four or more posts and an open roof of beams. It gives light shade. It marks a place to sit, eat, or rest. For years, building one meant cutting lumber and guessing at plans. Today, top rated pergola installation kits with free shipping have changed that. The parts arrive at your door in one box. Every beam is cut to size. Every bolt is in the bag. You follow the plan and put it up in a weekend. This guide explains what these kits are, how to pick a good one, what they cost, and how to keep yours standing strong for years.
Why It Matters
A backyard without shade can sit empty in summer. The sun beats down at noon. The patio grows too hot to use. A pergola fixes this problem for less money than a full patio cover. It lets air move through. It lets some light come in. It feels open, not closed.
A kit matters because it takes the hard thinking out of the job. The maker has done the math. The posts stand at the right spots. The beams cross in the right way. You do not need to be a builder. Many owners finish the work with one helper and basic tools. Home improvement stores sell these kits by the thousands each year, and large home center retailers run fall sales on them every season.
Free shipping matters because pergola kits are heavy. A full kit can weigh 200 to 500 pounds. Normal freight for such a load can cost 150 dollars or more. When the seller covers that cost, the price you see is the price you pay. That makes it easy to compare pergola kit prices side by side. You know exactly what each kit will cost you.
Top ratings matter because a pergola must stand up to wind and rain. A kit with poor reviews may have weak joints or cheap screws. A kit with strong reviews has been tested by real buyers in real yards. Reading those reviews takes ten minutes. It can save you from a structure that leans or falls in the first storm.
What to Look For: How to Choose: Top Rated Pergola Installation Kits with Free Shipping
Start with size. Measure the spot in your yard. Most kits come in sizes like 8 by 8 feet, 10 by 10, 10 by 12, and 12 by 16. Leave room to walk around your chairs and table. A kit that is too big will crowd the yard. A kit that is too small will feel useless. Mark the corners with string before you order. Walk around inside the lines. Make sure it feels right.
Next, look at the material. Cedar is the classic choice. It smells good. It resists rot. It turns a soft gray with age unless you stain it. Pressure treated pine costs less than cedar. It lasts long, but it can twist as it dries. Redwood is fine and strong, but it costs more and is harder to find. Vinyl kits need almost no care. They will not rot or peel. They look plain, and they can sag in great heat. Aluminum and steel kits are very strong. They suit modern homes. They cost more up front but last for decades.
Check the hardware. The bolts, screws, and brackets hold the whole thing up. Stainless steel or coated steel is best. Plain steel will rust and stain the wood. Good kits list the hardware in the manual. If the listing says little about hardware, ask the seller before you buy.
Look at how the kit fastens to the ground. Some kits use metal stakes that drive into the soil. These work for light kits in calm areas. Most experts say concrete footings are better. You dig a hole, pour concrete, and set the post in it. This holds firm in wind. Old house guides often show this method step by step. If your kit will stand on a deck or patio, you need post bases made for that surface. Make sure the kit you pick includes them or can take them.
Read the wind rating. Many kits are rated for winds of 90 to 130 miles per hour. If you live where storms are strong, pick a kit at the high end. A light kit with no rating is a risk. It can lift off the ground in a storm and damage your home or your neighbor’s fence.
Study the shipping terms. “Free shipping” should mean the full kit comes to your home at no extra cost. Some sellers charge extra for far states or for lift gate service. A lift gate lowers the heavy box from the truck. If your street has no loading dock, you may need it. Read the fine print so there is no surprise at delivery day.
Finally, read buyer reviews. Look for kits with many reviews, not just a few. Read the bad ones first. They tell you where the kit falls short. Common complaints are missing parts, poor plans, and weak anchors. A reviews and buying guide can help you sort the strong kits from the weak ones.
Types of Pergola Kits
Wood kits are the most common. Cedar kits lead the group. They look warm and natural. They suit most yards. Pressure treated pine kits cost less. They are a good pick if you plan to paint or stain the wood a bold color. Some wood kits come pre stained. This saves you a day of work. Check that the stain is even and the wood is smooth.
Vinyl kits suit owners who want no upkeep. The posts and beams are hollow vinyl over a wood or metal core. You wash them with soap and water once a year. That is all. They come in white and tan. They do not take paint well. In very hot sun, cheap vinyl can sag between posts. Pick a kit with a strong core if your summers run hot. Home advice sites often list vinyl kits as a good pick for owners who want low upkeep.
Metal kits use aluminum or steel. Aluminum kits are light and will not rust. Steel kits are heavier and stronger. They can hold a solid roof or a shade sail. Both types suit modern homes with clean lines.
Open roof kits are the classic style. The top has rafters with gaps between them. They give broken shade. Plants can climb up the posts and over the top. Solid roof kits have panels on top. They keep rain off your chairs. They cost more and catch more wind, so they need stronger anchors. Louvered kits have slats you can tilt open or closed. They cost the most. They give you full control of sun and rain.
Attached kits fix to the side of the house. They use one wall of the home as support. They suit small yards and patios. Freestanding kits stand alone anywhere in the yard. They need four or more posts and good footings. Most top rated kits are freestanding because they fit more yards.
Cost and Price
Prices move with size, material, and style. A small pressure treated pine kit, 8 by 8 feet, can cost 500 to 900 dollars. A cedar kit of the same size runs 900 to 1,600 dollars. A 10 by 12 cedar kit often costs 1,500 to 2,500 dollars. Vinyl kits run 1,000 to 3,000 dollars. Aluminum kits run 800 to 2,500 dollars. Steel kits with a solid roof can reach 4,000 dollars. Louvered roof kits start near 3,000 dollars and climb past 6,000.
Free shipping is often built into the price. The seller pays the freight and adds it to the kit cost. This is still a good deal for you. You avoid a large freight bill at the door. Budget-friendly kits with free shipping often cost less in total than a cheaper kit with paid freight.
Plan for extra costs. Concrete for footings costs 30 to 80 dollars. Stain or sealer for a wood kit costs 40 to 100 dollars. Tools you may need include a drill, a level, a tape measure, and a ladder. Most owners already have these.
How to Install
Check your local rules first. Some towns ask for a permit for any structure over a set size. Some limit how tall it can be or how close to the fence it can stand. A quick call to the town office clears this up. It takes ten minutes and avoids a fine.
Call 811 before you dig. This is the national call before you dig number. The utility firms mark buried lines for free. You must do this at least two days before you dig. Hitting a gas or power line is a grave danger. Never skip this step.
Open the box and count every part. Lay the beams out on the grass. Read the whole manual once before you start. This takes twenty minutes. It saves hours of backtracking later. If parts are missing, call the seller at once.
Mark the post spots. Measure twice. The posts must form a true rectangle. Use the 3-4-5 rule to check square corners. Dig the holes 24 to 36 inches deep, or below the frost line in cold states. Frost can heave shallow posts out of the ground in winter.
Set the posts in concrete. Brace each post plumb while the concrete sets. Let it cure a full day. Rushing this step is the most common cause of a leaning pergola.
Attach the beams and rafters per the plan. Work with a helper. The beams are long and heavy. One person cannot hold them level and drive screws at the same time. Use a level often. Family handyman guides say small errors at the base grow large at the top.
Most owners finish in one to two days. Wood kits take longer if you stain as you go. Metal kits go up faster because the parts are light and the joints are simple. Take your time with the last bolts. Snug every one. A tight kit stays quiet in wind. A loose kit creaks and works itself apart.
Care and Upkeep
Wood kits need the most care. Seal or stain the wood once a year, or once every two years in mild climates. This keeps water out and stops the wood from graying. Check the screws each spring. Wood shrinks and swells with the seasons. Screws work loose. Tighten them with a drill.
Wash vinyl kits with mild soap and water. A garden hose does the job. Do not use a pressure washer at close range. It can crack the vinyl skin. Check the core posts for cracks after hard winters.
Metal kits need little care. Wash off dirt once a year. Touch up paint chips with matching paint. Chips let rust start on steel kits. Check the anchor bolts each year. Tighten any that have worked loose.
Keep plants in check. Vines look fine on a pergola, but heavy vines add weight. They hold water against the wood. Trim them back each fall. Keep the roof clear of leaves. Wet leaves stain wood and vinyl both.
Safety
Pergola parts are heavy. A single beam can weigh 40 pounds or more. Lift with your legs, not your back. Never try to raise a beam alone. A falling beam can break a bone or worse.
Use a sound ladder on firm ground. Do not stand on the top step. Have your helper hold the ladder while you work at height. Keep children and pets away from the work area. Loose parts on the ground are a trip hazard.
Anchor the kit well. A pergola is a large sail in a storm. Poor anchors are the top cause of failure. Follow the wind rating in the manual. If your area sees strong storms, add extra anchors. Building product makers and exterior home firms both stress proper fastening for any outdoor structure.
Keep fire away from wood pergolas. Do not hang a grill or a fire pit under the roof. Sparks can catch dry wood. Keep tiki torches and candles at least three feet from any post. Check that outdoor lights are rated for outdoor use.
Frequently Asked Questions
How long does it take to install a pergola kit? Most owners finish in one to two days with one helper. Metal kits go faster. Wood kits take longer, chiefly if you stain the parts first. Reading the manual fully before you start saves the most time.
Do I need a permit for a pergola kit? It depends on your town. Many towns ask for a permit if the structure is large or tall. Some ask for none at all. Call your local building office before you order. The call is free and takes a few minutes.
Can I put a pergola kit on my deck? Yes, if the deck is strong enough. The kit adds weight and wind load. Use post bases made for decks, and bolt them through the deck boards into the frame below. If your deck is old or weak, set the posts in the ground beside the deck instead.
What size pergola kit should I buy? Measure your furniture first. A dining set for six needs at least a 10 by 12 foot cover. Add two feet on each side for walkways. When in doubt, go one size up. A pergola that is too small is a common regret.
Do free shipping kits include all the hardware? Most top rated kits include every bolt, screw, and bracket. The manual lists each part. Count them on arrival. A few kits sell anchors or post bases as add ons. Check the listing so you know what is in the box.
Will my pergola stand up in a storm? A well anchored kit with a good wind rating will stand up in normal storms. Kits rated for 100 miles per hour or more handle most weather. No kit is safe in a tornado or hurricane. In such cases, take down shade sails and loose covers, and check the anchors after the storm.
A Short Final Word
A pergola kit is one of the best value projects in the yard. The parts are cut. The plan is clear. The work is honest. With top rated pergola installation kits with free shipping, the hardest part, getting the heavy load to your door, is already done for you. Pick the right size and material. Read the reviews. Anchor it well. Then enjoy the shade for years to come. Home and garden guides are full of ideas for furnishing and lighting your new space once the last bolt is tight.
References
Bob Vila. (n.d.). Home improvement advice. https://www.bobvila.com CertainTeed. (n.d.). Building materials and exterior products. https://www.certainteed.com Family Handyman. (n.d.). DIY home repair and maintenance. https://www.familyhandyman.com James Hardie. (n.d.). Fiber cement siding and exterior products. https://www.jameshardie.com Lowe’s. (n.d.). Home improvement products. https://www.lowes.com The Home Depot. (n.d.). Home improvement products. https://www.homedepot.com The Spruce. (n.d.). Home and garden advice. https://www.thespruce.com This Old House. (n.d.). Home renovation guidance. https://www.thisoldhouse.com
Was this guide helpful?

About Emily Rodriguez
The My Garden US editorial team writes practical, in-depth home and garden guides for American homeowners — tested advice, no fluff.
You May Also Like
Budget Friendly Fiber Cement Siding Panels Buying Guide
August 22, 2026 0 views
Energy Efficient Exterior Stair Railings With Free Shipping: A Complete Guide
March 4, 2026 0 views
Vinyl Siding Installation Cost Guide USA
January 28, 2026 0 views