
Fruit trees need steady water to grow strong and bear well. A hose moved by hand is slow work. A sprinkler wastes water on leaves and grass. This drip irrigation for fruit trees guide shows a better path. Drip irrigation puts water drop by drop at the roots. It saves water. It saves time. It keeps trees healthy. Read on to learn how to plan, buy, install, and care for a drip system in your home orchard.
Why Drip Irrigation Matters for Fruit Trees
Fruit trees drink deeply. Their roots spread wide and reach down. When water lands on the surface far from the trunk, much of it evaporates. Wind carries sprinkler spray away. Weeds steal the rest. Drip irrigation solves these problems. Water flows through small tubes. It drips out slowly near the root zone. The soil soaks up each drop. Almost no water is lost.
Deep, slow watering helps trees in two ways. First, roots grow downward toward the moisture. Deep roots make a tree strong against heat and wind. Second, the leaf canopy stays dry. Wet leaves invite fungus and rot. Dry leaves stay clean. Apples, pears, peaches, plums, and citrus all do better with dry leaves.
Drip systems also save labor. Once the lines are in place, a timer does the work. You turn the water on. You set the schedule. The system waters while you rest. Many home orchards run on one hour of drip per week in cool months and two or three hours in summer heat.
There is one more gain. Fertilizer can ride along with the water. Liquid feed added through a drip system reaches roots fast. It does not wash over the lawn. It goes where it counts.
How to Choose the Right Drip System: Drip Irrigation for Fruit Trees Guide
A good system starts with good planning. Two facts shape every choice: the trees you grow and the water you have.
Know Your Trees
Young trees need less water than old ones. A new sapling may need one gallon per watering. A mature apple tree may need fifteen gallons. Space between trees matters too. In a tight row, one drip line can serve several trees. In a wide orchard, each tree may need its own loop of tubing.
Think about soil. Sandy soil drains fast. Water sinks straight down. You will need more emitters spaced close together. Clay soil holds water. Water spreads sideways. Fewer emitters will do. Dig a small test hole after watering once by hand. See how wide the wet spot grows. That wet width tells you how far apart to place your drip points.
Check Your Water Source and Pressure
Most home systems run from a garden hose bib. Check the pressure first. A simple gauge screws onto the faucet. Drip systems want low pressure, about twenty to thirty pounds per square inch. House pressure often runs higher. A pressure regulator brings it down. Without one, emitters pop off and lines burst.
Flow matters too. A drip system with fifty emitters needs more flow than a system with ten. Test your faucet with a bucket and a watch. Time how long it takes to fill five gallons. That rate tells you how many emitters your system can feed at once. Large orchards may need two zones. Each zone runs on its own schedule.
Types of Drip Irrigation Options
Three main designs serve fruit trees. Each has a place.
Drip Tubing With Emitters
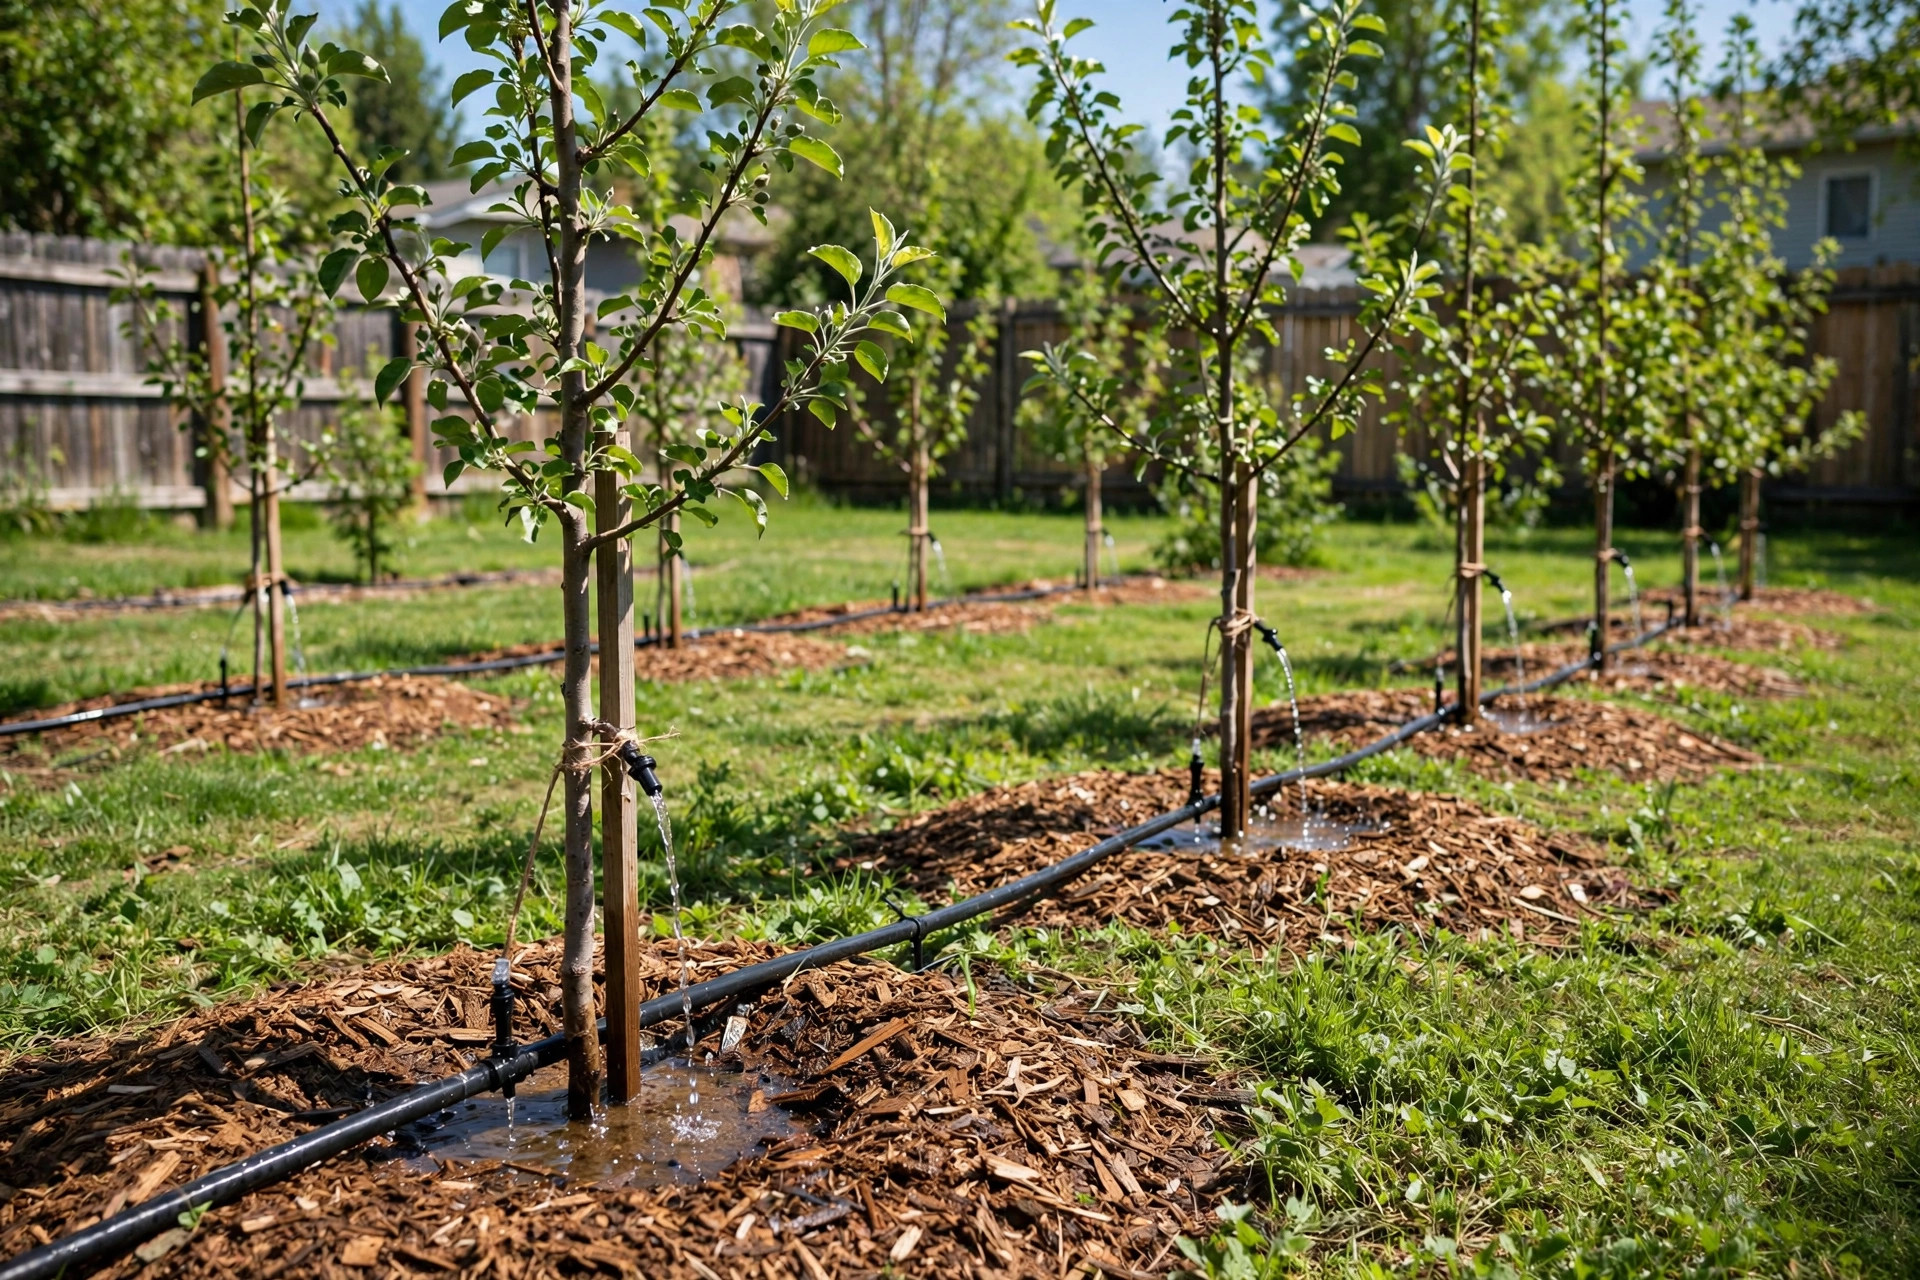
This is the most common choice. Black poly tubing runs along the tree row. Small emitters plug into the tube at each tree. Each emitter drips at a fixed rate, such as one or two gallons per hour. You can add more emitters as a tree grows. This design suits straight rows and orchards of any size. Most home garden supply stores carry starter kits with tubing, emitters, and fittings.
Soaker Hose
A soaker hose sweats water along its full length. Lay it in a ring around the trunk or snake it down a row. It is cheap and simple. It works well for a small group of young trees. Over time, minerals clog the pores. Soaker hoses also water weeds between trees. For help getting the most from one, read this guide on how to use soaker hose effectively.
Micro-Sprinklers and Bubblers
Micro-sprinklers spray a small circle of water. Bubblers flood a small basin around the tree. Both put out more water per hour than drip emitters. They suit sandy soil where drip water sinks too fast. They also suit large mature trees with wide root zones. The trade is higher water use and wet trunk bark, which you must watch.
Planning Your Layout
Draw your orchard on paper first. Mark each tree. Note the distance between trees. Note the distance from the faucet. This sketch becomes your shopping list.
Run a main line from the water source to the orchard. Half-inch poly tubing serves most home orchards. From the main line, run branch lines down each row. At each tree, form a loop of tubing around the trunk. Place the loop near the drip line of the canopy, where rain would fall off the leaves. Roots drink most in that ring.
Place emitters on the loop. Start with two emitters per young tree and four per mature tree. Point them outward from the trunk. Keep emitters at least six inches from the bark. Wet bark invites disease.
Add these parts at the head of the system, right after the faucet: a backflow preventer, a filter, a pressure regulator, and a timer. The backflow preventer keeps garden water out of your house pipes. The filter stops sand and grit from clogging emitters. The regulator sets safe pressure. The timer sets the schedule. You can find all of these at Lowe’s or any full-line garden center.
If you water from a rain barrel, plan for low pressure. Gravity feed gives only a few pounds of pressure. Use low-flow emitters made for gravity systems, and keep the barrel raised on a stand. Our review of the best rain barrel for garden watering covers barrels with the right fittings for drip lines.
Cost and Price Guide
A small system for five to ten trees costs between fifty and one hundred fifty dollars. A starter kit with one hundred feet of tubing and twenty emitters covers this size. Add a timer for twenty to forty dollars. Add a filter and regulator for another twenty.
A mid-size orchard of twenty to thirty trees costs one hundred fifty to four hundred dollars. You will buy tubing in bulk rolls. You will buy emitters in bags of fifty or one hundred. Two zones may need two timers or one two-zone timer.
A large home orchard of fifty trees or more can run four hundred to one thousand dollars. Trenching tools, extra valves, and a larger filter add cost. Even so, the water savings pay back fast. Many growers cut outdoor water use by one third after switching from sprinklers to drip.
Buy quality on the parts that fail first. Cheap emitters clog. Cheap timers lose their program in a power cut. Brands with long track records, reviewed by groups like Consumer Reports, tend to last more seasons.
Step-by-Step Installation
Set aside a weekend. The work is simple but takes time.
1. Lay out the plan. Walk the orchard with your sketch. Mark emitter spots with small flags. 2. Connect the head assembly. Screw the backflow preventer, filter, regulator, and timer onto the faucet in that order. 3. Run the main line. Roll out half-inch tubing from the faucet to the orchard. Stake it down every few feet. 4. Run branch lines. Cut tubing for each row with a clean cut. Connect with barbed tees. Flush each line before adding emitters so dirt washes out the open end. 5. Make tree loops. At each tree, cut a length of quarter-inch tubing. Form a ring around the trunk at the canopy edge. Connect it to the branch line with a barbed connector. 6. Punch in emitters. Use a punch tool to make clean holes. Push emitters in firmly. Keep them upright. 7. Test the system. Turn on the water. Walk every line. Look for leaks, popped emitters, and dry spots. Fix what you find. 8. Cover the tubing. Mulch over the lines with wood chips. Mulch hides the tubes, blocks sun damage, and holds soil moisture.
For raised beds near the orchard, a separate small system works best. See our walkthrough on how to install raised bed irrigation for that project.
Care and Upkeep
A drip system needs little care, but it needs regular checks.
Flush the lines twice a year. Open the end caps. Run water for two minutes. Dirt and algae wash out. Clean the filter monthly in summer. A clogged filter starves the whole system.
Walk the lines each month. Look for chewed tubing. Rabbits and mice gnaw poly tube. Look for clogged emitters. Pull one and check the flow. Soak clogged emitters in vinegar to dissolve mineral crust.
In cold climates, winterize the system. Drain the lines before the first hard freeze. Remove the timer and store it indoors. Water left in tubes can freeze and split them. Guides from The Spruce and Family Handyman give good winterizing checklists for home irrigation.
Adjust the schedule with the seasons. Spring rain may let you skip weeks. Summer heat may call for longer runs. A rain sensor on the timer pauses watering after storms. Watch the trees. Wilting leaves at midday mean more water. Yellow leaves and soggy soil mean less.
Pruning tools stay busy in an orchard too. Clean cuts heal faster, so keep shears sharp. Fiskars and Corona Tools both make sturdy pruners that hold an edge through a full season of orchard work.
Safety Notes
Water and electricity do not mix. Keep timers and valve wires away from standing water. Use outdoor-rated extension cords only.
Backflow protection is not optional. Without it, fertilizer or dirty water can siphon back into your home pipes. Most local codes require a backflow device on any irrigation hookup. Check your city rules before you dig.
Dig with care. Call your local utility marking service before trenching. Buried gas, electric, and cable lines hide just inches down. The Bob Vila home site has a plain guide to safe digging around utilities.
Some liquid fertilizers burn leaves and skin. Wear gloves when handling them. Store them away from children and pets. Follow label rates exactly. More is not better.
Frequently Asked Questions
How often should I water fruit trees with drip irrigation?
Most established trees do well with one deep watering per week in mild weather. In hot summer, water two or three times per week. Young trees in their first year may need water every two or three days. Always check soil moisture six inches down before adding more water.
How many emitters does each fruit tree need?
Start with two emitters for a new tree. Add emitters as the canopy grows. A mature tree with a ten-foot canopy may need four to six emitters around its drip line. The goal is a wide wet zone that matches the root spread.
Can I use drip irrigation for citrus trees?
Yes. Citrus trees love drip irrigation. Their roots sit near the surface, so shallow frequent watering suits them. Use more emitters with lower flow rates, and keep water off the trunk to prevent rot.
What is the best drip irrigation kit for a small orchard?
A kit with at least one hundred feet of half-inch tubing, twenty to fifty adjustable emitters, a filter, a pressure regulator, and a basic timer covers most small orchards. Burpee and other garden suppliers sell orchard starter kits with clear part lists.
Do drip lines work on a slope?
Yes, with care. Run lines across the slope, not up and down it. Use pressure-compensating emitters so each one drips the same rate despite the height change. On steep ground, split the slope into short zones.
How long do drip irrigation parts last?
Poly tubing lasts ten to fifteen years above ground when mulched over. Emitters last five to ten years before minerals clog them. Timers last three to seven years. Replace worn parts each spring during your first system check.
A Final Word
Drip irrigation turns orchard watering from a chore into a quiet routine. Plan on paper. Buy the right parts. Lay the lines with care. Then let the timer do the work while your trees drink deep. In one season you will see the difference: greener leaves, stronger growth, and heavier harvests. Your fruit trees will thank you with every basket you carry in.
References
Bob Vila. (n.d.). Home improvement advice. https://www.bobvila.com Burpee. (n.d.). Seeds, plants, and gardening supplies. https://www.burpee.com Consumer Reports. (n.d.). Product reviews and ratings. https://www.consumerreports.org Corona Tools. (n.d.). Garden and landscape tools. https://www.corona-tools.com Family Handyman. (n.d.). DIY home repair and maintenance. https://www.familyhandyman.com Fiskars. (n.d.). Garden and cutting tools. https://www.fiskars.com Gardener’s Supply Company. (n.d.). Gardening tools and supplies. https://www.gardeners.com Lowe’s. (n.d.). Home improvement products. https://www.lowes.com The Home Depot. (n.d.). Home improvement products. https://www.homedepot.com The Spruce. (n.d.). Home and garden advice. https://www.thespruce.com
Was this guide helpful?

About Lisa Anderson
The My Garden US editorial team writes practical, in-depth home and garden guides for American homeowners — tested advice, no fluff.
You May Also Like
Vermicomposting Bin for Beginners Guide: How to Start a Worm Bin at Home
January 19, 2026 0 views
Best Garden Hose Splitter Two Way: A Complete Guide
May 27, 2026 0 views
How to Harden Off Seedlings Before Planting: A Simple Day by Day Plan
June 28, 2026 0 views