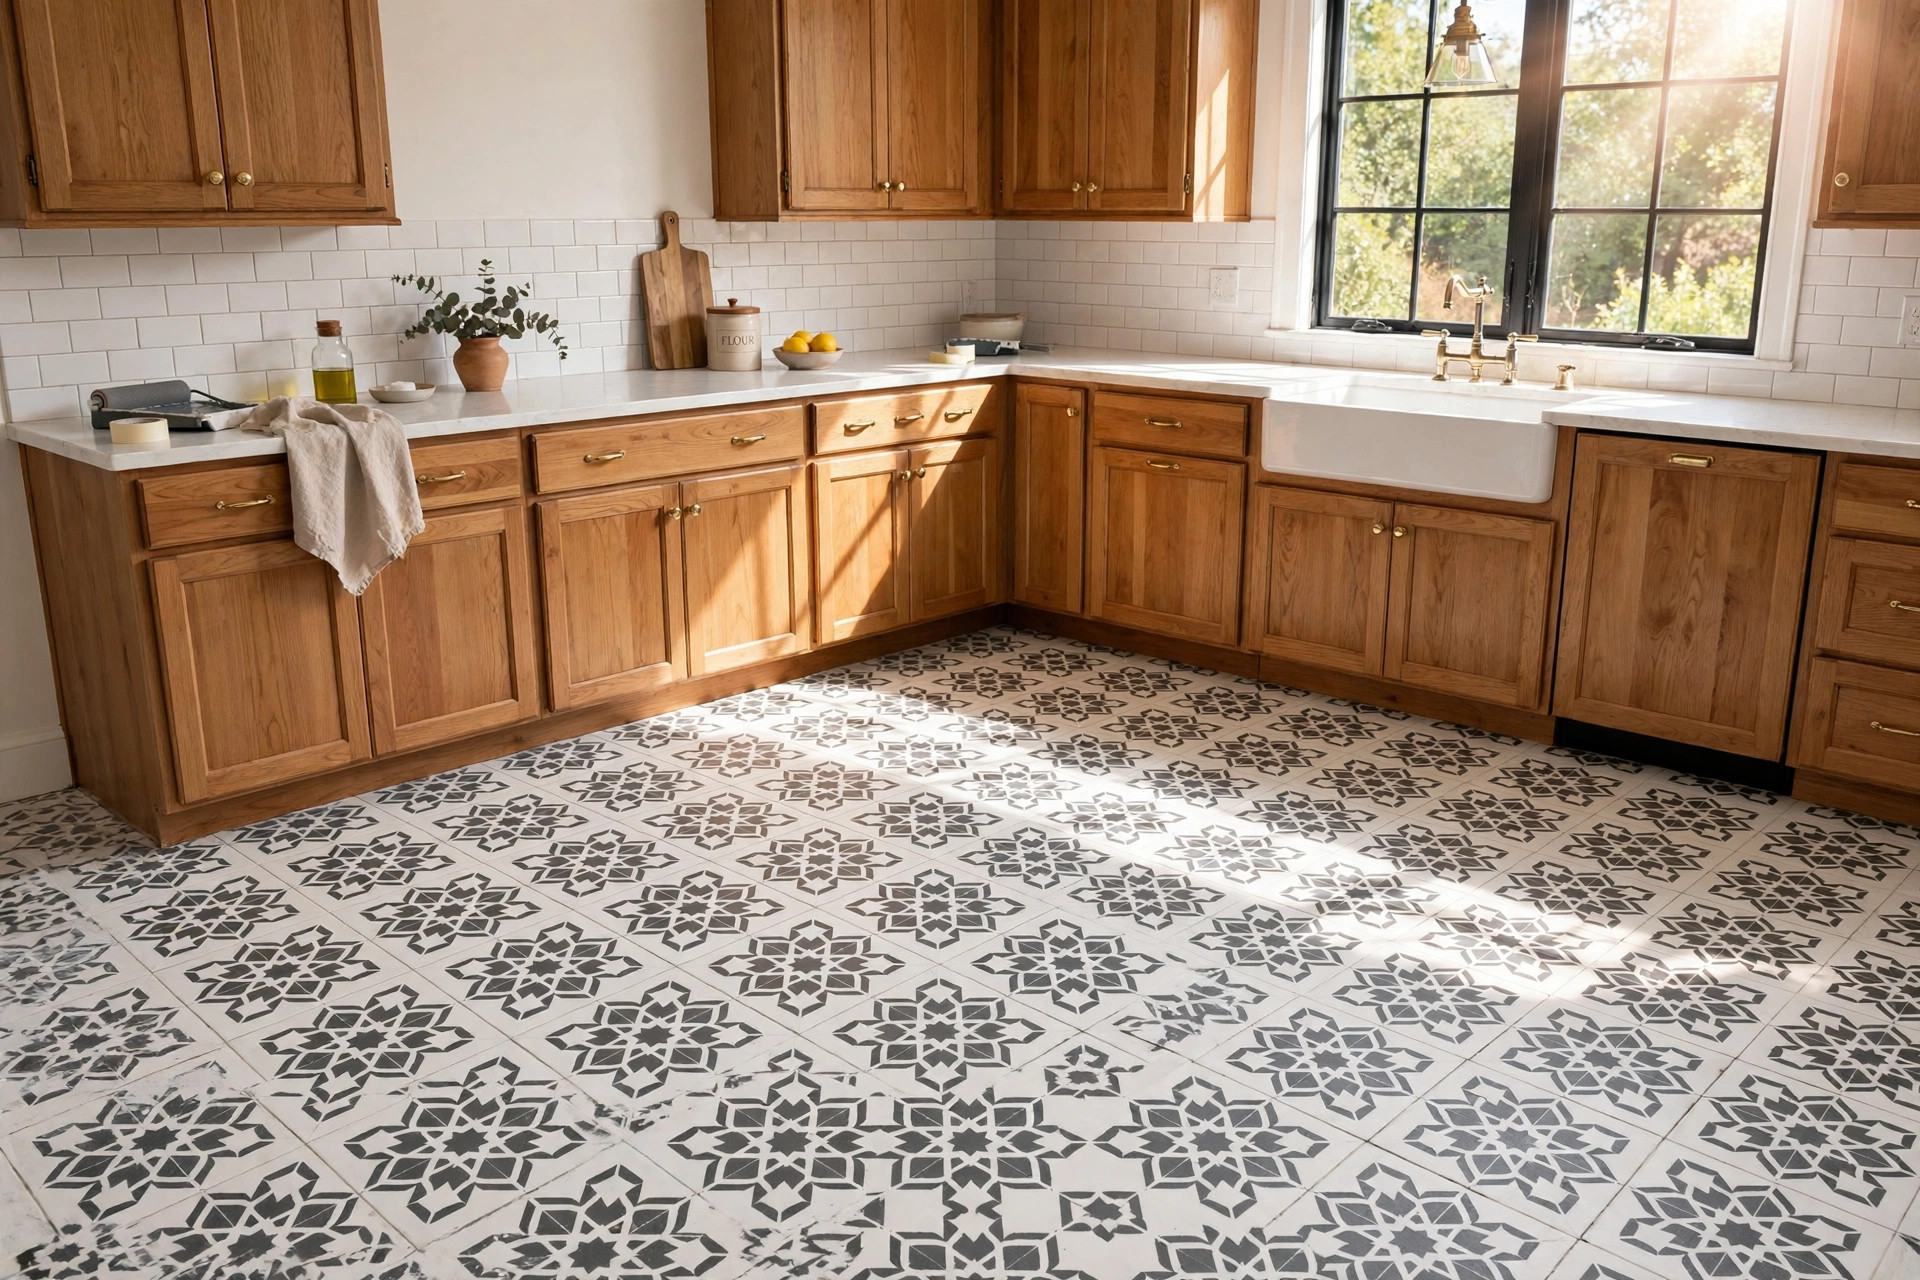

A search for stenciled tile floor paint kit reviews usually begins with an old floor and a tight budget. The tile may be twenty years old. The grout may be dark with age. A full tear-out and retiling would cost thousands of dollars and take weeks of mess. A paint kit promises a different path: a new pattern, new color, and a floor that looks close to real tile, all for a fraction of the cost. This guide reads through what those reviews tend to say, what the kits actually contain, and how to pick one that will hold up in a real home.
Why Stenciled Tile Floors Have Become So Popular
The appeal is simple. Replacing a tile floor is one of the most expensive small jobs in a house. Between demolition, new tile, mortar, grout, and labor, a modest bathroom can cost two or three thousand dollars. A stenciled tile floor paint kit, by contrast, often costs less than one hundred dollars and needs only a weekend of work. Reviews return to this point again and again: the value is hard to beat.
The look is the second draw. Modern stencils copy the look of old cement tiles, Portuguese azulejos, and Moroccan patterns. With a light base coat and a dark stencil color, a plain ceramic floor can take on a patterned design that reads well from across the room. Renters like the method because it costs little. Homeowners selling a house like it because an outdated pink or green bathroom floor can be turned into something neutral and current in two days.
There is also a craft pleasure to the work. Stenciling a floor is slow, steady, repetitive work. You roll on the base coat, let it dry, then move across the floor tile by tile with the stencil. The pattern grows row by row.
What Comes in a Typical Kit: Stenciled Tile Floor Paint Kit Reviews
A stenciled tile floor paint kit is sold as a bundle, and reviews agree that the bundle is what makes the project easy. Most kits include the same basic parts.
First comes the stencil itself. Good stencils are cut from thick, reusable mylar. They are sized to fit standard floor tiles, often twelve inches square, and they include small registration marks so each repeat lines up with the last. Cheap stencils cut from thin plastic are a common complaint in reviews: they curl, they tear, and paint bleeds under the edges.
Second comes the paint. Most kits include a base coat in white or off-white and one or two accent colors for the stencil. The better kits use paints made to bond to tile, often chalk-style paint or acrylic formulas with strong adhesion. Some kits add a clear topcoat or sealer meant to protect the design from foot traffic and water.
Third come the tools. A dense foam roller is standard, along with a small brush for touch-ups. Most kits include a printed guide with drying times and the order of steps. Some add painter’s tape and a practice board, which reviewers praise, because practicing on cardboard before touching the floor saves mistakes.
What kits usually do not include is the degreaser or the primer some floors need. Ceramic tile with a glossy glaze often needs a light sanding and a bonding primer first. Buyers who skip this step and then blame the kit are a familiar theme in these reviews. The kit can only be as good as the surface under it.
How to Choose the Right Kit
Reviews point to three decisions that matter more than brand loyalty. Get these right and the floor lasts. Get them wrong and the pattern lifts within a year.
Match the Kit to Your Floor Surface
Not every kit suits every floor. Ceramic tile, porcelain tile, and concrete each take paint differently. Kits made for porous surfaces may peel on slick glazed ceramic unless the tile is sanded first. Before buying, read the kit’s list of approved surfaces. If your floor is vinyl or linoleum, look for a kit that names those materials directly. A good practice guide from This Old House walks through how to test paint adhesion on a small hidden spot before committing to the whole floor.
Look at Paint Quality and Coverage
Paint is where cheap kits fail. Reviews praise kits whose paint covers in one or two coats and whose topcoat dries hard rather than sticky. Look for stated coverage in square feet and compare it to your room size. A bathroom of forty square feet needs far less than a kitchen of two hundred. Buyers of large rooms should check whether the maker sells extra paint separately. The Behr and Sherwin-Williams sites both carry floor-rated paints that many reviewers pair with stencil-only sets when a kit’s included paint feels thin.
Pick a Stencil Design You Can Live With
Bold patterns look exciting in photos and tiring in person. Reviews often advise starting with a simple geometric or classic tile motif rather than an elaborate medallion. Simple patterns also forgive small alignment errors. Dark stencils on light bases hide dirt better in entryways. Many makers sell single stencils apart from kits, so you can test a pattern on a board and live with it for a week before painting the floor.
Types and Options on the Market
The market breaks into a few clear groups, and reviews treat each group differently.
All-in-one kits are the most popular. They include the stencil, paints, topcoat, and tools in one box. They suit beginners and small rooms. Reviews like the simplicity but warn that the included paint colors cannot be changed.
Stencil-only sets come next. These are for buyers who want to choose their own paint. You buy the mylar stencil and pair it with a floor-rated paint from a brand you trust. Experienced reviewers prefer this route for large rooms, because they can match paint exactly and buy extra gallons. If you plan other painted projects, the painting vinyl shutters tips and tricks guide covers surface prep that applies to tile floors as well.
Chalk-paint-based kits form a third group. Chalk paint bonds well to tile with little sanding, which is why so many reviews mention it for glazed ceramic. The trade-off is that chalk paint is soft and needs a strong sealer on top. Skipping the sealer is the most common reason these floors wear fast.
Epoxy-based systems are the heavy-duty option. They cost more and demand careful mixing and ventilation, but they produce the hardest, most water-resistant finish. Reviews from laundry rooms and mudrooms favor epoxy where the floor sees real abuse.
Finally, there are peel-and-stick vinyl stencils and printed floor decals. These are not paint kits at all, but reviews often compare them. They go down fast and remove cleanly, which suits renters. They do not last as long under heavy traffic.
What Reviews Say About Cost and Value
Stenciled tile floor paint kit reviews almost always include the money math, and the numbers are kind to the method. A basic all-in-one kit runs from forty to ninety dollars and typically covers sixty to one hundred square feet. A large kitchen may need two kits. Add a bonding primer and extra sealer, and the total often lands between one hundred and two hundred dollars.
Compare that with retiling. Professional tile work in the United States often costs ten to twenty dollars per square foot installed. A two-hundred-square-foot kitchen runs two to four thousand dollars. Even do-it-yourself retiling, with tile, mortar, grout, and tool rental, rarely lands under one thousand dollars. The stencil route costs roughly one tenth as much. Reviewers also count the hidden savings: no dumpster, no demolition dust, no days without a working kitchen.
Where reviews urge caution is on the cheapest kits. A thirty-dollar kit with thin paint that needs four coats and peels in six months is not a bargain. Spending ten or twenty dollars more for thicker paint and a heavier stencil pays back in durability. Shoppers comparing prices can browse the paint aisles at Home Depot and Lowe’s to see what quality floor paint costs on its own, which puts kit pricing in context.
Care and Upkeep of a Stenciled Floor
A painted floor is not a fired tile floor, and reviews are frank about that. It needs gentler care. The care is simple.
Let the floor cure fully before heavy use. Most kits ask for three to seven days of cure time after the final sealer coat. Rushing furniture back onto a soft finish causes dents and peeling that no warranty covers. Plan the project for a week when the room can stay quiet.
Clean with mild soap and water. Harsh cleaners, bleach, and ammonia can dull the sealer and lift the pattern. A damp mop and a pH-neutral floor cleaner are enough. Sweep or vacuum often, because sand under shoes grinds the finish down. A walk-off mat at the door cuts wear in half.
Keep leftover paint and a small brush on hand. High-traffic lanes will show wear first, usually after a year or two. Touching up a worn spot takes minutes and keeps the whole floor looking fresh. Reviewers who sealed their floors with two coats of topcoat report much longer life than those who stopped at one. For more ideas on keeping painted surfaces sound around the house, the best paint for brick fireplace makeover usa article covers sealer habits that transfer well to floors.
Recoating is normal. Even the best stenciled floor is a finish with a lifespan. Most reviews describe three to five years of good looks in a normal home before a refresh is welcome. That is shorter than real tile, but at one tenth the cost, most reviewers call it a fair trade.
Safety Notes Worth Reading
Stenciled tile floor paint kit reviews touch on safety less often than they should, so these points deserve their own space.
Ventilation comes first. Paint fumes build up fast in a small bathroom. Open windows, run a fan, and keep the door open while you work and while coats dry. Epoxy systems in particular need strong airflow and a proper respirator, not just a dust mask.
Old paint is the second concern. Homes built before 1978 may have lead paint on floors or trim. Sanding lead paint spreads lead dust, which is a serious health hazard, especially for children. If your home is old, test for lead before sanding anything. The federal guidance at CPSC explains lead paint hazards in plain terms, and local health departments can point to testing services.
Slip resistance is the third point. A glossy sealer on a bathroom floor can be slick when wet. Look for a topcoat rated for floors, and consider adding a slip-resistant additive to the final coat in bathrooms and entries. Reviews rarely mention this until someone slips, so plan for it in advance.
Skin and eye protection round out the list. Gloves keep paint off skin during hours of rolling, and safety glasses matter when sanding glaze.
Frequently Asked Questions
How long does a stenciled tile floor last?
In a normal home, reviewers report three to five years of good looks with proper sealing and gentle cleaning. Bathrooms and laundry rooms, where water stands on the floor, tend toward the shorter end. Entryways with grit and heavy shoes wear faster unless mats are used.
Can I stencil over grout lines?
Yes, and most projects do. The base coat covers tile and grout alike, and the stencil pattern bridges the grout lines. Deep or cracked grout should be repaired first, because the paint will follow every dip and flaw. Some reviewers fill very wide grout lines with a skim coat before painting for a smoother look.
Do I need to sand glossy tile before painting?
For glazed ceramic and porcelain, yes in most cases. A light sanding with fine sandpaper dulls the glaze so paint can grip. A bonding primer after sanding gives the best results. Reviews of failures trace back to skipped sanding more than to any other single cause. Always test a small area first.
Will the paint peel in a wet bathroom?
It can if the floor stays wet and the sealer is thin. Reviews recommend two or three coats of a water-resistant topcoat in bathrooms, plus a bath mat outside the shower. Standing water should be wiped up rather than left to sit. Epoxy-based systems handle moisture best.
Can renters use these kits?
Many renters do, but the paint bonds to the tile and is not easy to remove completely. A landlord’s written permission is wise before starting. Peel-and-stick vinyl patterns are the safer rental choice since they come up cleanly. If you own the home, paint is the more durable route.
What if I make a mistake with the stencil?
Wet paint wipes off with a damp cloth, so small slips are easy to fix while working. A misaligned repeat can be covered with the base coat once dry, then restenciled. Reviewers advise keeping the base color on hand for exactly this reason. Practicing on cardboard first prevents most errors.
A Short Final Word
Stenciled tile floor paint kit reviews tell a consistent story. The kits work. They turn dated floors into patterned ones for very little money. They ask for careful prep, honest cure time, and gentle cleaning in return. Choose a kit with a thick reusable stencil, paint made for floors, and enough sealer for two full coats. Test first, ventilate well, and give the finish a full week to harden. Do those things and the pattern you roll on in a weekend can please you for years. For color ideas and project guides, HGTV, Bob Vila, The Spruce, and Benjamin Moore all offer useful starting points. If fences and outdoor trim are next on your list, the white picket fence paint reviews usa guide continues the paint theme outdoors.
References
Behr. (n.d.). Paints, primers, and stains. https://www.behr.com Benjamin Moore. (n.d.). Paints and stains. https://www.benjaminmoore.com Bob Vila. (n.d.). Home improvement advice. https://www.bobvila.com HGTV. (n.d.). Home and garden ideas. https://www.hgtv.com Lowe’s. (n.d.). Home improvement products. https://www.lowes.com Sherwin-Williams. (n.d.). Paints and coatings. https://www.sherwin-williams.com The Home Depot. (n.d.). Home improvement products. https://www.homedepot.com The Spruce. (n.d.). Home and garden advice. https://www.thespruce.com This Old House. (n.d.). Home renovation guidance. https://www.thisoldhouse.com U.S. Consumer Product Safety Commission. (n.d.). Product safety information. https://www.cpsc.gov
Was this guide helpful?

About Lisa Anderson
The My Garden US editorial team writes practical, in-depth home and garden guides for American homeowners — tested advice, no fluff.
You May Also Like

How to Use a Two Story House Painting Cost Calculator USA Homeowners Trust
February 24, 2026 0 views
How to Use a Painting Quote Comparison Checklist for Homeowners
June 13, 2026 0 views
Teak Oil vs Stain for Outdoor Furniture: A Plain Guide
September 15, 2026 0 views