
Why Warmth Matters More Than You Think
Seed starting heat mat thermostat reviews exist for a simple reason. Most seeds will not sprout well in a cold room. A tomato seed needs soil near 75 degrees to wake up. A pepper seed wants it even warmer. When the soil sits at 60 degrees, many seeds sit still and wait. Some never wake up at all.
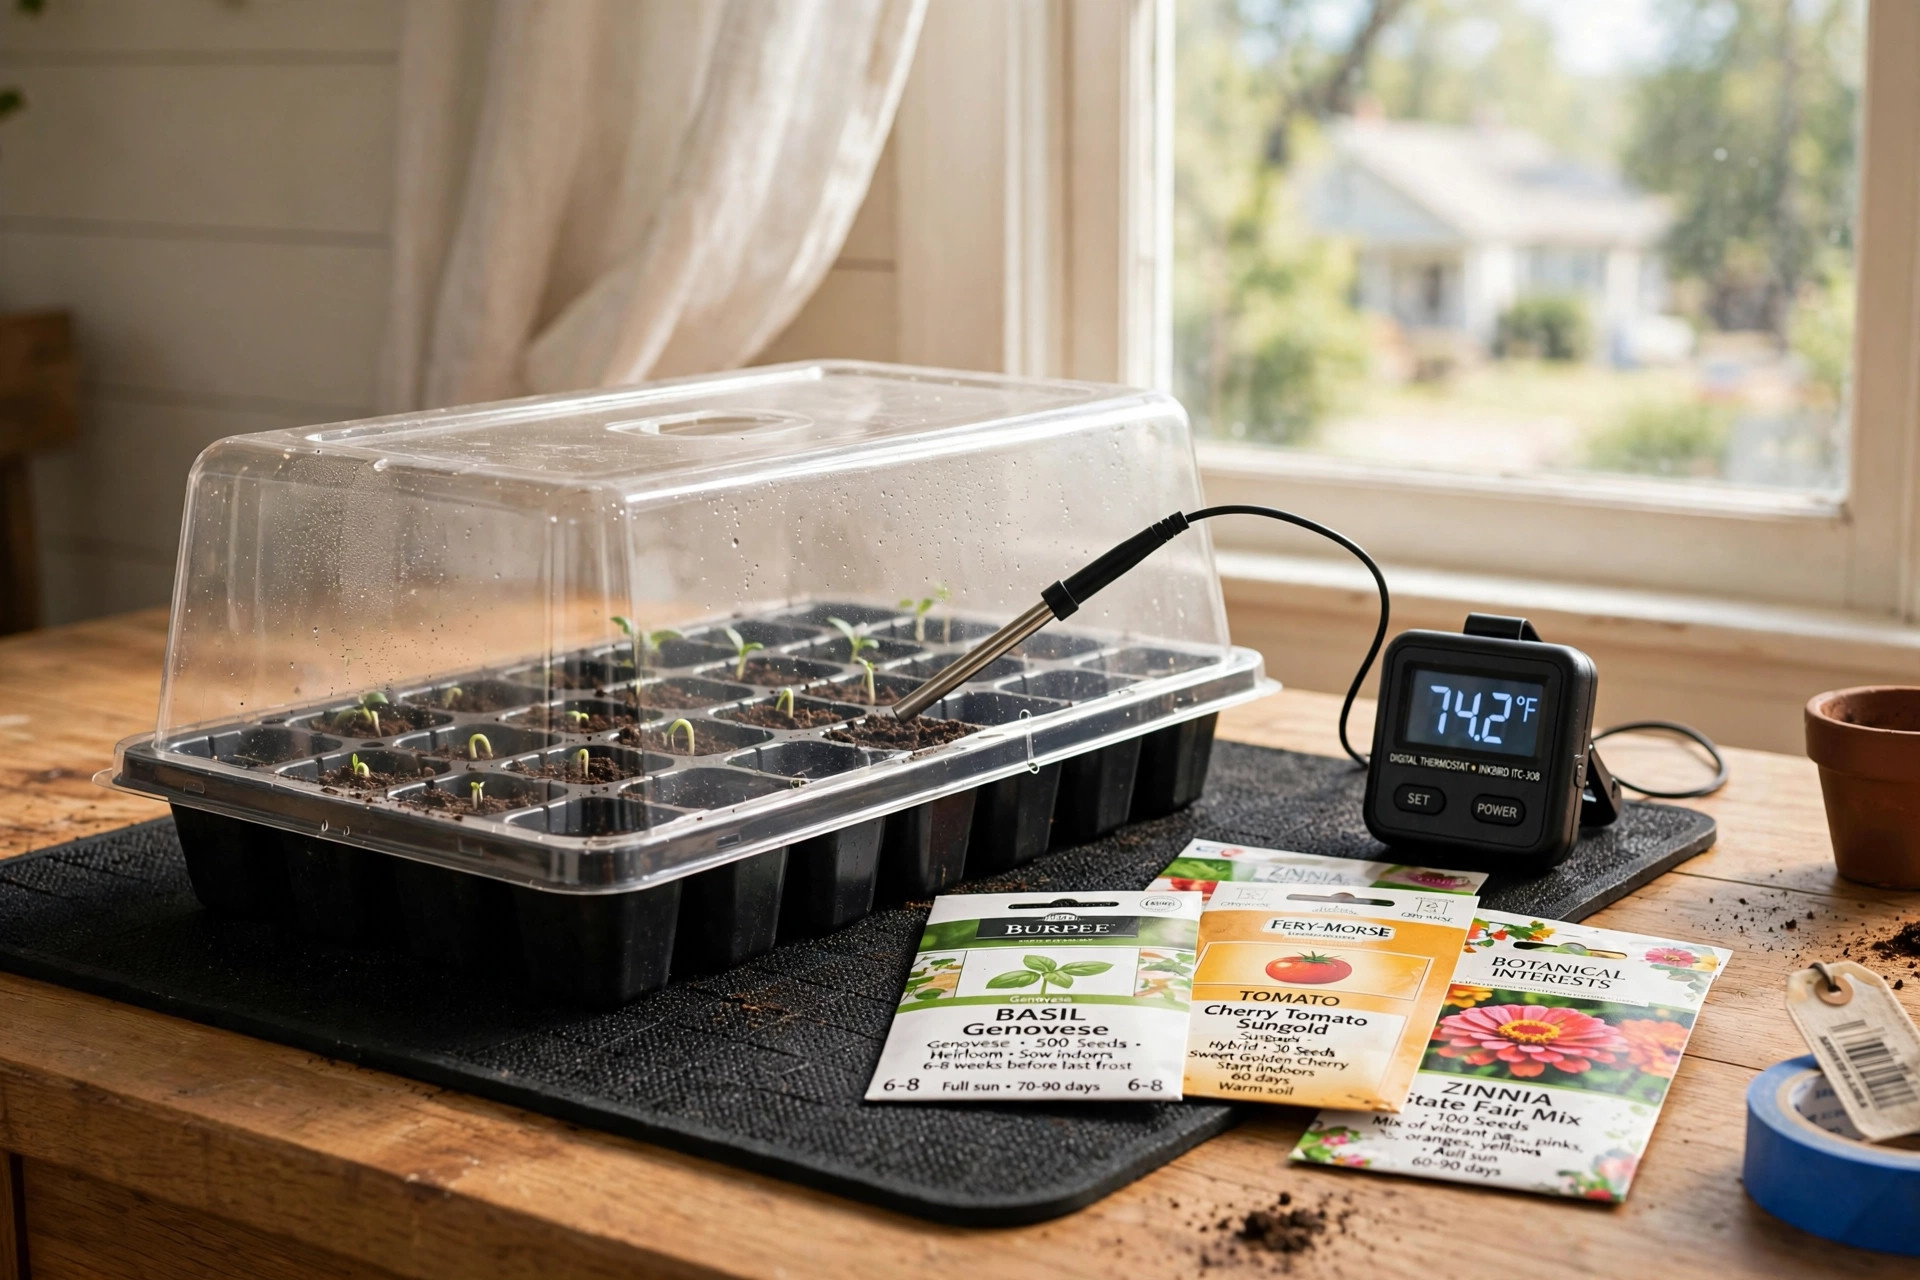
A heat mat solves this problem. It is a flat pad that goes under your seed tray. It warms the soil from below. A thermostat is the brain of the setup. It reads the soil temperature with a small probe. Then it turns the mat on and off to hold the heat steady. Without a thermostat, a heat mat just keeps warming. The soil can climb too high. Seed starting heat mat thermostat reviews help you find units that hold a true temperature.
Every gardener who starts seeds indoors should read how to start seeds indoors guide before buying gear. The basics matter more than the tools.
What a Seed Starting Heat Mat Thermostat Actually Does: Seed Starting Heat Mat Thermostat Reviews
A thermostat is a control box with a probe on a wire. You push the probe into the seed starting soil. You set the target temperature on a dial or a digital screen. The thermostat checks the probe every few seconds. When the soil drops below your setting, it sends power to the mat. When the soil reaches the setting, it cuts the power.
This cycle repeats all day and all night. The result is soil that stays within a degree or two of your target. That steady warmth is what seeds love. Natural temperature swings in a house do not matter much, because the thermostat adjusts.
Most models let you set a range from about 68 to 108 degrees Fahrenheit. Seeds have their own sweet spots. Lettuce likes it cool, near 70. Peppers and eggplant like it warm, near 85. A good review will note how fine the control is. Cheap units may jump in big steps. Better units let you set the exact degree.
What to Look for When You Read the Reviews
Seed starting heat mat thermostat reviews are only useful if you know which details count. Here are the points that matter.
Temperature accuracy
The best units read within one or two degrees of the true soil temperature. Reviews often test this with a separate thermometer. Look for words like “holds steady” and “matches my thermometer.” Avoid units that users say run hot or cold by five degrees or more. Five degrees is a big gap for a seed.
Probe quality
The probe is the part that lives in damp soil for weeks. It should be waterproof and sturdy. Thin, flimsy probes break or read wrong. Some reviews mention probes that corrode after one season. Look for probes that reviewers call solid and easy to clean.
Wattage rating
Every thermostat has a limit on how much power it can switch. Most home models handle about 1,000 watts. One seed tray mat uses about 20 watts. You can run many mats on one thermostat. But a large commercial mat may draw more. Check the limit before you plug in a big pad.
Ease of setting
A dial is simple and cheap. A digital screen with buttons is easier to read and set. Digital models usually remember your setting if the power blips. Dials do not. If you have poor eyesight or arthritic hands, a big bright display helps.
Indicator lights
A small light that shows when the mat has power is a real help. It tells you the unit is working without a thermometer check. Many digital models show the current temperature on screen, which is better still.
Types of Seed Starting Heat Mat Thermostats
There are three main styles on the market. Reviews cover all three.
Basic on-off controllers
These are the most common and the least costly. They switch the mat fully on or fully off. The soil temperature wobbles a little around your setting. This wobble is fine for most seeds. Most gardeners never need more than this.
Proportional controllers
These send less power as the soil nears the target. The result is a tighter hold on temperature. They cost more. Serious growers who sprout fussy seeds like peppers and herbs may like them. For plain tomatoes and marigolds, they are more than you need.
Dual outlet controllers
Some units have two outlets. They can run a heat mat and a fan, or two mats, at once. Some let you set day and night temperatures. These suit growers with a full indoor rack. They cost more and have more buttons to learn.
For a beginner, a basic on-off digital controller is the right pick. It is simple, cheap, and does the job.
Cost and Price: What Should You Pay?
A plain heat mat without a thermostat costs about 15 to 30 dollars. Add a thermostat and the pair usually runs 40 to 70 dollars. Combo kits that bundle a mat, a thermostat, and a tray often sell in that same range. That is good value.
Do not be tempted by a 15 dollar thermostat with no name on it. Seed starting heat mat thermostat reviews are full of stories about cheap units that read 10 degrees off or quit in a week. A middle priced unit from a known garden brand will last many seasons.
Think of it as a cost per season. A 50 dollar setup that lasts five years costs 10 dollars a year. You will start hundreds of plants with it. That is cheap seed money.
Large retailers that carry garden supplies keep these in stock every spring. Lowe’s and other home stores sell mats and controllers side by side with trays and domes. You can also read buyer notes at Consumer Reports to compare brands.
How to Use One, Step by Step
1. Place the heat mat on a flat, dry surface. Never fold it or bunch it up. 2. Set your seed tray on top of the mat. The tray should sit flat. 3. Push the thermostat probe into the soil near the center of the tray. Keep it in the soil, not in the air. 4. Plug the mat into the thermostat outlet. Plug the thermostat into the wall. 5. Set your target temperature. Use 75 degrees for most vegetables and 70 for cool crops like lettuce. 6. Fill the tray, plant your seeds, and cover with a dome to hold moisture. 7. Check the first day. Put a hand near the tray or use a thermometer. The soil should feel warm, not hot.
When seeds sprout, remove the dome. Many growers keep the mat on for a few more days, then turn it off. Young seedlings like room air better than hot feet. If you use seedling heat mat for germination reviews to compare mats, the same logic applies.
Care and Upkeep
A heat mat and thermostat need little care. Wipe the mat with a damp cloth at the end of the season. Let it dry fully before you roll it up for storage. Roll it, do not fold it. Folding can break the wires inside.
Clean the probe with a damp rag and store it with the box. Check the cord each spring for cracks or frayed spots. If the cord is damaged, replace the unit. Do not tape it and hope.
Keep the mat away from water puddles. It is made for damp soil, not standing water. A drip tray under the seed tray catches spills and keeps the mat dry. Advice on indoor seed care also appears at The Spruce and Burpee, both of which carry seed starting gear.
It is also wise to write down your settings each spring. A small label on the tray with the crop name and the set temperature saves you from guessing later. When you start a second batch of seeds, you can repeat what worked. Many gardeners keep a simple notebook of sowing dates, soil temperatures, and sprout times. Over two or three seasons, those notes become a custom guide for your own house and your own seeds.
Safety Points You Must Not Skip
Heat and water live close together in seed starting. Respect that.
– Never let the probe wire or the mat sit in standing water. – Plug the setup into a grounded outlet. A surge protector is a fine choice. – Keep the mat flat. Bunching traps heat and can scorch a spot. – Unplug the mat before you lift it or move the tray. – Keep pets from chewing the cords. – Do not use a heat mat as a heating pad for your body. It is not made for that.
Fire risk is low with a quality unit, but cheap no-name controllers have failed. Look for units with standard safety marks. When in doubt, pay a little more for a known brand. Corona Tools and Fiskars are long standing garden names, and garden writers at Bob Vila and Family Handyman often cover safe indoor growing setups.
How It Fits the Whole Seed Starting Setup
A heat mat thermostat is one part of a system. It works best with a good tray, a humidity dome, and a strong light. The mat handles warmth. The dome holds moisture. The light feeds the seedlings after they sprout. Read about trays and domes in seed starting trays with dome reviews to round out your kit.
Also remember that soil matters. Warm soil cannot fix poor seed mix. Use a fine seed starting mix, not heavy garden soil. Water from below when you can. It keeps the soil even and avoids disturbing tiny seeds.
Garden suppliers like Gardener’s Supply sell matched kits with mat, tray, and dome together. Buying a kit takes the guesswork out of sizing.
FAQ
Do I really need a thermostat, or will a mat alone do?
A mat alone warms without control. In a cool room it may be fine. In a warm room it can cook seeds. A thermostat is cheap insurance. Most seed starting heat mat thermostat reviews agree that the thermostat is the more important half of the pair.
What temperature should I set for tomato seeds?
Set 75 to 80 degrees Fahrenheit. Tomatoes sprout fast in this range. Turn the mat off once most seeds have sprouted.
What temperature should I set for pepper seeds?
Peppers are slow and fussy. Set 80 to 85 degrees. Keep them warm until they sprout, which can take two weeks or more.
Can one thermostat run two heat mats?
Yes, if the total wattage is under the thermostat limit. Two small 20 watt mats are no trouble for a 1,000 watt controller. Plug both into a power strip, then plug the strip into the thermostat.
Where should I place the probe?
Push it into the soil in the middle of the tray, about an inch deep. Keep it away from the tray edge, where the soil is cooler. Do not let it sit in the air.
How long does a heat mat thermostat last?
A good one lasts five to ten years with simple care. Cheap ones may fail in a season. Reviews that track long term use are worth more than first week reviews.
A Short Final Word
Seed starting heat mat thermostat reviews point to a clear lesson. Steady warmth is the secret of strong seedlings. A simple digital controller with a sturdy probe, set to the right temperature, will serve most gardeners for years. Buy a known brand, keep the probe in the soil, and pair the mat with a dome and a good tray. Your seeds will thank you with quick, even sprouts.
References
Bob Vila. (n.d.). Home improvement advice. https://www.bobvila.com Burpee. (n.d.). Seeds, plants, and gardening supplies. https://www.burpee.com Consumer Reports. (n.d.). Product reviews and ratings. https://www.consumerreports.org Corona Tools. (n.d.). Garden and landscape tools. https://www.corona-tools.com Family Handyman. (n.d.). DIY home repair and maintenance. https://www.familyhandyman.com Fiskars. (n.d.). Garden and cutting tools. https://www.fiskars.com Gardener’s Supply Company. (n.d.). Gardening tools and supplies. https://www.gardeners.com Lowe’s. (n.d.). Home improvement products. https://www.lowes.com The Spruce. (n.d.). Home and garden advice. https://www.thespruce.com
Was this guide helpful?

About Michael Thompson
The My Garden US editorial team writes practical, in-depth home and garden guides for American homeowners — tested advice, no fluff.
You May Also Like
Best Garden Kneeler With Handles Reviews: A Complete Buying Guide
January 15, 2026 0 views
Best Garden Rake for Gravel Reviews: What to Know Before You Buy
June 1, 2026 0 views
The Best Garden Boots Waterproof for Mud: A Plain Guide
May 24, 2026 0 views