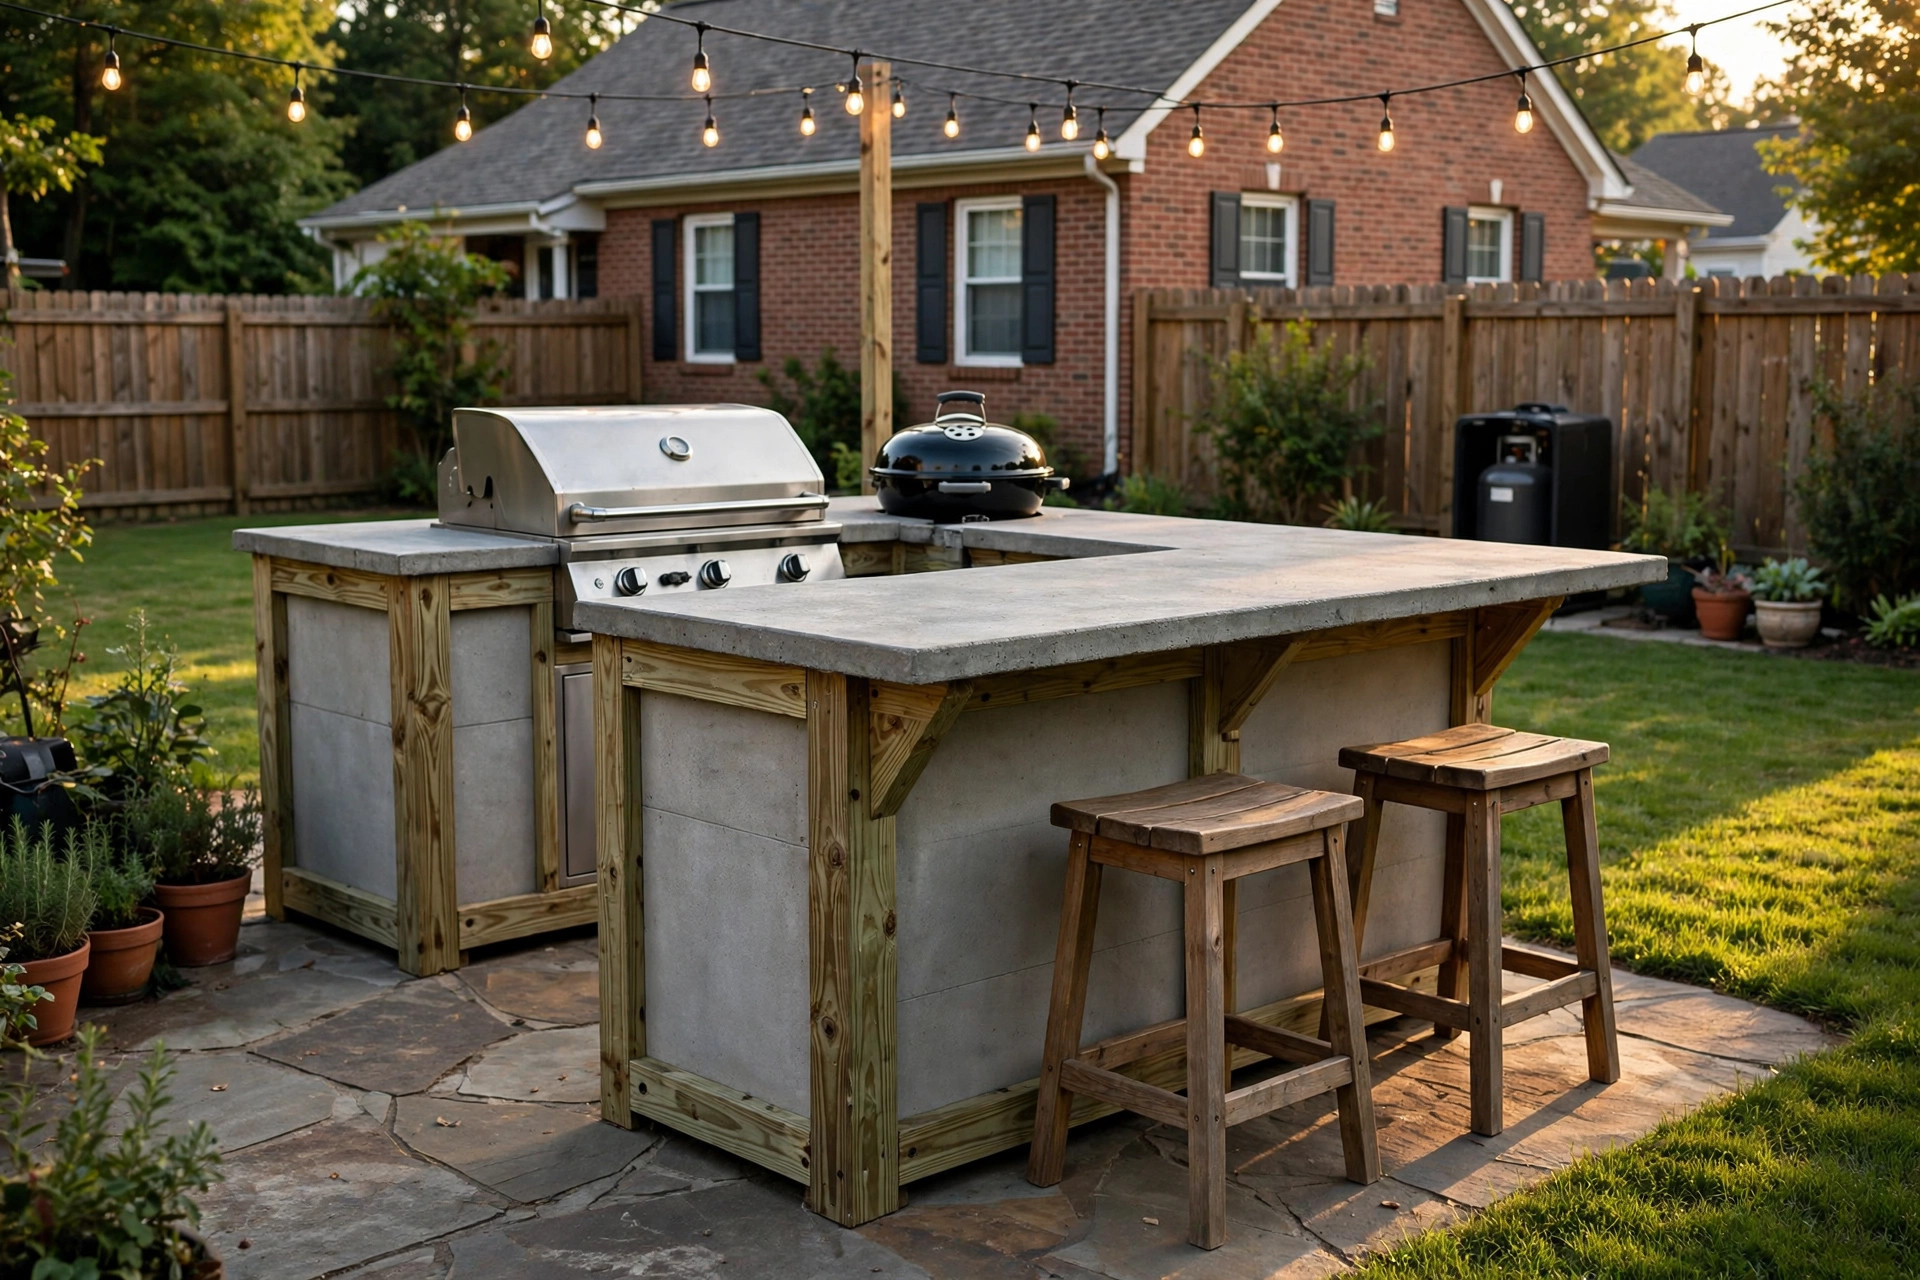

An outdoor kitchen island is the heart of a backyard cooking space. It holds the grill, gives room for food prep, and offers a place where guests gather. When you follow solid outdoor kitchen island plans for diy, you can build one yourself in a weekend or two, and the result will look like it cost far more than it did. The work is not hard, but it does take careful planning. A good plan tells you what to measure, what to buy, and in what order to put the pieces together.
This guide walks through the whole process. You will learn why an island is worth the effort, how to choose a plan, what materials to buy, and how to frame and finish the build. It also covers cost, upkeep, and safety, with answers to the questions people ask most often. If you are new to this kind of project, a related guide on how to build an outdoor kitchen on budget will help you keep spending under control.
Why an Outdoor Kitchen Island Matters
A freestanding island changes how you cook outside. Without one, you carry everything from the indoor kitchen to the grill and back again. With an island, the counter space sits right where you work. You chop, season, and serve in one spot. This alone makes weekend cookouts much easier.
An island also adds order to the patio. A grill standing alone in the yard looks temporary. An island around it looks planned. Guests naturally drift toward the island, the way they gather around a kitchen counter indoors. If you add a countertop overhang and a couple of stools, the island becomes a serving and eating area as well.
There is also the matter of value. Outdoor living space is one of the most popular home upgrades in recent years. A well-built island, even a simple DIY one, makes a patio feel finished. It will not match a full contractor-built kitchen, but for a fraction of the price it gives you most of the daily use.
What to Look for in Outdoor Kitchen Island Plans for DIY
Not every plan you find online is worth following. A good set of outdoor kitchen island plans for diy should have a few clear marks of quality. Look for these before you buy lumber.
First, the plan should give full measurements. You need the length, width, and height of the island, the spacing of the frame studs, and the cut sizes for every board. Plans that say “build to suit” without numbers will leave you guessing. Numbers are what make a plan useful.
Second, the plan should list all materials with quantities. You should be able to walk into a lumber yard or a store like The Home Depot with the list and buy everything in one trip. A material list saves both time and money.
Third, look for drawings. A simple front view, side view, and top view are enough. Photographs of a finished build are helpful too. If a plan has neither drawings nor photos, move on.
Fourth, the plan should note the grill cutout size. Different grills need different openings. A drop-in grill needs a precise hole in the countertop. A freestanding grill needs a bay in the frame. Make sure the plan matches the grill you own or plan to buy.
Finally, check that the plan suits your skill level. Some plans assume you can pour concrete footings or run gas lines. For a first build, pick plans that use basic carpentry: a lumber frame, screws, and cement board.
Types of DIY Outdoor Kitchen Islands
Outdoor kitchen island plans for diy come in several styles. Each has its own strengths. The right one depends on your budget, your tools, and how you cook.
Simple Lumber Frame Island
This is the most common DIY design. The frame is built from pressure-treated two-by-fours, just like a wall frame. Cement board panels screw to the frame, and tile, stone veneer, or stucco covers the panels. The countertop can be poured concrete, granite tile, or even sealed plywood for a low-cost start. These plans are the easiest to follow and adapt.
Modular Steel Frame Kit
Steel frame kits are sold by several grill makers and outdoor kitchen companies. You buy the frame, cut no lumber, and bolt the sections together. The kit tells you the exact grill opening and counter size. This option costs more than lumber but saves a full day of framing work. It is a good middle ground for people with less carpentry practice.
Repurposed and Pallet Builds
Some builders make islands from old cabinets, steel drums, or wood pallets. These builds are cheap and creative, but they take more problem solving because every donor piece is different. If you like improvising and want the lowest cost, this path works. Just make sure the finished island is strong and weather tight.
Built-In Island with Bar Seating
This is the most popular finished style. The island is longer than a plain grill cart, with a countertop overhang of about twelve inches on one side. Bar stools tuck under the overhang. The island serves as both work counter and eating spot. Plans for this style show how to support the overhang with brackets so the counter does not crack.
If you are still shaping the look of your whole space, browse these outdoor kitchen design ideas for your backyard for layout tips that pair well with an island.
Planning Your Build: Measure Twice, Cut Once
Before you buy anything, plan the footprint. Measure your patio and mark where the island will stand. Leave at least three feet of clear space on the working side so you can move with tongs and trays. On the seating side, leave four feet so chairs or stools fit.
Now think about what goes inside the island. The most common setup is a grill on one end and open counter space on the other. Some plans include a space for a small refrigerator or an ice bin. Others add pull-out drawers for tools. Write down what you want the island to hold, then pick a plan with those bays.
Draw your plan on paper, even if the downloaded plan has drawings. Sketching helps you see the layout in your own space. Mark where the grill cutout will be, where the gas hose will run, and where water might pool after rain.
Check local rules before you build. Some towns require permits for outdoor kitchens with gas or electric lines. A simple island with no utilities often needs no permit, but a quick call to the local building office is worth the time. They will tell you in minutes what the rules are.
Tools and Materials You Will Need
A lumber frame island needs tools most homeowners already own or can rent. You will need a circular saw or miter saw, a drill and driver, a level, a tape measure, and a square. A tile saw helps if you are tiling the counter, and a masonry drill bit is needed for screwing cement board.
The materials list for a typical four-by-eight foot island is short:
– Pressure-treated two-by-fours for the frame – Pressure-treated plywood for the sub-top – Cement backer board for the walls – Outdoor tile, stone veneer, or stucco for the finish – Concrete mix or granite tile for the countertop – Three-inch exterior screws and one-and-one-quarter inch backer board screws – Metal brackets or corner braces – A weatherproof outlet box if you want power
For the countertop, weigh your options carefully. A poured concrete top looks great and costs little, but it takes a form, a day of curing, and some polishing. Granite tile over a cement board top is faster and still tough. Our guide to outdoor kitchen countertop material options walks through each choice in detail.
Step-by-Step Build Overview
Every set of outdoor kitchen island plans for diy follows the same basic order. The steps below describe the typical flow so you know what is coming.
Step 1: Build the Frame
Cut the studs to length and assemble the walls on the ground. Stand them up and screw the walls together at the corners. Add horizontal blocking where the countertop and grill cutout will sit. Check that the frame is square by measuring the diagonals; they should match.
Step 2: Set the Frame in Place
Carry the frame to its spot on the patio. Level it with shims. If the patio slopes, shim one side until the top is level. A level island matters because grills sit unevenly on a sloped base, and countertops can crack.
Step 3: Attach the Cement Board
Cut the cement backer board to fit each wall of the frame. Screw it to the studs with backer board screws spaced about eight inches apart. Seal the seams with alkali-resistant tape and thin-set mortar. This gives you a solid, water-proof surface for the finish.
Step 4: Finish the Walls
Apply your chosen wall finish. Stone veneer goes up with mortar. Tile goes up with thin-set and grout. Stucco goes on in two or three coats. Take your time here. The walls are what people see, and neat work shows.
Step 5: Install the Countertop
Set the sub-top of plywood, then add the finished top. For concrete, build a form, pour, let it cure for a full week, then polish and seal. For tile, spread thin-set on the cement board top, set the tiles, and grout the next day. Seal the finished top with an outdoor-rated sealer.
Step 6: Set the Grill and Details
Drop the grill into its opening or roll the freestanding grill into its bay. Connect the gas line if you use propane or natural gas. Add doors, drawers, or open shelving to the front. Install the outlet box if you planned for power.
Choosing the Right Grill for Your Island
The island is built around the grill, so pick the grill before you finalize the plan. A gas grill drops into a counter cutout and lights in seconds. A pellet grill adds wood smoke flavor and needs a weatherproof cover and a nearby outlet. A ceramic kamado cooker holds heat for long smoking sessions but is heavy and needs a strong base.
Size matters. A common drop-in grill needs a cutout around thirty inches wide and twenty inches deep. Measure your grill first, then adjust the plan. It is much easier to change the plan on paper than to cut a finished island.
Think about how you cook. If you grill burgers and steaks on weeknights, a gas grill is the fastest choice. If you smoke brisket on weekends, plan space for a smoker nearby. The AmazingRibs site has deep guides on grill types that can help you decide.
For fuel, propane is the simplest for DIY. A propane tank slides into the island bay with no plumber needed. Natural gas gives you endless fuel but requires a licensed installer in most areas. Charcoal is cheap and tasty but needs ash cleanup after every cook.
Cost and Price: What a DIY Island Really Costs
One of the main reasons people choose outdoor kitchen island plans for diy is the saving. A contractor-built island can cost five thousand dollars or more. A DIY island usually costs between eight hundred and two thousand dollars, depending on size and finish.
Here is where the money goes. Lumber and frame hardware run about two hundred to three hundred dollars. Cement board and wall finish add three hundred to six hundred dollars. A concrete countertop costs around one hundred dollars in materials, while granite tile costs three hundred or more. Hardware, sealers, and small parts add another hundred dollars.
The grill is the wild card. A good gas grill costs four hundred to one thousand dollars, and that cost sits on top of the island build. You can reuse a grill you already own to keep the budget tight.
Ways to save are simple. Build smaller. Use tile instead of stone. Pour your own concrete top. Buy the grill in the off season when stores clear stock. And do all the labor yourself, which is the whole point of DIY plans.
Care and Upkeep Through the Seasons
A DIY island will last for many years if you care for it. The main enemies are water and winter. Water gets into unsealed grout and cracks, then freezing makes the damage worse.
Seal the countertop once a year with an outdoor stone sealer. Check the grout lines each spring and repair any cracks with fresh grout. Tighten any loose screws in the frame doors. Cover the grill with a quality cover when it is not in use. In cold climates, a full island cover or a tarp over the winter keeps snow off the top.
Clean the island the way you would clean outdoor furniture. A mild soap and a brush handle most dirt. Avoid pressure washers on tile grout and stucco, since the hard spray can wear them down. Wipe stainless steel doors with a soft cloth and stainless cleaner to keep them bright.
Pest control is worth a thought too. Spiders and wasps like the dark spaces inside an island. Open the doors once a month in summer and sweep out any nests. Keep food scraps out of the island so mice are not tempted.
Safety First: Gas, Fire, and Structure
Safety is not a step you skip. An island with a grill deals with gas, fire, and heavy weight, and each needs care.
For gas, follow the grill maker’s instructions exactly. Keep propane tanks upright and in a ventilated bay, never in a sealed box. Check hoses and connections for leaks each spring with soapy water; bubbles mean a leak. If you run natural gas, hire a licensed plumber to make the connection. This is not a place to improvise.
For fire, keep the island away from anything that burns. Ten feet from the house and from wooden fences is a common rule. Do not store charcoal, paper, or lighter fluid inside the island. Keep a fire extinguisher rated for grease fires within reach of the cooking area.
For structure, make sure the island can carry the load. A stone countertop and a heavy grill can weigh several hundred pounds. Solid framing with closely spaced studs handles this fine. If the island wobbles, add cross bracing until it is rock solid.
Ventilation matters as well. Grill bays need air flow so heat and gas do not build up inside. Most plans show vent openings in the frame. Do not block them.
Frequently Asked Questions
How long does it take to build an outdoor kitchen island?
A simple lumber frame island takes most people two to three weekends of part-time work. Framing and cement board go up in a weekend. Wall finish and the countertop take the next weekend, plus curing time. Poured concrete tops need a full week of curing before you set the grill.
Can I build an island if I have never done carpentry?
Yes, if you pick beginner-level plans. A lumber frame island uses straight cuts and screws, the same skills as building a simple workbench. Watch a few framing videos, measure carefully, and ask a handy friend to help on framing day.
What is the best height for an outdoor kitchen island?
Match indoor kitchen counters: thirty-six inches to the top of the counter. This is the most comfortable height for prep work. If you add bar seating, make the seating side forty-two inches high or add a raised bar top.
Should I pour a concrete slab for the island to sit on?
If you have a level patio of concrete or pavers, the island can sit right on it. If the ground is bare soil or uneven, pour a small pad or set the island on concrete blocks. The base must be stable and level.
How do I protect the island from rain?
The materials themselves are weatherproof: cement board, tile, stone, and sealed concrete all handle rain. The grill needs its own cover. The inside of the island stays dry if the countertop overhangs the walls by an inch or two and the wall finish sheds water.
Do I need a permit to build an outdoor kitchen island?
In most places, a simple island with no gas line, no electric line, and no plumbing needs no permit. Once you add natural gas, electrical wiring, or a water line, a permit and inspection are often required. Check with your local building office before you start.
A Short Final Word
Good outdoor kitchen island plans for diy turn a daunting project into a series of small, clear steps. Measure your space, pick plans with full numbers and drawings, choose a grill that fits your cooking, and work through the build one stage at a time. The first weekend you cook on an island you built with your own hands, you will know the effort was worth it.
Before you buy materials, take a look at independent reviews of grills and tools on Consumer Reports, recipes and technique ideas at The Spruce Eats, and grill maker resources like Napoleon and Broil King. With the right plan and a little patience, your backyard will have a cooking spot you use for years.
References
AmazingRibs.com. (n.d.). Barbecue and grilling science. https://www.amazingribs.com Big Green Egg. (n.d.). Kamado grills and outdoor cooking. https://www.biggreenegg.com Broil King. (n.d.). Gas and charcoal grills. https://www.broilkingbbq.com Consumer Reports. (n.d.). Product reviews and ratings. https://www.consumerreports.org Napoleon. (n.d.). Fireplaces, grills, and heating products. https://www.napoleon.com The Home Depot. (n.d.). Home improvement products. https://www.homedepot.com The Spruce Eats. (n.d.). Recipes and cooking guides. https://www.thespruceeats.com Traeger. (n.d.). Wood pellet grills. https://www.traeger.com Weber. (n.d.). Grills and outdoor cooking. https://www.weber.com
Was this guide helpful?

About Michael Thompson
The My Garden US editorial team writes practical, in-depth home and garden guides for American homeowners — tested advice, no fluff.
You May Also Like

Pellet Grill Grease Fire Prevention Tips for Safe Backyard Cooking
July 20, 2026 0 views
The Best Outdoor Deep Fryer for Turkey: A Buyer’s Guide
January 28, 2026 0 views
How to Clean Outdoor Griddle After Cooking: A Simple Step-by-Step Guide
March 30, 2026 0 views