
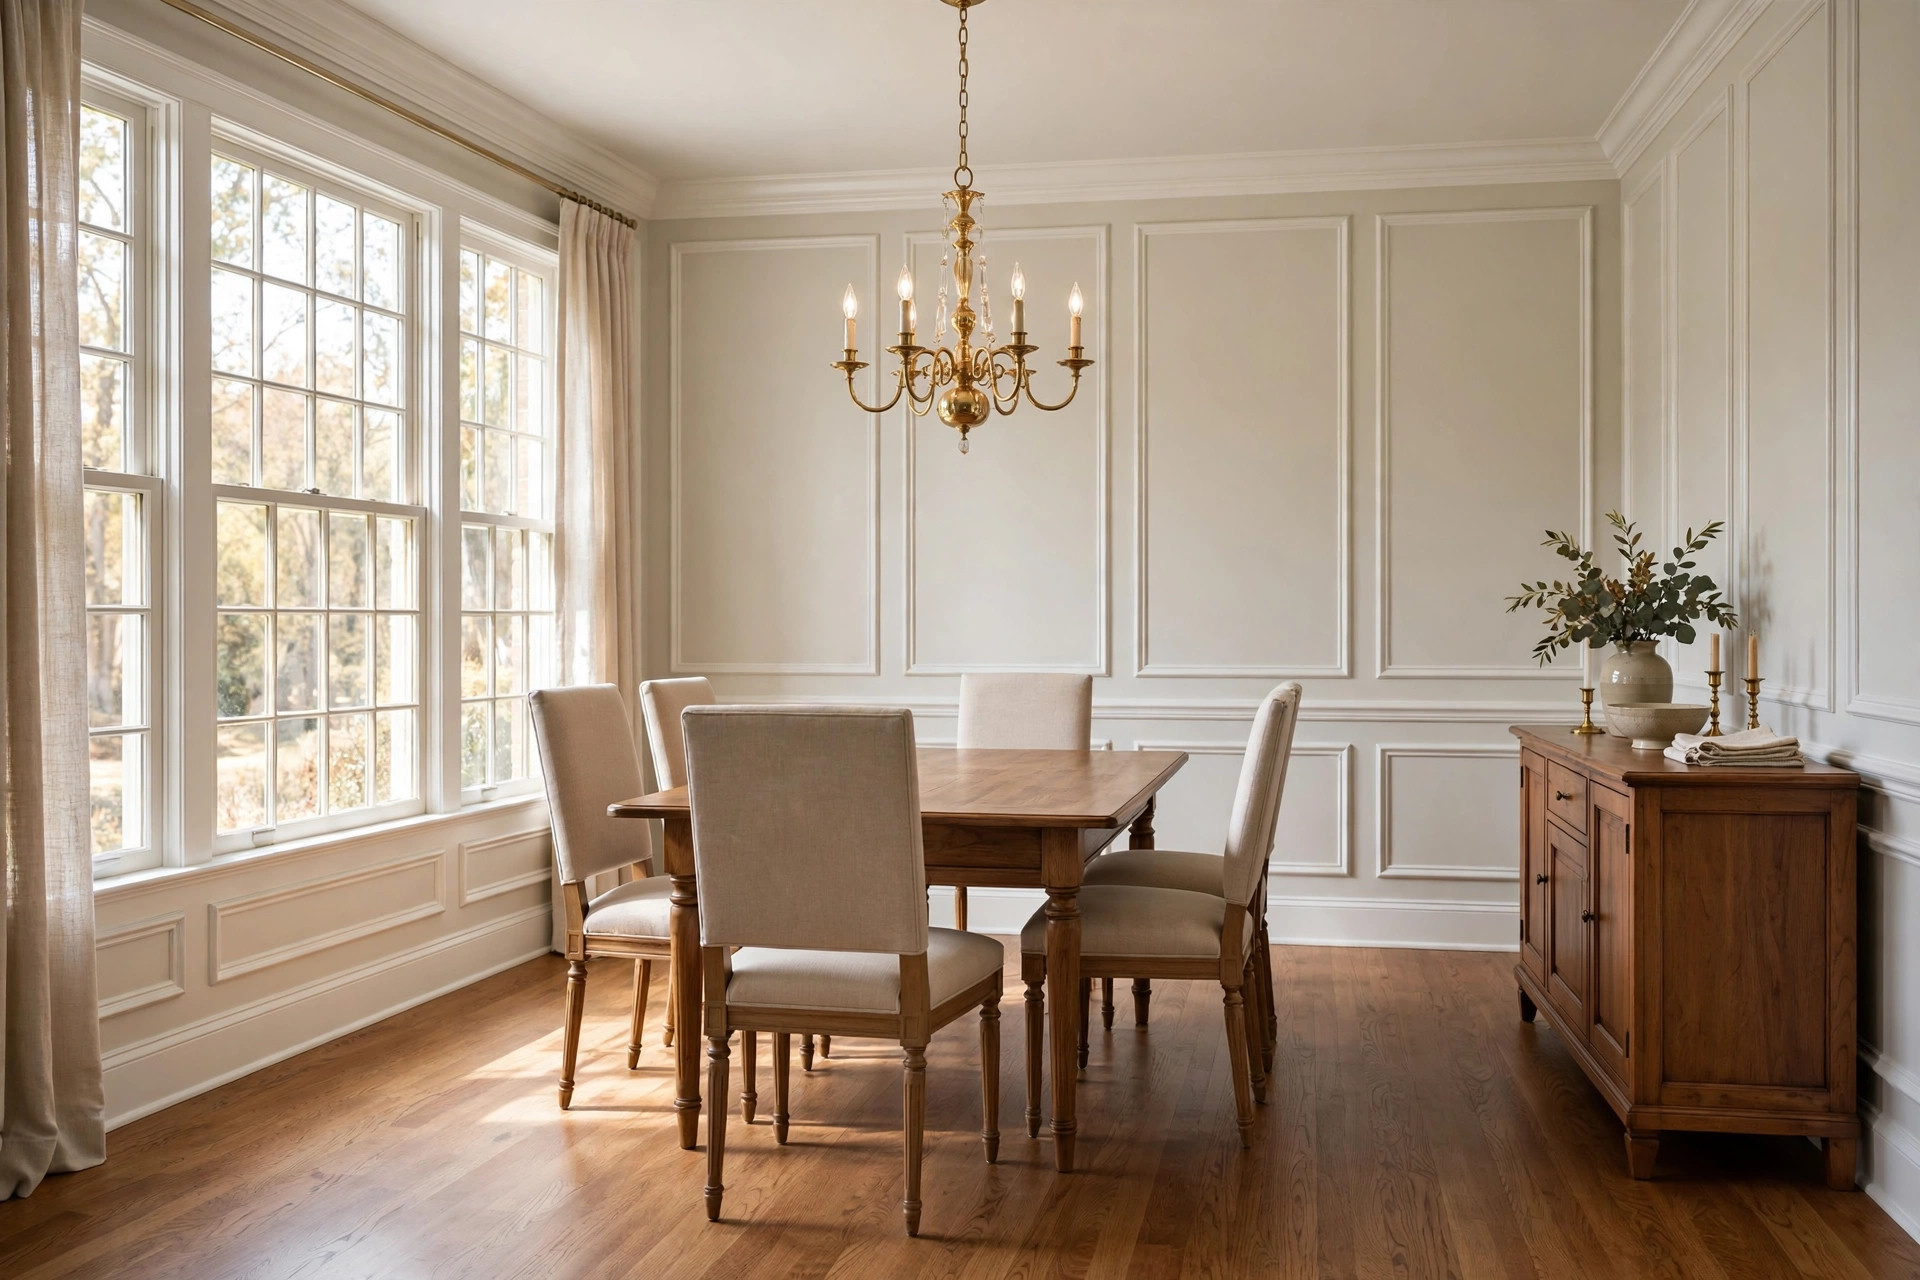

A plain dining room can feel flat. A wall molding kit can change that in a single weekend. These kits give the room a finished, built-in look without the cost of a full remodel. This guide explains what wall molding kits for dining room usa buyers should know: the main types, what to look for, typical costs, care, and safety. It also answers common questions from homeowners.
Why Wall Molding Matters in a Dining Room
The dining room is a place for meals, talk, and guests. Walls shape how the room feels. Bare drywall can look unfinished, even when the furniture is fine. Molding adds depth. It breaks a large wall into framed panels. It gives the eye something to follow.
Molding guards the wall in daily use.
There is also a practical side. A chair rail guards the wall against bumps from chair backs. Wainscot panels guard the lower wall against scuffs. The kit makes the work simple. Instead of cutting long strips and coping joints, you buy pre-made frames or rails sized for standard rooms. You glue or nail them in place. Then you paint.
What to Look for When You Choose a Kit: Wall Molding Kits for Dining Room Usa
Not all kits are alike. A few points matter more than others.
Material. Most kits come in one of three materials. MDF, or medium-density fiberboard, is the most common. It is smooth, takes paint well, and costs less than wood. Polyurethane is light and resists dents. It also resists damp air, which helps in a room near the kitchen. Real wood, often pine or poplar, is the strongest. It costs more, and it can swell if the room gets damp. For most dining rooms, MDF or polyurethane is enough.
Style. Kits copy classic panel styles. The most common are square picture-frame panels, raised-panel wainscot, and beadboard. Square panels fit most rooms. They look clean and modern or classic, depending on the paint color. Beadboard gives a country or cottage feel. Raised-panel wainscot looks formal. Pick the style that matches your table, chairs, and trim.
Kit contents. Read the parts list before you buy. A good kit should include enough frames or rails for a standard wall, plus corner pieces if needed. Some kits include only the molding strips. Then you must measure and cut the frames yourself. Others include ready-made frames in fixed sizes. Ready-made frames save time but need walls that fit their sizes.
Paint and finish. Many kits come pre-primed in white. Pre-primed MDF saves a coat of paint. Check the product notes to see if a top coat is needed. Dark colors look rich on molding. Light colors look clean. A high-quality interior paint made for trim gives the best result.
Types of Wall Molding Kits
Several types of kits are sold in the United States. Each fits a different room and budget.
Picture-frame panel kits. These are the most popular. Each kit holds a set of square or tall rectangle frames. You place them in a grid on the wall. They sit flat against the surface. Installation is simple. You mark the layout with a level, glue the frames, and paint. They work on flat walls and suit both formal and casual dining rooms.
Chair rail and wainscot kits. These kits cover the lower half of the wall. A chair rail runs at about three feet from the floor. Below it sit panels or beadboard. Above it, the wall can be painted a different color. This style guards the wall where chairs strike it. It is a strong choice for busy family dining rooms.
Full-height panel kits. These cover the wall from floor to crown. They make a plain wall look like old-style paneled woodwork. They use more material, so they cost more. They suit large dining rooms with high ceilings.
Crown molding kits. Some buyers pair wall panels with crown molding at the ceiling line. Crown molding alone can also be bought as a kit. It adds a finished edge where the wall meets the ceiling. In a dining room with a chandelier, crown molding frames the room from above.
Before you choose a type, look at your room. Measure the wall height and the length of each wall. Note windows, doors, and vents. A wall with many openings suits simple picture-frame panels. A long clear wall can carry full wainscot. If you plan to hang new art or a mirror, keep the panel layout simple so the wall does not look crowded. For ideas on how wall color changes a room, it helps to read about the best paint finish for kitchen walls usa homeowners pick, since dining rooms share the same light and wear concerns.
Cost and Price of Wall Molding Kits
Prices vary by material, size, and brand. A small picture-frame kit for one accent wall can cost between 60 and 150 dollars. A full wainscot kit for a whole dining room can run from 300 to 900 dollars. Real-wood kits cost more than MDF or polyurethane.
Paint and supplies add to the total. Plan for a quart or two of trim paint, caulk, wood filler, and sandpaper. A simple kit for a single wall may need only 40 to 60 dollars in extras. A full room may need 120 to 200 dollars.
Labor is the largest extra cost if you hire help. A carpenter may charge 200 to 500 dollars to install a kit in one room. Many buyers install the kit themselves. The work is not hard. It takes basic tools: a level, a tape measure, a saw, a nail gun or a hammer, and a caulk gun. A weekend is enough for most rooms.
To keep costs down, start with one wall. The wall behind the sideboard or buffet is the natural choice.
When you shop, compare kits at large home stores. Both Lowe’s and Home Depot carry molding kits from several brands, and both list customer reviews that help you judge fit and finish before you buy.
How to Install a Wall Molding Kit
Installation follows the same steps for most kits. Take your time with layout. Good layout is what makes the work look right.
Step one: prepare the wall. Remove pictures, hooks, and switch plates. Wash the wall with mild soap and water. Let it dry. Fill dents and nail holes with spackle. Sand the patches smooth. If the wall has heavy texture, note that molding sits best on smooth walls. Light texture is fine.
Step two: plan the layout. Use painter’s tape to mark the panel frames on the wall. Step back and look. The spacing between frames should be even. A common rule is to keep three to four inches of space between frames, and the same space from the frames to the ceiling, baseboard, and corners. Move the tape until the grid looks right. Take a photo of the layout before you start.
Step three: cut and test. If the kit needs cutting, cut the pieces and dry-fit them on the wall. Check each corner. Mark each piece with a small pencil number so you know where it goes. A miter saw gives the cleanest cuts. A simple hand miter box also works for MDF and polyurethane.
Step four: attach. Apply construction adhesive to the back of each piece, or use small finish nails. Many installers use both. Press each piece into place. Check with a level as you go. Wipe away extra adhesive at once with a damp cloth.
Step five: fill and caulk. Fill nail holes with wood filler. Run a thin bead of paintable caulk along each joint where the molding meets the wall. Smooth the caulk with a wet finger. This step hides small gaps and gives a built-in look.
Step six: paint. Prime any bare spots. Then paint the molding with trim paint. Two thin coats are better than one thick coat. Satin or semi-gloss sheen works best on trim. It resists scuffs and wipes clean. Flat paint on the upper wall and satin on the molding is a classic pairing.
Guides from This Old House and Bob Vila walk through each of these steps with photos, and both are useful references if this is your first trim project.
Care and Upkeep
Molded walls are easy to keep. Dust the ledges with a soft cloth or a duster once a month. Dust gathers on the top edge of chair rails and frames. Wipe scuffs with a damp sponge.
Check the caulk lines once a year. Small cracks can open where the house moves with the seasons. A fresh bead of caulk and a touch of paint fix them fast. Keep a small jar of the trim paint for touch-ups. Label it with the room name and the paint color code.
Keep the room at a steady level of heat and dampness. MDF swells if it gets soaked. Wipe up spills near the baseboard. In a dining room that opens to a kitchen, run the range hood when you cook. Steam from long cooking can soften paint and filler over time.
If a piece of molding comes loose, do not force it. Pull it free, scrape off the old adhesive, and re-glue it. A loose piece is often a sign of one bad bond, not a bad kit.
Paint Colors That Work with Wall Molding
Paint color decides the mood of the room. White molding against a colored wall is the classic look. The frames read as bright lines on the wall. Navy, deep green, and warm gray are popular wall colors for dining rooms. They make white trim stand out.
The classic pairing is white molding against a colored wall.
Some buyers paint the lower wainscot dark and the upper wall light. This split is old and tested. It grounds the room and keeps the upper wall bright. Test colors on the wall first. Paint a two-foot square of each color before you commit.
For color ideas, browse the palettes at Benjamin Moore and Behr. Both sites show trim and wall colors paired in real rooms. The Spruce also publishes room-by-room color guides that show how molding reads under warm dining-room light.
Safety Notes
Wall molding work is low risk, but a few rules apply.
– Cut MDF and wood in a room with open air, and wear a dust mask. Fine dust from MDF is not good to breathe. – Unplug or switch off power at the breaker before you remove switch plates or outlet covers near the work area. – Use a stable step stool or ladder. Do not stand on chairs. – Keep a nail gun pointed away from hands and feet. Disconnect it when you are not nailing. – Keep paint and adhesive away from heat and open flame. Work with the room aired out.
If your home was built before 1978, the old paint may hold lead. Do not sand or scrape old paint without a lead test kit. Federal rules require safe work practice for lead paint in older homes. When in doubt, call a pro who is certified for lead-safe work.
Frequently Asked Questions
How long does it take to install a wall molding kit in a dining room? Most kits take one weekend. A single accent wall can be done in a day. A full room with wainscot may take two days. Layout and paint drying take more time than the nailing.
Can I install a wall molding kit over wallpaper? It is better to remove the wallpaper first. Molding bonds best to bare, smooth wall. If you plan to add new wallpaper after the molding, put up the molding first, then hang the paper inside the frames. If you are weighing peel-and-stick paper, read about the best adhesive for peel and stick wallpaper before you decide.
Will molding work on textured walls? Light texture is fine. Heavy knockdown or orange-peel texture can leave small gaps under the molding. Caulk fills those gaps. For very heavy texture, some buyers skim-coat the wall smooth first. That adds a day of work.
What is the best height for a chair rail? The old rule is one third of the wall height. For an eight-foot wall, that is about 32 inches from the floor. Modern rooms often use 36 inches. Pick the height that lines up with your window sills or door trim if you can. A rail that lines up with other trim looks built-in.
How do I match new molding to old trim in the house? Take a small piece of the old trim to the store. Match the profile shape and the width. Paint covers small differences in material. If the profiles do not match, use the new kit in one room only. A room can carry its own style without matching the hall.
A Short Final Word
A wall molding kit is one of the simplest upgrades a dining room can get. It costs less than new furniture. It takes a weekend of work. And it gives the room a finished look that guests notice. Start with one wall. Keep the layout even. Caulk the joints. Paint with care. If you want more ideas for pairing trim with color, HGTV shows finished dining rooms in many styles, and a related guide on basement floor epoxy kit for sale usa options shows how another kind of kit project is priced and installed. A calm, plain room waits behind every bare wall. A kit, a level, and a can of paint are all it takes.
References
Behr. (n.d.). Paints, primers, and stains. https://www.behr.com Benjamin Moore. (n.d.). Paints and stains. https://www.benjaminmoore.com Bob Vila. (n.d.). Home improvement advice. https://www.bobvila.com HGTV. (n.d.). Home and garden ideas. https://www.hgtv.com Lowe’s. (n.d.). Home improvement products. https://www.lowes.com Sherwin-Williams. (n.d.). Paints and coatings. https://www.sherwin-williams.com The Home Depot. (n.d.). Home improvement products. https://www.homedepot.com The Spruce. (n.d.). Home and garden advice. https://www.thespruce.com This Old House. (n.d.). Home renovation guidance. https://www.thisoldhouse.com
Was this guide helpful?

About James Carter
The My Garden US editorial team writes practical, in-depth home and garden guides for American homeowners — tested advice, no fluff.
You May Also Like
House Painting Estimate Free Near Me: What Every Homeowner Should Know
May 28, 2026 0 views
Best Paint Sprayer for Home Use Reviews
January 24, 2026 0 views
Painted Tile Backsplash Pros Cons: What American Homeowners Should Know
April 12, 2026 0 views