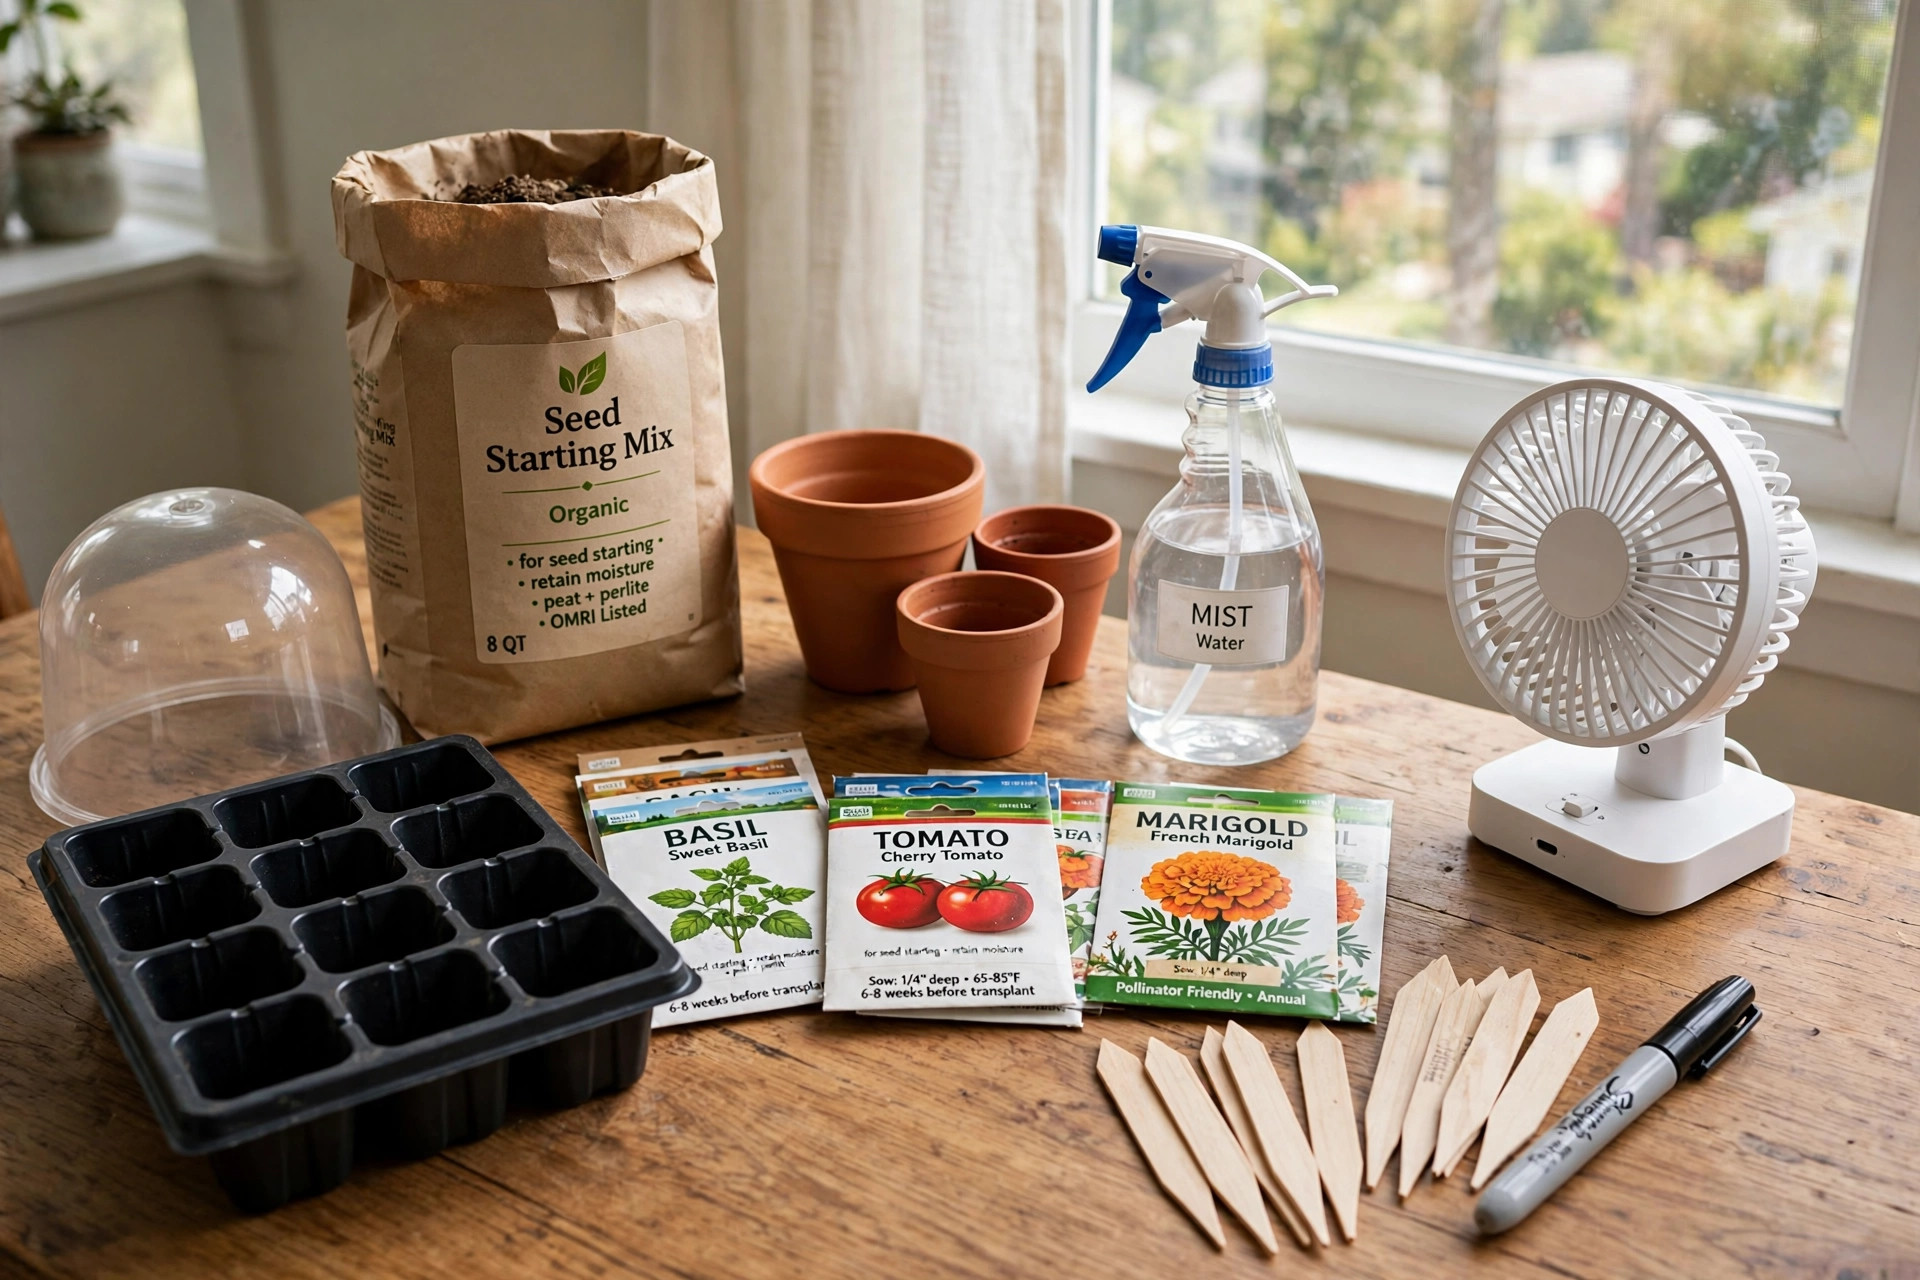

Starting seeds indoors is one of the simplest joys of home gardening. This seed starting supplies checklist for beginners gives you every item you need before the first seed touches soil. With the right tools on hand, your first season can be calm and orderly instead of rushed and wasteful. Many new gardeners buy too much, or they buy the wrong things, and then wonder why their young plants struggle. A short, clear checklist keeps you focused. You spend less money, learn faster, and your seedlings are strong enough to move outside without shock.
Why a Checklist Matters for New Growers
New gardeners often learn by trial and error. Some of those trials are costly. Seeds rot in cold soil. Seedlings stretch toward a dim window and turn weak. Trays dry out on a hot afternoon and a whole row of tomato sprouts dies in hours. Most of these failures come from missing one basic supply, not from bad luck.
A checklist turns a vague project, “start some seeds,” into clear steps. You can gather everything in one shopping trip and set up your growing area in a single afternoon. When something goes wrong, you can look back at the list and find the gap.
A list also keeps spending in check. Garden stores are full of tempting products: heat mats with fancy controls, multi-tier greenhouses, costly organic feeds. A checklist tells you what is truly necessary, and what is a luxury you can add in year two or three.
The Full Checklist: What You Need: Seed Starting Supplies Checklist for Beginners
Here is the complete list. Every beginner should have all of these items before planting the first seed.
– Seed trays or flats with drainage holes – Individual pots or cell inserts (for potting up) – Humidity domes or clear covers – Seed starting mix (sterile, soilless) – Quality seeds from a trusted source – Grow lights or strong fluorescent tubes – A simple timer for the lights – A small fan for air movement – A spray bottle or fine mist nozzle – Watering can with a narrow spout – Plant labels and a permanent marker – A thermometer (soil or room type) – Plastic wrap or spare clear covers (backup humidity)
The sections below explain each item in plain terms.
Seed Trays and Flats
Seed trays are shallow plastic containers that hold your soil mix. Look for trays with drainage holes in the bottom, since standing water rots seeds. Standard 1020 flats fit most humidity domes and heat trays sold in stores. Buy sturdy trays, since thin ones crack after a few uses while sturdy ones last for years.
Cell Inserts and Small Pots
Cell inserts fit inside the trays and divide them into small compartments, keeping roots separate and making transplanting far easier. A 72-cell insert suits most beginners, while larger seeds like beans do better in 32-cell or 50-cell inserts. You will also want small pots of three or four inches for potting up, which means moving a seedling into a larger container as it grows.
Humidity Domes
A humidity dome is a clear plastic cover that holds warm, moist air around the seeds, which helps them sprout. Remove the dome as soon as the seedlings emerge. Once the young plants have leaves, they need fresh air, and a dome left on too long invites mold and damping off, a disease that kills seedlings at the soil line.
Seed Starting Mix
Seed starting mix is a sterile, soil-free blend of peat moss or coco coir, perlite, and vermiculite. Do not use garden soil or heavy potting soil for seeds. Garden soil holds too much water, may carry disease, and packs down hard. Buy a bag marked specifically for seed starting and keep it closed and dry between uses.
Seeds
Choose seeds from a trusted seed house, since fresh seed germinates far better than old packets. Many packets print a packing year and a germination rate on the label. For a first year, pick easy crops: tomatoes, peppers, basil, marigolds, and zinnias all forgive small mistakes. Guidance on choosing beginner-friendly varieties is easy to find from established seed companies such as Burpee, which has sold garden seed to American households for generations.
Store seeds in a cool, dry place. A sealed jar in the refrigerator keeps most seeds viable for several years. Mark each jar with the seed name and year.
Grow Lights
Light is the most common weak point for beginners. A sunny windowsill is rarely enough in late winter, and without strong light, seedlings grow tall, pale, and weak. This condition is called legginess.
A simple shop light with two fluorescent tubes, hung two to three inches above the plants, works very well. Adjust the light upward as the plants grow. Many gardeners now use LED grow lights, which run cooler and use less power. Retailers like Lowe’s and The Home Depot carry both kinds, so you can compare prices side by side before you buy.
A Timer for the Lights
Seedlings need about fourteen to sixteen hours of light each day. A simple plug-in timer handles this job perfectly. Set it once and forget it. Without a timer, most people give their plants too little light, because they forget to switch the lamps on in the morning or off at night.
A Small Fan
Gentle air movement makes seedlings stronger. A small desk fan, set on low and placed a few feet from the trays, keeps the air moving. The light breeze causes the young stems to thicken, just as outdoor wind does. It also reduces mold on the soil surface.
Run the fan for part of the day. Do not aim it directly at the trays, or the soil may dry too fast.
Watering Tools
Young seedlings need gentle water. A spray bottle gives fine control for the smallest seeds. For larger trays, a watering can with a narrow spout lets you water the soil without blasting the young plants. Bottom watering is even better: pour water into the tray below the cells and let the soil draw it up. This keeps the leaves dry and reduces disease.
Labels and a Marker
Label everything. Use plastic or wooden plant labels and a permanent marker, and write the plant name and planting date. After a month, every tray of green seedlings looks the same, and you will not remember which is the tomato and which is the pepper.
A Thermometer
Temperature decides how fast seeds sprout. Most vegetable seeds like soil between seventy and seventy five degrees. A simple room thermometer near the trays tells you if your growing area is warm enough. If your house runs cool, a seed heat mat under the tray can raise the soil temperature by ten or fifteen degrees.
What to Look for When Buying Supplies
Quality matters more than brand names. When you shop, check a few simple things.
First, look at the plastic. Trays and domes should feel firm, not brittle. Bend a corner gently. If it cracks or turns white at the bend, it will not last.
Second, read the seed starting mix bag. It should list its parts clearly. Avoid any bag that smells sour or looks moldy.
Third, check the light rating if you buy a grow light. Full spectrum lights near 5000 to 6500 Kelvin suit most seedlings. Independent testing groups such as Consumer Reports publish buying guides that explain these numbers in plain language.
Fourth, compare prices across stores. Specialty garden catalogs like Gardener’s Supply offer kits that bundle several items at a discount.
Types of Seed Starting Setups
Beginners usually choose one of three setups.
The basic windowsill setup. One tray, a dome, and a bag of mix, placed in the brightest window. This costs the least. It works for small batches of easy seeds, but the light is often too weak for best results.
The table with lights. One or two trays under a shop light or LED panel, with a timer and a fan. This is the setup most experienced gardeners recommend for beginners. It costs more than the windowsill method, but the plants are far stronger.
The shelf rack system. A wire shelf unit with lights on each shelf, holding many trays. This suits a gardener who wants to start hundreds of plants, but most beginners do not need it in year one.
Start with the middle option if you can. It gives the best return for your money and effort.
Cost and Price Guide
Seed starting is one of the cheapest ways to grow a garden. Here is what a beginner might pay in a typical American store.
– Seed trays: two to five dollars each – Cell inserts: three to eight dollars per pack – Humidity domes: four to eight dollars each – Seed starting mix (eight quarts): five to nine dollars – Seed packets: two to five dollars each – Shop light fixture: twenty to forty dollars – LED grow panel: twenty five to sixty dollars – Timer: eight to fifteen dollars – Small fan: twelve to twenty dollars – Spray bottle: three to six dollars – Labels and marker: five to eight dollars
A full starter set costs between sixty and one hundred fifty dollars, depending on the choices you make. Compare that with the price of buying the same number of nursery plants, and the savings are clear. One packet of tomato seed can produce more plants than most families need, and the leftover trays and lights serve you for many seasons. Product reviews and price comparisons from sources like The Spruce can help you find the best value before you spend.
Care and Upkeep of Your Supplies
Good supplies last for years if you care for them. After each season, wash trays, domes, and pots with warm soapy water and rinse well. For extra safety, soak them for ten minutes in a weak bleach solution of one part bleach to nine parts water, then rinse and dry them in the sun. This kills any disease left on the plastic.
Store everything in a dry place. Stack trays neatly so they do not warp. Keep domes out of direct summer sun, which makes the plastic brittle. Coil cords and keep lights in their boxes if you have the space.
Clean tools work better and cause fewer plant problems. A ten-minute wash at the end of the season saves you from a week of sick seedlings the next spring. Hand tools such as snips and trowels deserve the same care. Makers of fine garden tools like Fiskars and Corona recommend cleaning blades after each use and oiling hinges before storage, advice that applies to any brand you own.
Safety Notes
Seed starting is safe work, but a few cautions help. Keep electrical equipment away from water. Hang lights securely and keep cords off wet surfaces. Use a power strip with a ground fault outlet if your growing area is in a basement or garage.
Wear a dust mask when pouring dry seed mix. The fine dust from peat and perlite irritates lungs. Pour slowly and dampen the mix before you fill the trays. Keep seed packets and small supplies away from young children and pets. Home and garden how-to sites like Bob Vila and Family Handyman both publish simple workshop safety guides that cover these basics well.
Frequently Asked Questions
When should I start seeds indoors? Read the back of each seed packet. It tells you how many weeks before the last frost to plant. Tomatoes often start six to eight weeks before the last frost. Peppers may need eight to ten weeks.
Do I really need a grow light? You need strong light, and a window rarely provides it in late winter. If your seedlings grow tall and lean toward the glass, that is the sign of weak light. A simple shop light costs little and fixes the problem.
Can I reuse seed starting mix? It is not wise. Used mix may hold disease from last year’s seedlings and loses its light, airy texture. Fresh mix is cheap insurance. Put old mix in the compost pile or on garden beds, where it does no harm.
What is damping off, and how do I stop it? Damping off is a fungal disease. Stems rot at the soil line and seedlings fall over and die. To prevent it, use sterile mix, do not overwater, remove the dome after sprouting, and give gentle air movement. A related seed starting mistakes to avoid guide covers this and other common errors in more detail.
How do I know when to move seedlings outside? Wait until the danger of frost has passed and nights stay above fifty degrees. Harden the plants off first by placing them outside for a few hours each day, in shade at first, then in sun, for about a week. Skipping this step shocks the plants and can kill them.
What do I do with seedlings that outgrow their cells? Pot them up. Move each seedling into a larger pot with fresh mix, handling the plant by its leaves, never by the stem. Water well after moving. When harvest season comes, our best garden apron for harvesting reviews will help you pick a comfortable apron, and a drip irrigation kit for flower beds can keep new transplants watered without daily hand watering.
A Short Final Word
Seed starting asks little of you and returns a great deal. A modest set of trays, lights, and tools turns a kitchen corner into a small nursery. The work is simple. The cost is low. The reward is a garden full of strong plants that you raised from the very first day. Use this checklist, gather your supplies before the season begins, and give your seeds the steady start they deserve.
References
Bob Vila. (n.d.). Home improvement advice. https://www.bobvila.com Burpee. (n.d.). Seeds, plants, and gardening supplies. https://www.burpee.com Consumer Reports. (n.d.). Product reviews and ratings. https://www.consumerreports.org Corona Tools. (n.d.). Garden and landscape tools. https://www.corona-tools.com Family Handyman. (n.d.). DIY home repair and maintenance. https://www.familyhandyman.com Fiskars. (n.d.). Garden and cutting tools. https://www.fiskars.com Gardener’s Supply Company. (n.d.). Gardening tools and supplies. https://www.gardeners.com Lowe’s. (n.d.). Home improvement products. https://www.lowes.com The Home Depot. (n.d.). Home improvement products. https://www.homedepot.com The Spruce. (n.d.). Home and garden advice. https://www.thespruce.com
Was this guide helpful?

About David Wilson
The My Garden US editorial team writes practical, in-depth home and garden guides for American homeowners — tested advice, no fluff.
You May Also Like
How to Make Compost Tea for Plants
August 7, 2026 0 views
Best Garden Cart for Heavy Loads: How to Choose the Right One
August 27, 2026 0 views
Garden Edging Ideas for Vegetable Beds: Borders That Work as Hard as You Do
August 31, 2026 0 views