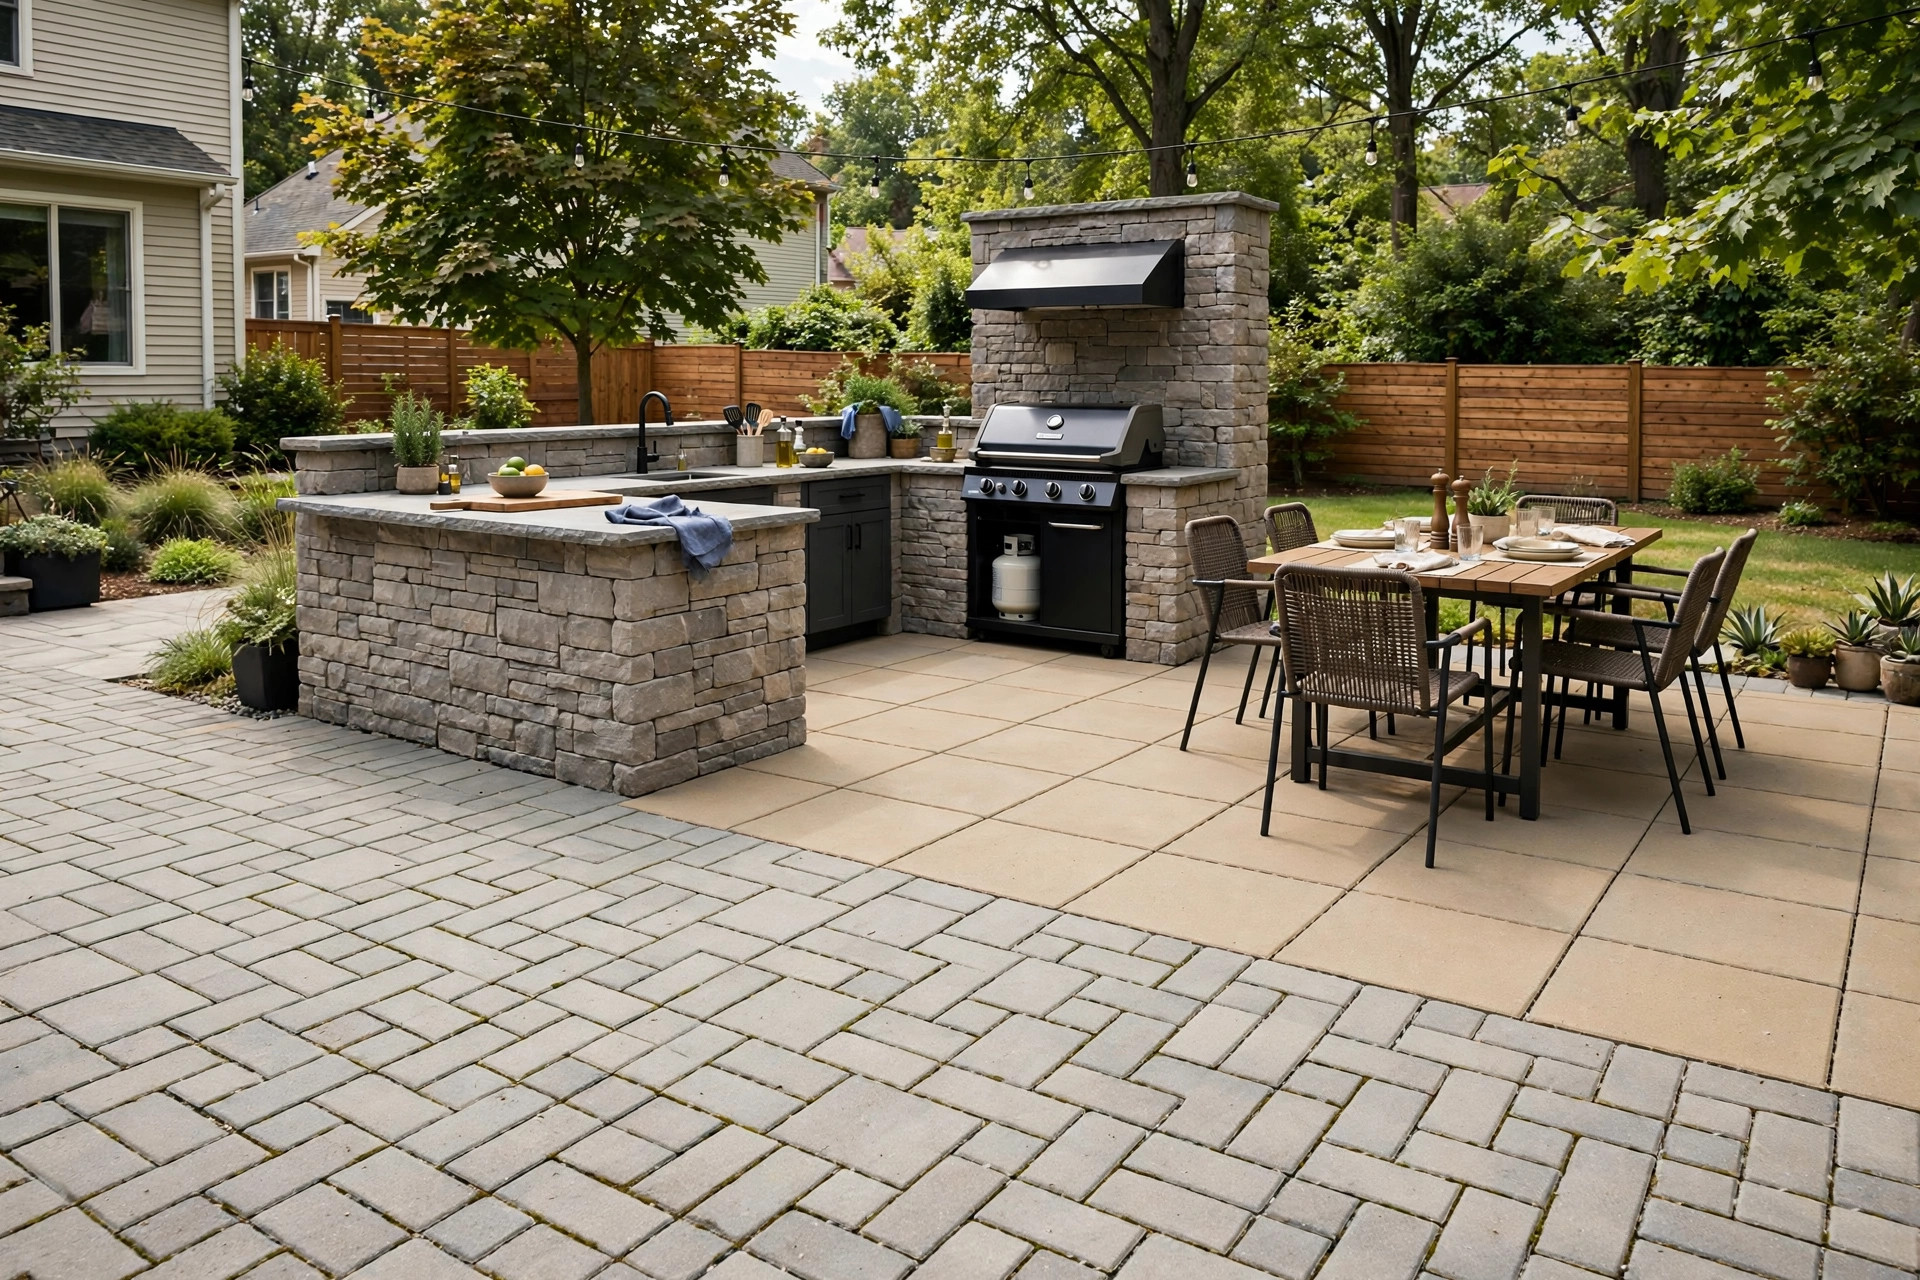

An outdoor kitchen is only as good as the floor beneath it. When you plan outdoor kitchen flooring options for patio spaces, the choice shapes safety, comfort, and cost. Grease will drip. Feet will shuffle. Chairs will scrape. The floor must take all of it and still look good years later. This guide walks through the main choices in plain terms, with prices, care needs, and honest trade offs, so you can pick the right surface for your cook space.
Why the Patio Floor Matters So Much
Most people pick the grill first. That is natural. The grill is the star. But the floor works harder than any appliance in an outdoor kitchen. It carries the weight of counters, a refrigerator, and a loaded grill. It faces heat, water, grease, and foot traffic in every season.
A poor floor choice causes real problems. Smooth tile gets slick when wet and can send a cook sliding while carrying a hot tray. Cheap wood boards rot fast near a sink. Loose gravel sticks to shoes and migrates into the grill. Each of these can be avoided with a sound choice at the start.
The right floor also sets the tone of the whole space. A warm brick patio feels like a country kitchen. A clean concrete slab feels modern and calm. Stone pavers lend a rustic air. Since the floor covers the largest area of the patio, it shapes the look more than any single appliance. Retailers who plan outdoor spaces, such as Home Depot, note that the floor is often the first decision in a layout because everything else must sit flat and stable on it.
What to Look for in an Outdoor Kitchen Floor: Outdoor Kitchen Flooring Options for Patio
Before comparing materials, know what a good floor must do. Keep these six points in mind as you read the options below.
Slip resistance. The floor around a grill and sink will get wet and greasy. Choose a surface with grip. Ask for the slip rating when you shop, or test a sample with wet shoes.
Heat tolerance. Dropped coals, splashed fat, and heat rising from a grill can damage some surfaces. The floor near the cook zone should stand up to heat without scorching or cracking.
Drainage. Water must run off, not pool. The patio needs a slight slope away from the house, usually about one quarter inch per foot. Some floors drain through joints; others need a sealed surface with a planned slope.
Weight capacity. A full outdoor kitchen can weigh thousands of pounds. Grills, stone counters, and ice chests add up. The base under the floor must be firm and well packed.
Cleaning. Grease stains are part of outdoor cooking. Pick a surface that can be hosed off and, when needed, scrubbed with a degreaser without harm.
Budget. Floor prices vary widely. When you build your outdoor kitchen on a budget, the floor is one place where smart choices save real money, because the square footage is large and small price gaps multiply fast.
The Main Types of Patio Flooring
Poured Concrete
Concrete is the workhorse of outdoor floors. A poured slab gives you a flat, strong, fireproof base at a modest price. It takes heavy loads without complaint and shrugs off heat from dropped coals. A simple broom finish gives decent grip.
Plain concrete can look dull, but it does not have to stay plain. Stains, dyes, and stamped patterns can make it look like stone or tile at a fraction of the cost. A sealer applied every two to three years keeps stains from setting and guards against freeze damage in cold states.
The main drawback is cracking. Concrete moves with heat and cold, and hairline cracks are common. Control joints, cut during the pour, help cracks stay small and straight. Cost runs about 6 to 12 dollars per square foot installed, or less if you pour it yourself.
Concrete Pavers
Pavers are thick blocks of molded concrete laid over a packed gravel base with sand in the joints. They are one of the most popular outdoor kitchen flooring options for patio builds, and for good reason. They come in many colors, shapes, and patterns. They drain well through the joints. And if one breaks, you can lift it out and set a new one without tearing up the whole floor.
Pavers sit slightly uneven by nature, but a careful installer keeps them flat enough for furniture. Weeds can sprout in the joints, though polymeric sand, which hardens when wet, keeps most of them out. Grease stains show on light colors, so many cooks choose mid tone or dark pavers near the grill.
Installed cost runs about 10 to 20 dollars per square foot. A handy homeowner can lay pavers as a do it yourself project, which cuts the cost nearly in half. Cooking sites that cover outdoor spaces, like The Spruce Eats, often point to pavers as the best balance of looks, strength, and repair ease.
Natural Stone
Flagstone, slate, and bluestone give a patio a timeless, solid feel. No two stones look alike, which many people love. Stone handles heat well and lasts for decades when set on a proper base.
Stone has two trade offs. First, the surface is uneven. That is fine for a dining corner but can make a rolling grill cart or a wheelchair hard to move. Second, the cost is high. Material and labor often reach 15 to 30 dollars per square foot or more.
If you choose stone, pick pieces with a rough face rather than a polished one. Polished stone turns slick when wet. A stone sealer helps fight grease stains. Keep a spare piece or two in the garage for future repairs, since matching old stone later can be hard.
Porcelain and Ceramic Tile
Outdoor rated porcelain tile gives a crisp, clean look and resists stains better than almost any other floor. Glazes shrug off grease, and the surface wipes clean with ease. Tile also offers endless color and pattern choices.
The catch is slipperiness and breakage. Only tile rated for outdoor use belongs on a patio. Look for a high slip resistance rating, often marked as R10 or higher, and a PEI wear rating suited to heavy traffic. Even then, a dropped cast iron pan can crack a tile. Keep spare tiles on hand.
Tile needs a solid concrete base and correct mortar, and grout lines must be sealed. Installed cost runs about 12 to 25 dollars per square foot. In regions with hard freezes, the tile must be rated for freeze and thaw, or ice will pop it loose.
Brick
Brick pavers bring warmth that suits classic and country style kitchens. Brick is fired clay, so it takes heat well and ages with charm. Like concrete pavers, single bricks can be replaced when damaged.
Brick costs about 10 to 18 dollars per square foot installed. It can be slick when wet if the surface is very smooth, so choose a rough or wire cut brick for the cook zone. Moss can grow in shaded, damp joints; a yearly wash keeps it in check.
Wood Decking
A wood deck feels warm underfoot and looks natural next to a garden. Cedar and redwood resist rot better than plain pine. But near a grill, wood demands care. Embers can scorch it. Grease soaks in. Boards need sealing every year or two, and even then the life span is shorter than stone or concrete.
Composite decking, made of wood fiber and plastic, lasts longer and needs less care. It resists stains and does not splinter. Still, it can get hot in direct sun, and it is not the best choice right beside a charcoal grill or fire pit. Wood and composite run about 8 to 20 dollars per square foot installed.
For many cooks, the best answer is a mix: a hard surface such as pavers or concrete under the grill and prep counters, with wood decking in the dining area beyond. This keeps heat and grease on the tough floor while feet rest on warm boards at the table.
Gravel and Decomposed Granite
Loose surfaces cost the least, sometimes under 3 dollars per square foot. They drain well and are easy to install. But they make a poor floor for a working kitchen. Chairs wobble. Carts sink. Grease is hard to clean from stone dust. Use these for paths and borders, not under the grill.
Cost and Price Comparison
Prices shift by region and by who does the work, but this table gives a fair sense of installed cost per square foot in the United States:
– Gravel or decomposed granite: 2 to 5 dollars – Poured concrete: 6 to 12 dollars – Wood decking: 8 to 15 dollars – Concrete pavers: 10 to 20 dollars – Brick pavers: 10 to 18 dollars – Composite decking: 12 to 20 dollars – Porcelain tile: 12 to 25 dollars – Natural stone: 15 to 30 dollars or more
Do not forget the base. A proper gravel base, edging, and drainage add to every option except a simple slab. Get at least two written quotes, and ask each builder what is included under the surface, not just on top of it.
When money is tight, a smart plan is to pour concrete now and upgrade later. Concrete accepts pavers or tile over it in the future. This phased approach lets you cook this summer and improve the look next year, a common tip in budget outdoor kitchen guides.
Care and Upkeep
Every outdoor floor needs some care. The good news is that most of it is simple.
Sweep the cook zone weekly. Crumbs and ash grind into surfaces underfoot. Hose the floor down monthly, or more often in heavy use. For grease spots, warm water with dish soap and a stiff brush handles most stains. For set in stains on concrete or pavers, a paste of baking soda and water left overnight often lifts the mark.
Reseal concrete, pavers, and stone every two to three years. The sealer blocks stains and slows freeze damage. It is a weekend job with a roller and a bucket. Wood needs stain or sealer every one to two years, more often in strong sun.
Check joints once a year. Sweep fresh sand into paver joints where it has washed out. Look for rocking stones or tiles and reset them before they crack. Clear leaves from corners, since trapped wet leaves stain many surfaces.
Grill makers remind cooks that the area under and around the grill takes the most abuse. Weber and Napoleon both advise keeping the ground under a grill clear of debris and easy to clean. A grill mat under the cook box catches drips and saves the floor beneath. Pellet grill owners find the same advice from Traeger, whose guides stress a clean, stable pad under the unit. Even kamado style cookers, which run very hot at the base, need a heat safe surface, a point echoed by Big Green Egg in its setup guidance.
Safety Around the Cook Zone
Safety starts with the floor. Keep the work triangle, the path between grill, sink, and prep counter, on the flattest and least slick surface. Avoid steps or lips in this zone where a cook carrying food could trip.
Leave clear space. Most grill makers call for at least three feet of clear floor around the cook box, and more where lids swing open. Broil King notes that stable, level ground under the grill prevents tipping, which matters most on soft or uneven patios.
Mind the heat below. Charcoal grills, smokers, and pizza ovens throw heat downward. Never set them on wood, composite, or artificial turf without a heat shield. A concrete or stone pad is the safe base. Barbecue experts at AmazingRibs have long warned that heat damage to decks is one of the most common outdoor cooking mistakes.
Light the floor well. A cook who cannot see a wet spot cannot avoid it. Simple step lights or string lights over the work zone cut the risk of slips after dark. Keep a fire extinguisher within reach of the grill, and know that a class B extinguisher suits grease fires.
Consumer testing groups add a useful check: read the safety labels on any grill or outdoor appliance before you plan the floor around it. Consumer Reports publishes buying guides that cover clearance and placement rules worth reading before you pour a slab or lay pavers.
Matching the Floor to Your Kitchen Style
The floor should suit how you cook and how the space looks. A few pairings work well.
A modern kitchen with stainless steel and straight lines suits stained concrete or large format porcelain tile. The clean lines of the floor echo the clean lines of the cabinets. When you pick countertop materials for the outdoor kitchen, keep the tones in the same family so the two surfaces do not fight.
A rustic kitchen with a smoker and wood fired oven suits flagstone or tumbled pavers. The rough texture fits the mood and hides ash and wear. A classic brick patio suits a kettle grill and a simple prep table, a look many backyard design ideas return to again and again.
Small patios gain from large pavers or tiles with few joints. Fewer lines make the space feel bigger. Large patios can use borders and inlays, a darker band of pavers around the cook zone, for example, to mark spaces without walls.
FAQ
What is the best flooring for an outdoor kitchen on a patio? Concrete pavers are the best all round choice for most homes. They are strong, drain well, resist heat, and single pavers can be replaced if damaged. Poured concrete is the best value. Natural stone is the most beautiful but costs the most.
Can I put a grill directly on a wood deck? It is not wise without protection. Heat and embers can scorch or ignite wood. If the grill must sit on a deck, use a listed grill mat or a concrete pad under it, keep clearances the maker calls for, and never leave a lit grill alone. A stone or concrete cook pad is safer.
Do I need a permit for a patio floor? Rules differ by town. A simple paver patio often needs no permit, while a poured slab, gas line, or roof structure often does. Call your local building office before you start. This is true for any outdoor kitchen design plan that adds plumbing or electric work.
How do I keep grease from staining my patio? Act fast. Blot fresh grease, then scrub with dish soap and hot water. A grill mat under the cook zone catches most drips before they reach the floor. Sealers on concrete, pavers, and stone make stains far easier to lift.
Is tile too slippery for an outdoor kitchen? Indoor tile is, but outdoor rated porcelain with a high slip rating is made for wet feet. Choose tile marked for outdoor use with strong grip, keep the slope right for drainage, and place mats in the busiest spots. Many cooks still prefer pavers for maximum grip.
How long does patio flooring last? A well built concrete or stone floor can last 25 years or more. Pavers last 20 years or longer with joint care. Tile lasts decades if the base is sound. Wood decks last 10 to 15 years, composite 20 to 25. Upkeep, more than material, decides the real life span.
A Final Word
There is no single perfect floor, only the right floor for your cooking style, your climate, and your budget. Start with the hard facts: grip, heat, drainage, weight, and cost. Then let taste decide among the options that pass those tests. Pavers suit most families. Concrete suits tight budgets. Stone suits those who want a patio that looks as good in twenty years as it does on day one.
Measure your space, price two or three options, and build the base right. A floor laid on a firm, well drained base will serve your outdoor kitchen for decades of good meals. Take your time with this choice, and the rest of the kitchen, from grill to counters, will have a solid place to stand.
References
AmazingRibs.com. (n.d.). Barbecue and grilling science. https://www.amazingribs.com Big Green Egg. (n.d.). Kamado grills and outdoor cooking. https://www.biggreenegg.com Broil King. (n.d.). Gas and charcoal grills. https://www.broilkingbbq.com Consumer Reports. (n.d.). Product reviews and ratings. https://www.consumerreports.org Napoleon. (n.d.). Fireplaces, grills, and heating products. https://www.napoleon.com The Home Depot. (n.d.). Home improvement products. https://www.homedepot.com The Spruce Eats. (n.d.). Recipes and cooking guides. https://www.thespruceeats.com Traeger. (n.d.). Wood pellet grills. https://www.traeger.com Weber. (n.d.). Grills and outdoor cooking. https://www.weber.com
Was this guide helpful?

About Emily Rodriguez
The My Garden US editorial team writes practical, in-depth home and garden guides for American homeowners — tested advice, no fluff.
You May Also Like

The Best Offset Smoker Under 500 Dollars: A Buyer’s Guide
March 6, 2026 0 views
Best Infrared Grill for Steaks Reviews: How to Find Your Perfect Sear
May 7, 2026 0 views
Best Outdoor Mini Fridge for Patio: How to Choose One That Lasts
June 26, 2026 0 views