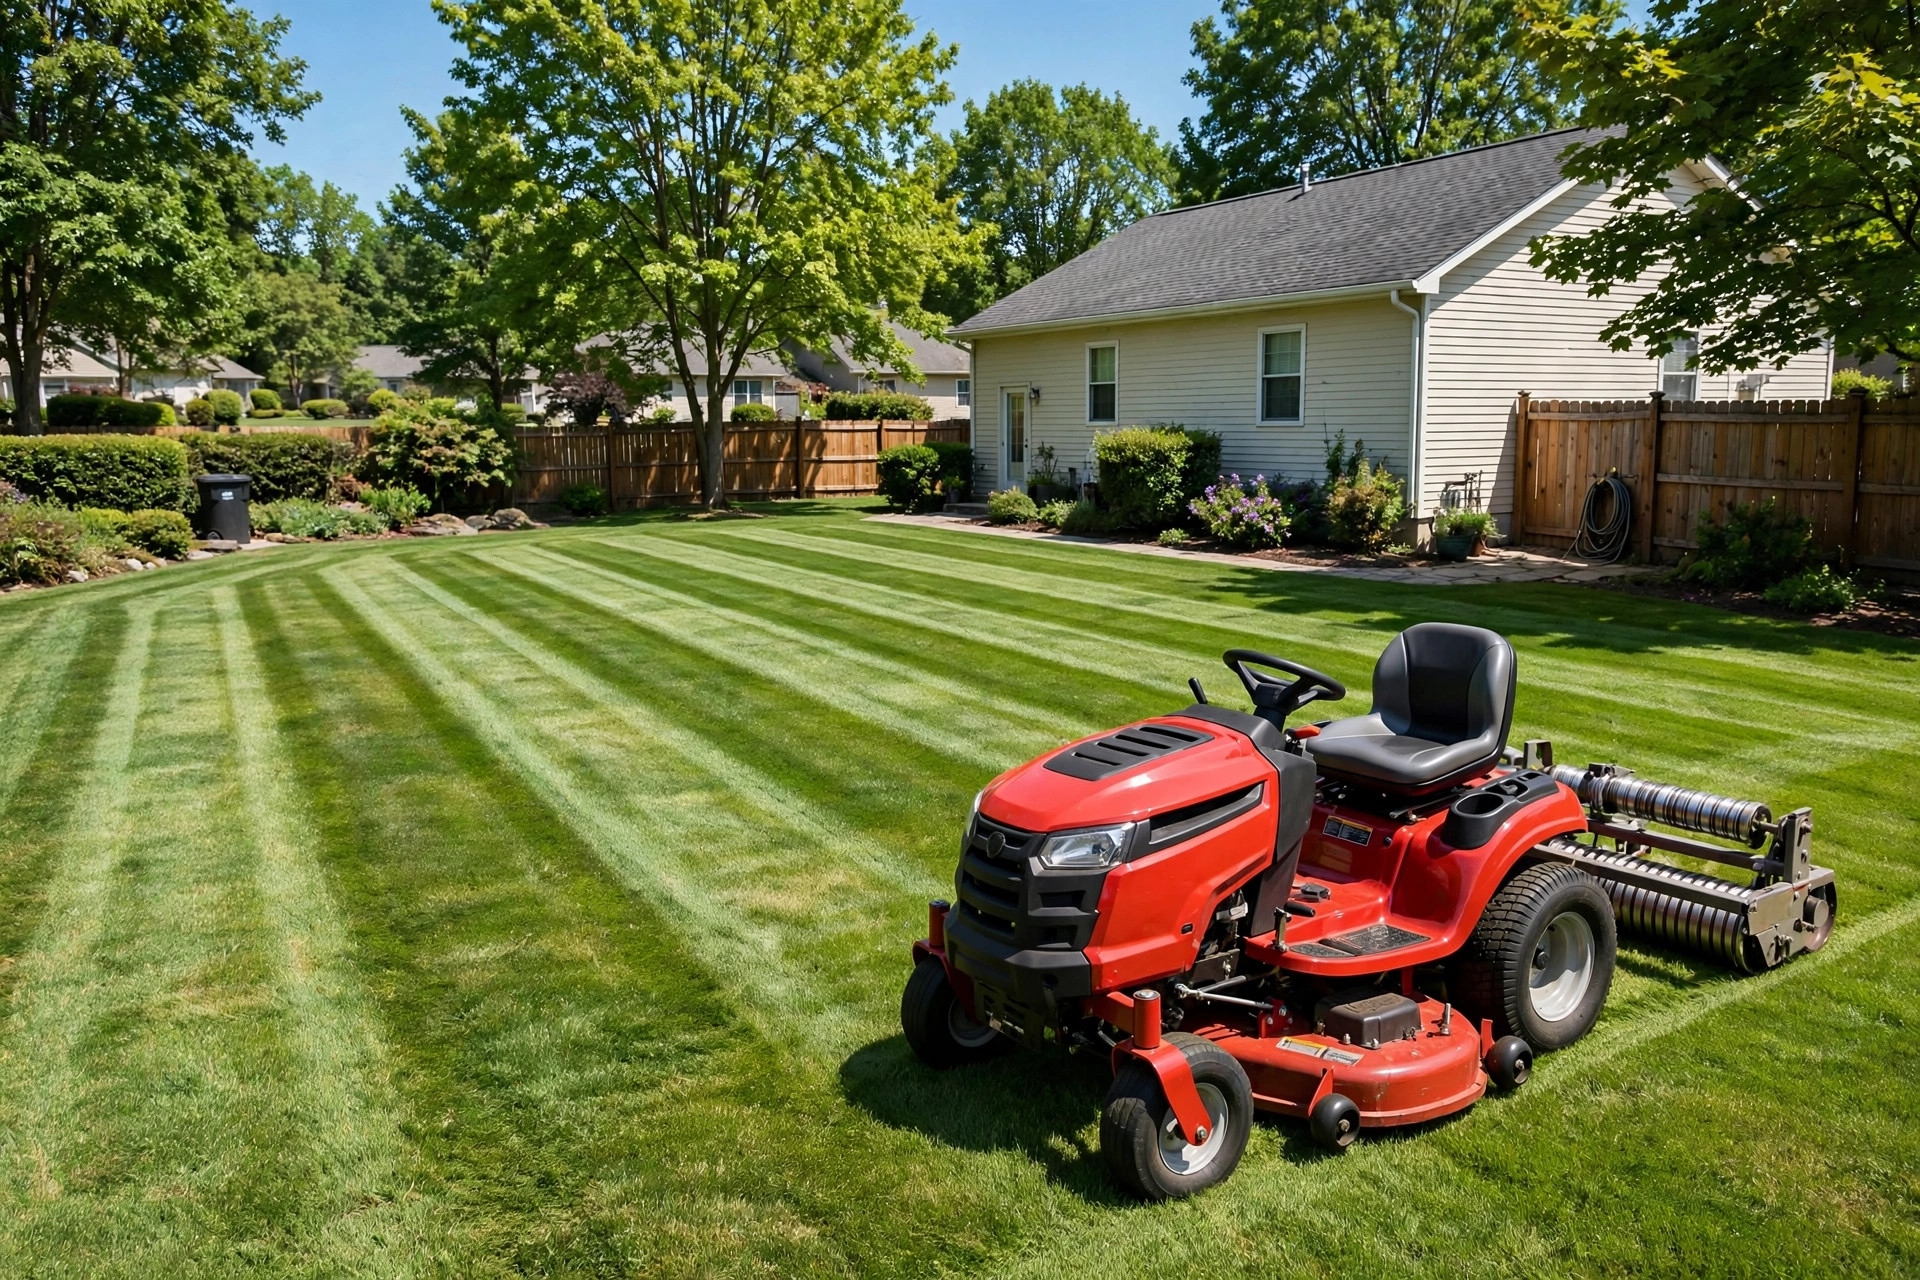

Every ballpark has them. Those light and dark bands of grass run across the field in neat rows. They look like they take a crew of men to make. In truth, they come from a simple trick. The grass is bent one way, then the other. A lawn striping kit for riding mowers brings that same trick to your own yard. It is a small attachment that bolts to the back of your mower. It bends the grass as you mow. The result is the striped look you see at the stadium.
You do not need a new mower to get it. You do not need pro tools. You need the right kit for your mower, a little time to put it on, and a plan for how you mow. This guide will walk you through it. It covers how striping works, the types of kits you can buy, what to check before you order, what they cost, and how to keep the kit in good shape.
Why Stripes Matter
A striped lawn stands out. Neighbors notice it. It gives a yard a clean, cared-for look, even if the lawn is not perfect. Stripes hide small flaws. Thin spots and uneven growth draw less notice when the eye follows long bands of light and dark green.
There is also a real benefit to the grass. The kit bends the blades without cutting them short. When it is set right, it does not scalp or tear the lawn. The look is the prize, but the lawn gets a fair deal too.
If you already own a rider, the kit is one of the cheapest upgrades you can make. A new deck, new blades, or a bigger mower all cost real money. A lawn striping kit for riding mowers costs less than a bag of fertilizer in most cases. It changes the look of the whole yard in one mow.
How a Striping Kit Works: Lawn Striping Kit for Riding Mowers
The idea is old and simple. Light bounces off grass blades. When blades lean away from you, they catch more sun and look light. When they lean toward you, they look dark. A striping kit presses the grass flat in one direction right after the blade cuts it. Mow one pass going north, and the next going south. The rows alternate light and dark.
Most kits use a roller. It is a bar or a set of wheels that drags behind the mower deck. The weight of the roller bends the grass. Some kits use a flap of rubber or heavy plastic instead of a roller. Both do the same job. They push the grass down in the direction of travel.
Your mower deck leaves faint lines on its own. A striping kit makes the lines sharp and even, bending the grass edge to edge across the cut.
Types of Striping Kits
Kits come in three main forms. Each has its own merits.
Roller bars. Steel or plastic bars that mount across the back of the deck. Wide, smooth, and simple, they roll or drag along the ground. They give the boldest stripes and work best on flat or nearly flat lawns.
Flap kits. These use a strip of thick rubber, often cut from a conveyor belt or a mud flap. The flap drags behind the deck and combs the grass flat. Flap kits are light and cheap. They follow bumps and dips better than a rigid bar. On rough ground, they often stripe better than a roller.
Wheel kits. One or two small wheels mounted behind the mower that press a narrow band of grass down. They are easy to fit and they last long. The stripes are softer than those from a full roller bar. They are a good choice if your ground is rough or full of roots.
Some kits are made to fit one brand of mower. Others are universal and fit many brands with bolts and clamps. Universal kits take more time to set up, but they let you keep the kit when you change mowers.
What to Look For When You Choose
Start with fit. Measure the width of your mower deck. Most decks run from 38 to 54 inches. The kit should match the deck or run a little wider. A kit that is too narrow leaves a gap with no stripe. A kit that is too wide may catch on fences and trees.
Check how the kit mounts. Some kits bolt to holes that are already in the deck. Some clamp to the deck edge. Some hang from the back of the frame. Bolt-on kits are the most solid. Clamp-on kits are easier to remove. Think about how often you will take the kit off. If you bag leaves in the fall, you may want to pull the kit for the season.
Look at the weight. A heavier roller makes sharper stripes. But too much weight can wear the grass, and it adds load to the mower. Kits that let you add or take away weight are worth a look. Sand, water, or steel plates are common ways to change the weight.
Check the ground clearance. The kit should sit low enough to press the grass, but not so low that it digs into dirt on bumps. Kits with a chain or spring mount ride up and over small rises. Rigid mounts give better stripes on flat ground but can scalp on hills.
Read the hardware list before you buy. Good kits come with all bolts, washers, and brackets. Poor kits leave you hunting for parts at the hardware store. Stainless or coated steel hardware holds up better in wet grass than bare steel.
Finally, match the kit to your grass. Thick, stiff grasses like tall fescue and bluegrass stripe well. A kit will not hide a lawn that is not healthy, so fix thin or weedy turf first. A good lawn roller can smooth bumps before you start; see our guide to the best lawn roller for leveling uneven ground.
Cost and Price
Most kits sell for between 80 and 250 dollars. Flap kits sit at the low end. Full roller bars sit at the high end. Brand-name kits made for a specific mower, such as those sold by Toro or John Deere dealers, often cost more than universal kits. They also tend to fit better with less fuss.
You can build your own kit from a rubber mat and a piece of steel. It can work well if mounted straight and level, but it will not last as long as a store-bought kit and may void part of your mower warranty if it damages the deck.
Do not forget the mower itself. A striping kit will not fix a dull blade or a weak engine. If your mower is on its last legs, put the money toward a new machine first. Read our guide to the best riding lawn mower for one acre lots if you are shopping. Sharp blades matter more than any kit. A clean cut bends well. A torn cut turns brown at the tips and ruins the striped look.
How to Install Your Kit
Most kits go on in under an hour. You will need basic hand tools, a jack or ramps, and a flat place to work. Chock the wheels. Disconnect the spark plug wire so the mower cannot start by accident.
1. Park the mower on flat ground and set the brake. 2. Raise the back of the mower or slide under it safely. 3. Hold the kit up to the back of the deck and mark where the brackets will bolt. 4. Drill new holes only if the kit calls for them. Use the holes already in the deck when you can. 5. Bolt the brackets on snug, but do not tighten them all the way yet. 6. Hang the roller or flap from the brackets. Check that it sits level across the deck. 7. Tighten all bolts. Grease any pivot points the kit has. 8. Lower the mower and check clearance. The roller should just touch the grass at your normal cutting height.
Take a test pass on a flat part of the lawn. Look back at the stripe. If it is weak, add weight or lower the kit a little. If the kit digs dirt, raise it. Small changes make a big difference.
Keep the kit bolts tight. Vibration loosens them. Check them each month during the mowing season. If your deck needs service at the same time, our riding mower deck belt replacement guide walks through that job step by step.
Mowing for the Best Stripes
The kit does the bending, but how you mow shapes the pattern. Mow in straight lines. Use a fixed point, such as a tree or a fence post, to keep your rows straight. Overlap each pass by a few inches so no strip of grass is missed.
Alternate direction on each pass. Go north, then south. The stripes appear where one pass leans one way and the next leans the other. For a checkerboard, mow the whole lawn in one direction, then mow it again at a right angle.
Never mow wet grass; clumps ruin stripes. Mow in the late morning after the dew has dried, and keep your speed steady. Fast starts and stops leave marks.
Change your pattern now and then. Mow north-south one week, east-west the next. This keeps the grass from leaning one way for good, which can thin the lawn over time.
Cut at the right height. Most cool-season grasses do best at three to three and a half inches. Tall grass bends well and shows bold stripes. Short grass shows little contrast. Let the grass grow a bit longer than usual in striping season.
Care and Upkeep
A striping kit is a simple tool, and it needs little care. But a little care goes far.
Clean the kit after each mow. Grass packs onto rollers and flaps, and wet grass turns to a crust that is hard to remove. A quick spray with the hose keeps it clean, and drying the steel parts keeps them from rusting.
Check the roller for dents and flat spots. A dented roller leaves a line in every stripe. Steel rollers can be straightened with care. Plastic rollers with deep cuts should be replaced.
Check rubber flaps for cracks. Sun and age make rubber stiff. A stiff flap does not comb the grass well. Replace the flap when it starts to crack at the bends.
Oil chains, springs, and pivot bolts now and then. Keep grease off the grass-contact surfaces, or you will leave dark marks on the lawn.
Store the kit out of the weather when you can. Winter is the best time to take the kit off, clean it, and touch up any bare metal with paint.
Safety
A striping kit hangs low behind the mower. It can catch on roots, rocks, and stumps. Walk your yard before the first striped mow of the season. Pick up sticks, toys, and stones. Mark stumps and low spots.
Back up with care, since the kit sticks out behind you. Turn around and look before you reverse. Keep children and pets out of the yard while you mow.
Let the engine cool before you work on the kit. Mower decks get hot. Wear gloves when you handle bolts and brackets. Never reach under the deck while the engine is on.
Do not overload the kit. Extra weight sharpens stripes, but it also strains the mounts. Stay within the weight the maker lists. If a bracket bends, fix it before you mow again.
Read your mower manual. Some makers warn against rear attachments. If your manual warns against them, check with the dealer before you bolt a kit on. Maker sites such as Toro, John Deere, and Briggs & Stratton list parts and advice for their own machines.
FAQ
Will a striping kit fit any riding mower? Most universal kits fit most riders, but not all. Check the deck width and the mount style. Brand-specific kits fit their brand best. Measure twice before you order.
Does a striping kit hurt the grass? No, when it is set right. The kit bends the grass, it does not cut it. Keep the weight fair and the kit level, and do not stripe the same way every week.
Can I stripe with a zero-turn mower? Yes. Zero-turn mowers stripe well because they turn sharp and hold straight lines. Buy a kit made for zero-turn decks, since the mount points differ from a lawn tractor.
How long does a kit last? A good steel kit lasts five to ten years with basic care. Rubber flaps wear faster and may need to be replaced every two or three seasons.
Will stripes show on any grass? Stripes show best on thick grasses like bluegrass, fescue, and ryegrass. Warm-season grasses like bermuda and zoysia show softer contrast. A thin or weedy lawn will show weak stripes no matter what kit you use.
Can I make my own striping kit? Yes. A rubber flap and a steel bar from the hardware store can work. Mount it straight and level. A home-made kit costs little, but it may not last and it can void part of your mower warranty.
A Final Word
A lawn striping kit for riding mowers is a small buy that makes a big change. It takes an hour to mount and a season to master. Start with straight rows, keep your blades sharp, and change your pattern now and then. In a few weeks your yard will carry the same bands you see at the ballpark.
References
Toro. (n.d.). Lawn mowers and yard equipment. https://www.toro.com John Deere. (n.d.). Lawn care and riding mowers. https://www.deere.com Briggs & Stratton. (n.d.). Small engines and outdoor power equipment. https://www.briggsandstratton.com
Was this guide helpful?

About David Wilson
The My Garden US editorial team writes practical, in-depth home and garden guides for American homeowners — tested advice, no fluff.
You May Also Like
Best Soil for Topdressing Lawn Reviews: A Plain Guide to What Really Works
March 8, 2026 0 views
Lawn Dethatcher Rental Prices Near Me: What You Will Pay
July 22, 2026 2 views
Top Rated String Trimmer for Thick Weeds: A Practical Guide
January 17, 2026 2 views