
When you search for concrete paver installation cost near me, you want a plain answer. How much will the job cost in my town? What makes the price go up or down? How do I find a good installer who charges a fair price?
This guide gives you those answers. It explains how installers price concrete paver work. It shows what to look for when you hire. And it tells you how to keep your new pavers looking good for years.
Why Paver Prices Differ From Place to Place
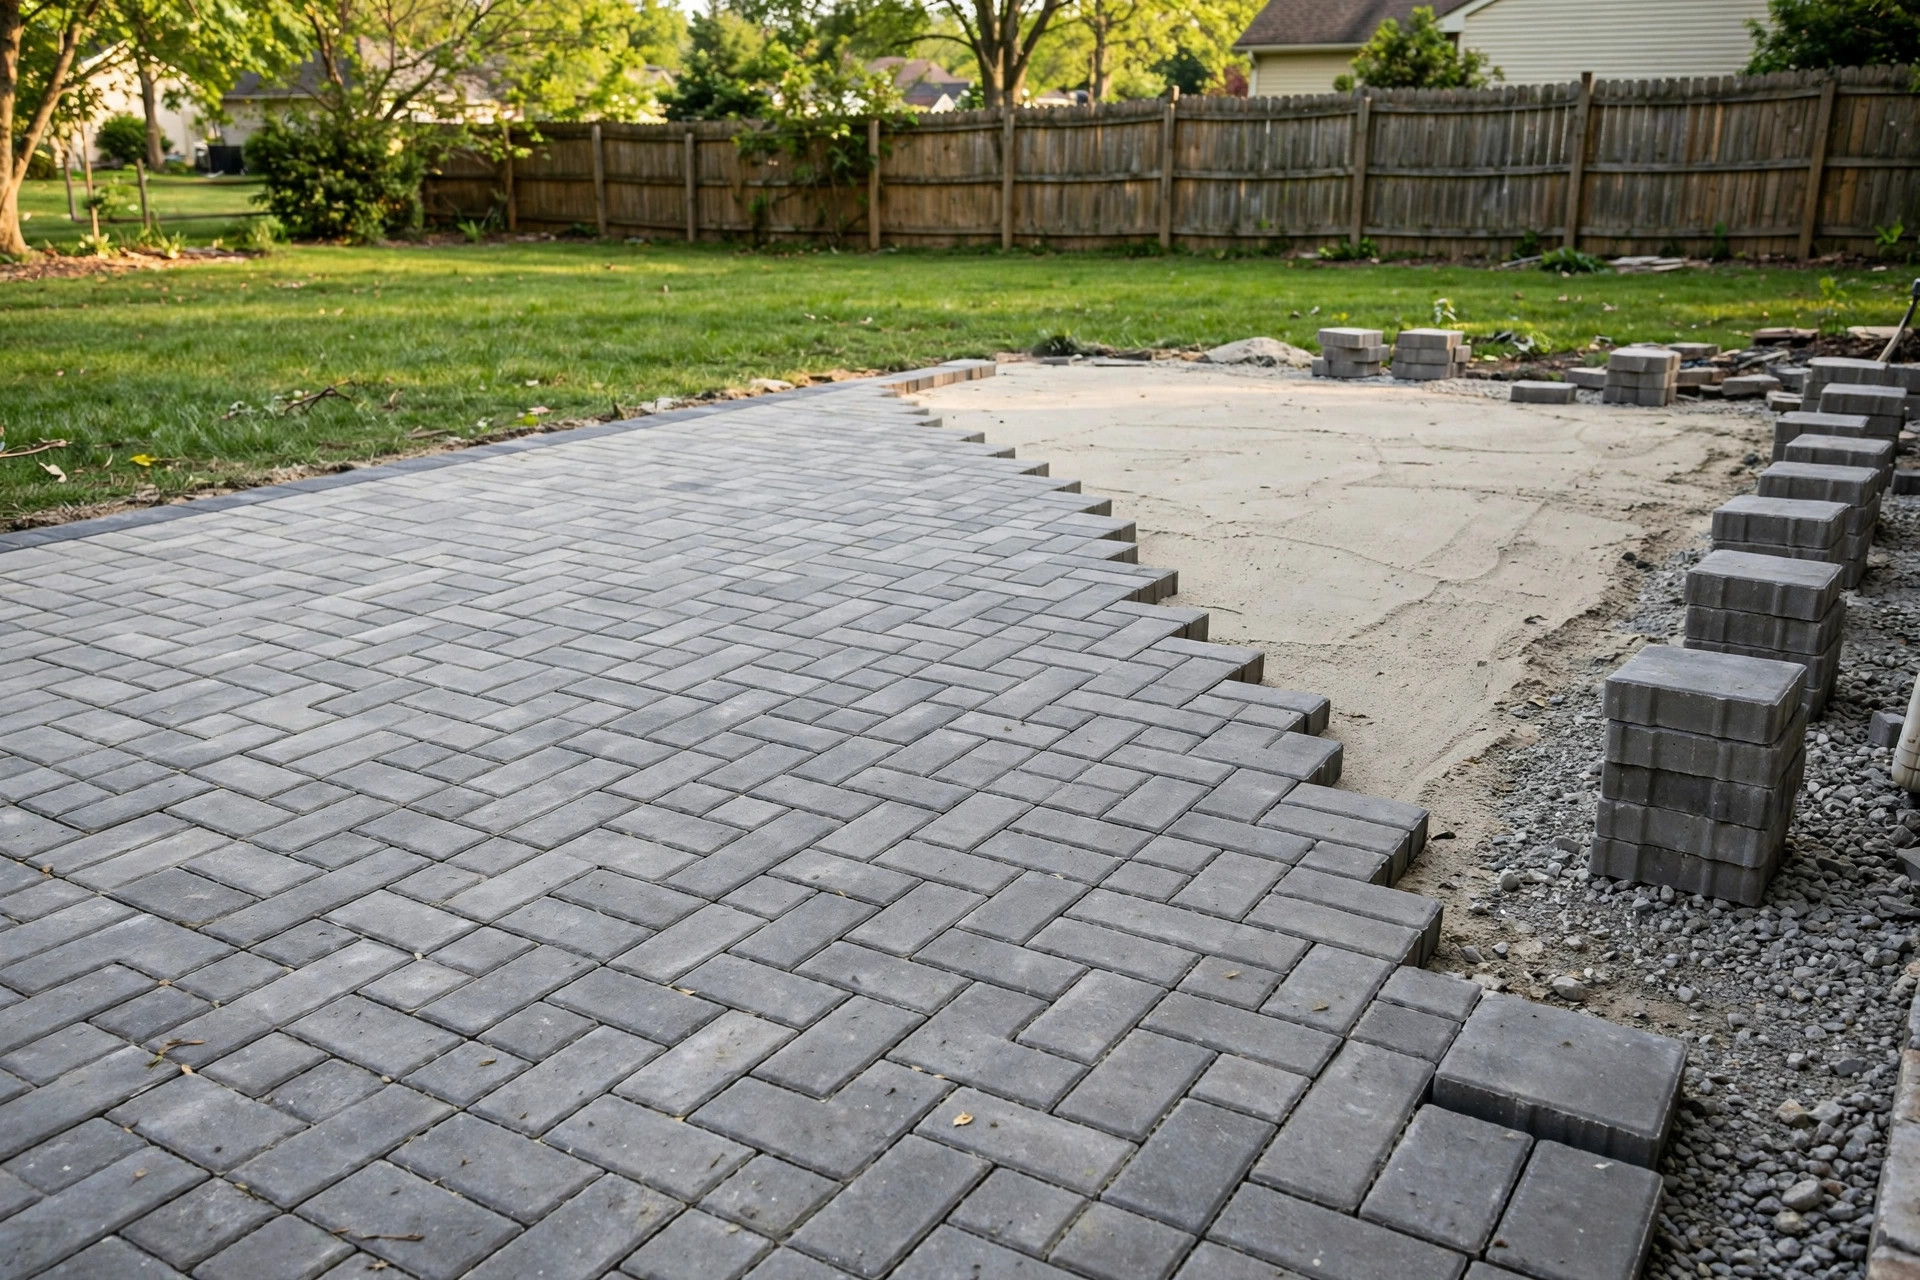
Concrete pavers are thick blocks of molded concrete. They sit on a prepared base of gravel and sand. They form patios, walkways, driveways, and pool decks. They are not poured slabs. They are individual stones that lock together.
The cost of hiring someone to install them is never one fixed number. Prices change from town to town. They change from season to season. They change with the size of the job and the ground under it.
That is why a local search matters. A national average only tells you so much. Your soil, your labor market, and your climate shape the final bill. The steps below show you how to find out what work in your area truly costs.
What Affects the Price of Installation: Concrete Paver Installation Cost near Me
Most installers price paver work by the square foot. They add extra charges for difficult sites or special designs. Here are the main factors.
The Pavers Themselves
Not all concrete pavers cost the same. Plain gray pavers are the cheapest. They work well and last long. They just look simple.
Pavers that copy the look of stone, brick, or slate cost more. They have texture and color mixed through the surface. Some are tumbled for an aged look. The nicer the face of the paver, the higher the price per piece.
Thicker pavers cost more too. Walkway and patio pavers are usually about two and three-eighths inches thick. Driveway pavers run three and one-eighth inches thick. The extra depth lets them carry cars.
When you compare quotes, check which paver the installer plans to use. A low bid may use thin, plain blocks. A higher bid may use premium, thick pavers. The material alone can move the price by several dollars per square foot.
Labor
Labor is the largest part of most paver jobs. Setting pavers takes time and skill. The crew must dig, haul gravel, compact the base, screed the sand, lay the stones, cut edges, and sweep in joint sand.
In areas where skilled crews are in high demand, labor costs more. Small towns often charge less than big cities. A job done in the busy season may cost more than the same job done in the slow season.
Ask each bidder how many days your job will take. A crew of three can often finish a simple patio in two to three days. A driveway may take a week or more.
Site Conditions
Your yard shapes the price more than many owners expect. The installer must remove grass, soil, or old concrete. They must haul the waste away. Then they must bring in gravel and sand for the base.
Flat ground is easy. A slope costs more. The crew must build a level base on uneven land. That means more digging and more material.
Poor drainage costs more too. Wet soil or a low spot may need extra gravel and a drain line. Trees near the work area add root removal. Old concrete that must be broken up adds a day of hard work.
Walk the site with each bidder. Point out slopes, roots, and wet spots. An honest installer will explain how these items change the price.
Design and Pattern
Simple patterns go fast. A running bond or simple brick pattern lets the crew work in a steady rhythm. Cuts along the edges are few.
Complex patterns take longer. Herringbone, basket weave, and circle kits need careful cuts. Borders, inlays, and multiple colors slow the work. Each of these adds labor hours.
Small projects also cost more per square foot than large ones. A fifty-square-foot landing has the same setup and hauling as a patio three times its size. The setup cost spreads over fewer feet, so the per-foot price rises.
How to Choose an Installer Near You
Finding a good local installer is as important as finding a good price. Use these steps.
First, get three written quotes. Each quote should list the same items: removal of old material, base depth and type, paver name and thickness, edge restraint, joint sand, and cleanup. When the lists match, you can compare prices fairly.
Second, check references. Ask for three jobs in your area that are at least one year old. Look at them if you can. Pavers that have lasted a year without sinking tell you the base was built right.
Third, ask about the base. A proper base is the heart of the job. Most good crews dig six to twelve inches deep. They lay four to six inches of compacted crushed gravel. Then they add one inch of coarse sand for bedding. Shallow bases sink and shift. Ask for the depth in writing.
Fourth, ask about insurance and guarantees. The installer should carry liability insurance. The guarantee should cover settling and shifting for at least one year. Many good installers offer two to five years.
Fifth, read home guides before you sign. Major home improvement retailers and national home centers publish paver project guides that explain each step. Home guides from The Spruce and This Old House show how a proper installation should look. Flooring makers such as Shaw Floors and Mohawk Flooring publish outdoor surface advice as well. LL Flooring and Daltile offer hard-surface guides that help you judge the quality of a bid.
Be wary of any bid that skips the written details. A verbal promise means little when pavers start to sink.
Types of Concrete Pavers
Knowing the types helps you talk with installers. These are the most common.
Standard interlocking pavers. These are the classic choice. They come in rectangular or shaped forms. They lock together so they cannot shift sideways. They suit patios, walkways, and driveways.
Permeable pavers. These have wide joints filled with small stone. Rain passes through the joints into the ground below. They reduce runoff and puddles. Some cities require them in certain areas. They cost more to install because the base is deeper.
Tumbled pavers. These are tumbled in a drum to round the edges. They look old and soft, like ancient stone. They suit gardens and cottage-style homes. The rounded edges make them a poor choice where snow must be shoveled often.
Large-format pavers. These are big slabs, sometimes two feet square or larger. They give a modern look with fewer joints. They need a very flat base, since any dip shows under a large slab.
Pavers with built-in color. Some pavers mix color all the way through the block. Chips and scratches show less on these. Others have color only on the face. Ask which type your installer offers.
Your choice affects both looks and price. Talk through the options during the quote visit.
Typical Cost Ranges
Actual prices move with the market, but ranges help you plan. For a standard patio or walkway, installed cost often falls between ten and twenty dollars per square foot. This includes removal of grass, a proper gravel base, standard pavers, and cleanup.
Driveways run higher. They need thicker pavers and a deeper base. Installed driveway pavers often fall between fifteen and thirty dollars per square foot.
Permeable systems run higher still. The deeper stone base and special joints add cost. Premium pavers, complex patterns, and difficult sites push any project toward the top of its range.
These numbers are guides, not promises. Your three local quotes will tell you the true number for your town. If all three quotes land near each other, that range is your local market price. If one quote is far below the others, ask what was left out.
For comparison with indoor work, look up tile installation cost per square foot when you plan a bathroom or kitchen. The same square-foot logic applies indoors, though indoor crews skip the gravel base. If your project touches wood floors, check hardwood floor installation cost near me for local labor rates. And if your home sits on a slab, read about the best basement flooring for a concrete slab before you choose a surface.
Care and Upkeep
Concrete pavers ask for little care. A few simple steps keep them looking new.
Sweep the joints clean each season. Leaves and dirt that sit on the surface can stain. A garden hose or a light pressure washer removes most marks. Keep the washer on a low setting. A hard blast can wash joint sand out of the gaps.
Refill joint sand when it runs low. Polymeric sand is a common choice. It hardens when wet and resists ants and weeds. Sweep it into dry joints, then mist it lightly with water.
Seal the pavers every three to five years if you want the color to stay rich. Sealer darkens the surface and guards against stains. It is not required for strength. Many owners skip sealer and accept a natural fade.
Pull weeds that grow in the joints. A weed killer made for paver joints works well. Do not let roots grow large in the gaps, since they can lift the stones.
Watch for sinking. Small dips can happen after heavy rain. Most good installers will lift and re-level the area under their guarantee. After the guarantee ends, a paver crew can fix a small spot in a few hours. One of the best traits of pavers is that they can be lifted and reset. A poured slab cannot be repaired so simply.
Safety
Paver work involves real hazards. Know them before the crew arrives and before you try any part of the job yourself.
Wet pavers can be slippery. Choose a textured paver for pool decks and walkways that stay damp. Keep the surface free of algae with regular washing.
Edges must be restrained. Without a metal or plastic edge, the border pavers drift outward. That creates gaps where feet catch. Make sure your quote includes edge restraint.
Digging is dangerous where wires and pipes hide. Call your local utility locator service before any digging begins. A good installer does this as a matter of course. If you dig yourself, mark the lines first.
Cutting pavers throws dust and chips. Crews should wear eye guards, ear guards, and dust masks. Keep children and pets away from the cutting area. The noise of a wet saw carries far and can startle small animals.
Stacked pallets of pavers are heavy. Do not let children climb on them. A full pallet can weigh over three thousand pounds.
Frequently Asked Questions
How long does a paver installation take? A simple patio takes two to four days. A driveway takes five to ten days. Rain, hard soil, and complex patterns add days. Your installer should give you a schedule in writing.
Can pavers be installed over an old concrete slab? Yes, in some cases. The slab must be sound and must drain well. The installer lays bedding sand on the slab and sets thin pavers on top. If the slab is cracked and heaving, it must be removed first.
Do concrete pavers crack in cold weather? Well-made pavers resist freeze and thaw. The joints give them room to move. The base below must drain freely. Standing water under the pavers is what causes most winter damage. A proper gravel base drains the water away.
How long do concrete pavers last? Most last twenty-five to fifty years. The color may fade with time. The stones themselves stay strong. Individual pavers that stain or chip can be lifted and replaced one at a time.
Is it cheaper to install pavers myself? You save the labor cost, which is large. But you must rent a compactor and a saw, buy gravel and sand, and haul tons of material. Mistakes in the base lead to sinking. Most owners find that a pro crew earns its fee on the base work alone.
Should I seal my new pavers right away? Most makers say to wait about sixty days. Fresh pavers carry salts that bloom on the surface. Let them weather through a few rains first. Then clean and seal if you wish.
A Final Word
The true concrete paver installation cost near me is the price three good local installers quote for the same written job. Get those quotes. Compare the base, the paver, and the guarantee. Then choose the crew that builds it right, not the one that simply bids low. A well-laid paver patio will serve your home for decades. A rushed one will remind you of its price every time it sinks.
References
Daltile. (n.d.). Ceramic and porcelain tile. https://www.daltile.com LL Flooring. (n.d.). Hardwood, vinyl, and tile flooring. https://www.llflooring.com Lowe’s. (n.d.). Home improvement products. https://www.lowes.com Mohawk Flooring. (n.d.). Flooring products. https://www.mohawkflooring.com Shaw Floors. (n.d.). Flooring products. https://www.shawfloors.com The Home Depot. (n.d.). Home improvement products. https://www.homedepot.com The Spruce. (n.d.). Home and garden advice. https://www.thespruce.com This Old House. (n.d.). Home renovation guidance. https://www.thisoldhouse.com
Was this guide helpful?

About Jennifer Lee
The My Garden US editorial team writes practical, in-depth home and garden guides for American homeowners — tested advice, no fluff.
You May Also Like
Coir Doormat vs Rubber Doormat: Which Wins in the USA?
July 1, 2026 0 views
How to Measure for Flooring Calculator USA
February 8, 2026 0 views
Best Tile for Shower Ceiling Reviews USA: A Plain Guide to What Works Overhead
August 25, 2026 0 views