
Every spring, the gardener faces the same problem. The days grow warm, but the nights stay cold. The seed packets promise early harvests, yet tender young plants die in a late frost. Gardeners have fought this battle for centuries, and one of their oldest tools is the cold frame. A cold frame is a simple box with a clear lid. It catches the heat of the sun and holds it close to the soil. It costs little. It needs no power. And thanks to cold frame construction plans free of charge in books, magazines, and libraries, anyone with basic tools can build one in a weekend.
This guide shows you how to pick good free plans, what materials you need, how to build the frame step by step, and how to use it through the year. It is written for the beginner who owns a saw, a drill, and a patch of garden soil.
Why a Cold Frame Matters
A cold frame works like a small greenhouse. Sunlight passes through the clear lid and warms the soil and air inside. At night, the lid holds some of that warmth back. On a cold March day, the air inside can run ten to twenty degrees warmer than the air outside it. That gap lets you sow lettuce, spinach, radish, and onion weeks before the ground is ready, and it hardens off tomato and pepper seedlings for the open garden.
Cold frames also teach patience and care. Unlike a heated greenhouse, a cold frame asks the gardener to watch the weather. On warm sunny days, you lift the lid to let the heat out, or the plants cook. On cold nights, you cover the lid with an old blanket or a straw mat to hold the warmth in.
For the budget-minded gardener, the cold frame is hard to beat. A frame built from free plans and salvaged lumber can cost less than a single trip to the garden center. It uses no fuel and makes no noise.
What to Look for in Good Free Plans: Cold Frame Construction Plans Free
Not all free plans are equal. Before you cut a single board, study your plans with a critical eye. A good set of cold frame construction plans, even when free, should give you five things.
First, exact dimensions. The plans should list the length, width, and height of every part. A common size is four feet long by three feet wide, tall enough at the back to clear your plants.
Second, a full materials list. You should know before you start how many boards you need, what size screws to buy, and what kind of lid material the design calls for. Good plans also note that an old window sash can stand in for a new polycarbonate sheet.
Third, a clear order of steps, from cutting the boards to fitting the lid.
Fourth, ventilation. Every cold frame needs a way to let hot air out. The best plans show a prop stick, a vent notch, or a hinged lid that can rest open at several angles.
Fifth, a realistic skill level. Beginner plans stick to straight cuts, butt joints, and screws. Pick plans that match the tools you own.
Reliable guidance on building and growing can be found from long-running home improvement publishers. The building editors at Bob Vila regularly cover simple outdoor structures, and the project guides at The Spruce walk through cold frame basics in plain language. Use two or three sources to cross-check your plans before you build.
Three Common Cold Frame Designs
Free plans come in many shapes, but most fall into three families. Each has its strengths.
The Classic Wooden Box
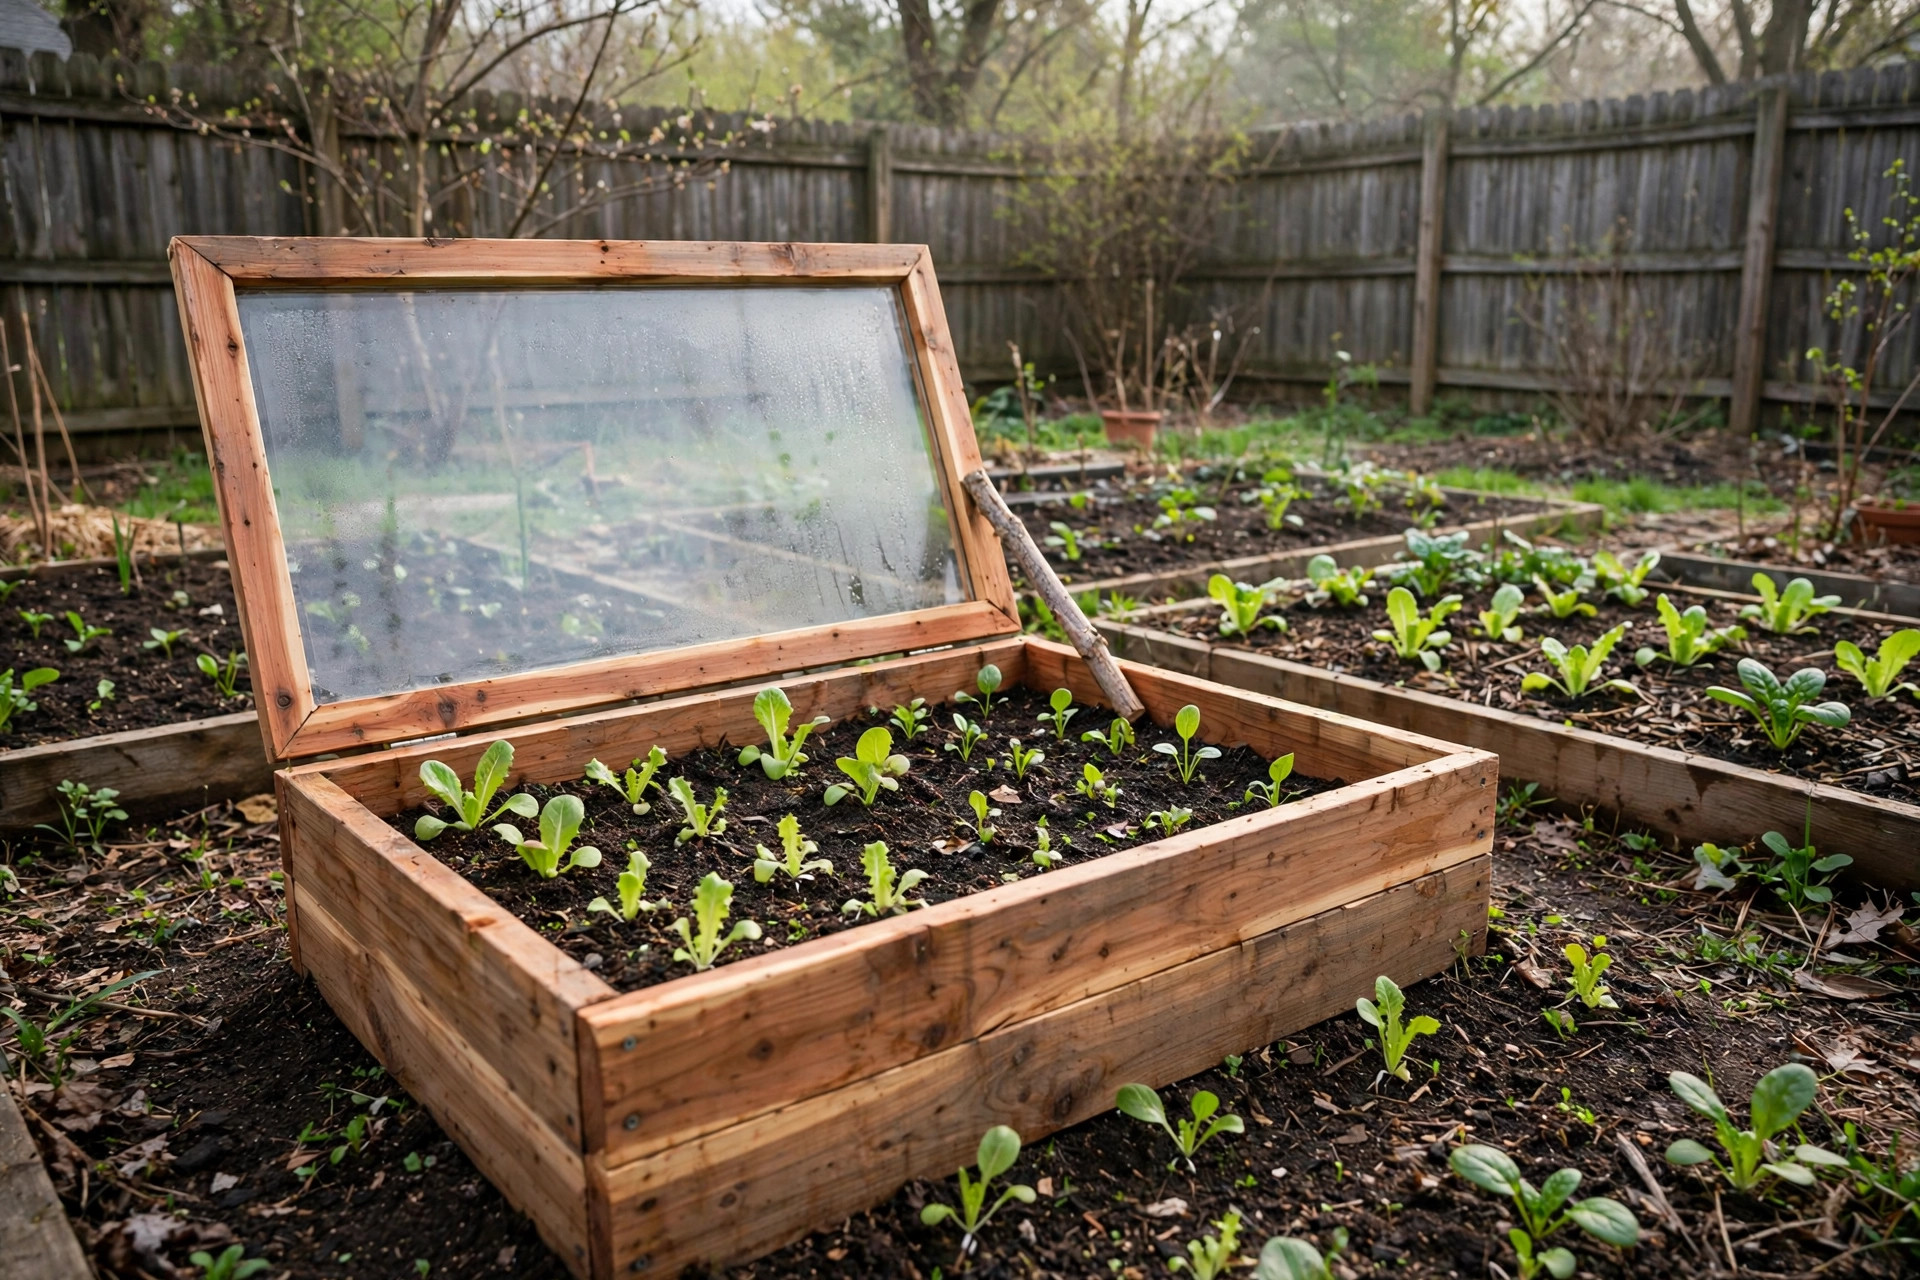
Four walls of cedar or pine, with the back wall taller than the front so the lid slopes toward the sun. The sloped lid sheds rain and catches low spring sun. This design is sturdy and lasts for years with rot-resistant wood. Most free plans in old gardening books describe this type.
The Straw Bale Frame
Stack straw or hay bales to form three walls, then lay an old window across the top. There is almost no building at all. The bales insulate well, and when they rot down in a year or two, they become mulch. The weakness is the short life, and the top can shift in heavy wind unless you stake it.
The Hoop-Top Frame
Half hoops of plastic pipe set over a low bed, covered with clear plastic sheeting. It goes up in an hour and costs very little. It is less sturdy than wood, and the sheeting wears out after a season or two, but for a quick spring trial, it is ideal.
Pick the design that fits your time, your tools, and how long you want the frame to last.
Tools and Materials You Will Need
For the classic wooden box, the most popular design, you need modest tools: a hand saw or circular saw, a drill, a tape measure, a square, a level, and a hammer. Garden tool makers such as Fiskars and Corona Tools sell the hand tools you will reach for when trimming and fitting parts. For lumber, screws, hinges, and hardware, the aisles at The Home Depot and Lowe’s carry everything on a typical free plan’s materials list.
For materials, plan on the following for a four-by-three-foot frame:
– Three 8-foot cedar or pressure-treated 1×8 or 1×10 boards for the walls – A sheet of clear polycarbonate or an old window sash for the lid, about 4 by 3 feet – 2×2 lumber for corner posts and the lid frame – Exterior wood screws, 1 1/4 inch and 2 inch – Two or three sturdy hinges and a lid prop stick – Wood glue and exterior wood sealant or linseed oil
You will also want garden basics for what grows inside. A review of the best garden soil test kit reviews can help you check the soil you fill the frame with. A best garden dibber for seed planting makes neat seed holes, and the best garden trowel for planting reviews will point you to a trowel that survives daily use in cold soil.
Building the Frame Step by Step
Set aside a full Saturday. Work on a flat spot near your garden, and read your plans through once before you touch the saw.
Step 1: Cut the walls. Cut the boards for the back wall, the front wall, and the two side walls. The back wall should stand about 16 to 18 inches tall, the front wall about 10 to 12 inches tall. The side walls slope from back to front. Mark the slope line on each side board with a straightedge, then cut along it. Sand the cut edges smooth.
Step 2: Build the box. Fasten the four walls together at the corners with 2×2 corner posts inside, driving two screws through each board into each post. Check with a square that the corners are true. A box that is not square will make the lid fit badly.
Step 3: Seal the wood. Brush the outside of the box with exterior sealant or linseed oil. Let it dry fully. Do not paint or seal the inside, where soil and plants will sit. Raw wood inside is safe for the plants.
Step 4: Build the lid. Build a simple frame from 2×2 lumber to match the top opening of the box. Fit your clear sheet into it. If you use an old window sash, check that the glass is sound. If you use polycarbonate, cut it with a fine-tooth saw and wear safety glasses.
Step 5: Hang the lid. Screw the hinges to the back wall and to the lid frame. Open and close the lid several times; it should move freely and rest flat when closed. Fit a prop stick with notches so you can hold the lid open at two or three heights for air.
Step 6: Set the frame in place. Choose a spot that faces south or southeast and gets full sun. Dig the frame an inch or two into the soil so wind cannot slip under the walls. Fill the inside with four to six inches of good garden soil mixed with compost. Water well, close the lid, and let the frame warm for two or three days before you sow seed. For seed bred for cold soil and short seasons, look to trusted seed houses like Burpee and suppliers such as Gardener’s Supply Company.
What It Will Cost
One of the great virtues of cold frame construction plans free from books and community sources is that the whole project can cost very little. Here is a rough guide in American dollars, as of the mid-2020s.
A frame built from new cedar boards, new polycarbonate, and new hinges runs about 60 to 120 dollars. Cedar costs more than pine, but it resists rot without chemical treatment, which matters when you grow food. If you use pressure-treated lumber, the cost drops to about 40 to 80 dollars. Some gardeners line the inside walls with plastic sheeting so the soil never touches treated wood.
The true bargain comes from salvaged material. An old window from a salvage yard costs little or nothing and makes a perfect lid. Scrap deck boards or fence pickets make fine walls. Builders who watch for free lumber on community boards often build a whole cold frame for under 20 dollars, spending only on screws and hinges.
Care and Upkeep Through the Seasons
A cold frame is not a build-it-and-forget-it box. It asks for small, steady care, and it rewards that care with strong plants.
Watering. The lid keeps rain out, so you must water by hand. Check the soil every day or two in spring. Water in the morning so the leaves dry before the cool night. Do not let the soil stay soggy; cold, wet soil rots seed.
Ventilation. This is the single most important habit. On any sunny day above about 45 degrees Fahrenheit, open the lid a crack. On warm spring days, open it wide. A thermometer hung inside takes the guesswork out. A bright April sun can push the inside past 100 degrees and kill seedlings in an hour if you forget.
Night covers. When frost threatens, lay an old blanket or a straw mat over the lid at dusk. This can buy five to ten extra degrees of protection. Remove it in the morning so light gets through.
Soil renewal. Each spring, take out the top few inches of soil and mix in fresh compost. Cold frame soil gets tired fast because it grows crops nearly year-round.
Lid care. Wash the glass or plastic each spring with mild soap and water. Clean lids let in more light, and more light means faster growth. Check hinges and screws yearly and tighten what has loosened.
Independent product testing groups such as Consumer Reports remind buyers to check materials for durability and safety before purchase, a habit worth applying to lumber, plastic sheeting, and hardware alike.
Safety First
Cold frame building is safe work, but it still calls for care. Wear safety glasses when cutting wood and plastic, and gloves when handling old window glass, which can have sharp edges. Keep power saws away from children, and never cut with a dull blade. Make sure the lid cannot slam shut in the wind; a strong prop or a short chain stops accidents. Round off sharp wood corners with sandpaper if children play near the garden.
Frequently Asked Questions
How early can I start seeds in a cold frame? In most American climates, you can sow hardy crops like spinach, lettuce, radish, and onion four to six weeks before the last spring frost. Tender crops like tomatoes should wait until the soil inside stays above 50 degrees at night.
Does the cold frame need to face south? South or southeast is best in the northern hemisphere, because the low spring sun strikes the sloped lid straight on. A frame that faces north will stay cold and grow little. If your yard has no good south spot, choose the brightest spot you have and keep the lid clean.
Can I leave the lid closed all winter? In deep winter, many gardeners close the frame and leave hardy greens like kale and mache to sit nearly dormant under the lid. Open it on mild days to give them air.
What is the difference between a cold frame and a hotbed? A cold frame runs on sun alone. A hotbed adds a heat source under the soil, usually a thick layer of fresh manure or an electric heating cable. Hotbeds grow faster but cost more and need more care. For most home gardeners, a cold frame is enough.
Will a cold frame work on a balcony or patio? Yes, if you scale it down. A small frame made from a wooden box and an old picture-frame glass can sit on a sunny balcony and raise herbs and salad greens. Make sure the building allows it, keep the box light enough to move, and water more often, since small boxes dry out fast.
How long will a wooden cold frame last? A cedar frame with a good coat of sealant can last eight to twelve years. Pine lasts about half that. Polycarbonate lids cloud over after five to eight years in strong sun and can be replaced while the wood frame goes on serving.
A Final Word
The cold frame is one of gardening’s quiet masterpieces. It is cheap, simple, and honest work. With cold frame construction plans free for the taking, a Saturday of carpentry, and a little daily attention, you can pull fresh greens from the soil while your neighbors are still waiting for the frost to pass.
References
Bob Vila. (n.d.). Home improvement advice. https://www.bobvila.com Burpee. (n.d.). Seeds, plants, and gardening supplies. https://www.burpee.com Consumer Reports. (n.d.). Product reviews and ratings. https://www.consumerreports.org Corona Tools. (n.d.). Garden and landscape tools. https://www.corona-tools.com Fiskars. (n.d.). Garden and cutting tools. https://www.fiskars.com Gardener’s Supply Company. (n.d.). Gardening tools and supplies. https://www.gardeners.com Lowe’s. (n.d.). Home improvement products. https://www.lowes.com The Home Depot. (n.d.). Home improvement products. https://www.homedepot.com The Spruce. (n.d.). Home and garden advice. https://www.thespruce.com
Was this guide helpful?

About Robert Taylor
The My Garden US editorial team writes practical, in-depth home and garden guides for American homeowners — tested advice, no fluff.
You May Also Like

Best Garden Gloves for Men Large: How to Find a Pair That Fits
July 26, 2026 0 views
How to Grow Chives Indoors Pots
June 28, 2026 0 views
Best Garden Shears for Hedges Reviews: What Homeowners Should Know
February 22, 2026 0 views