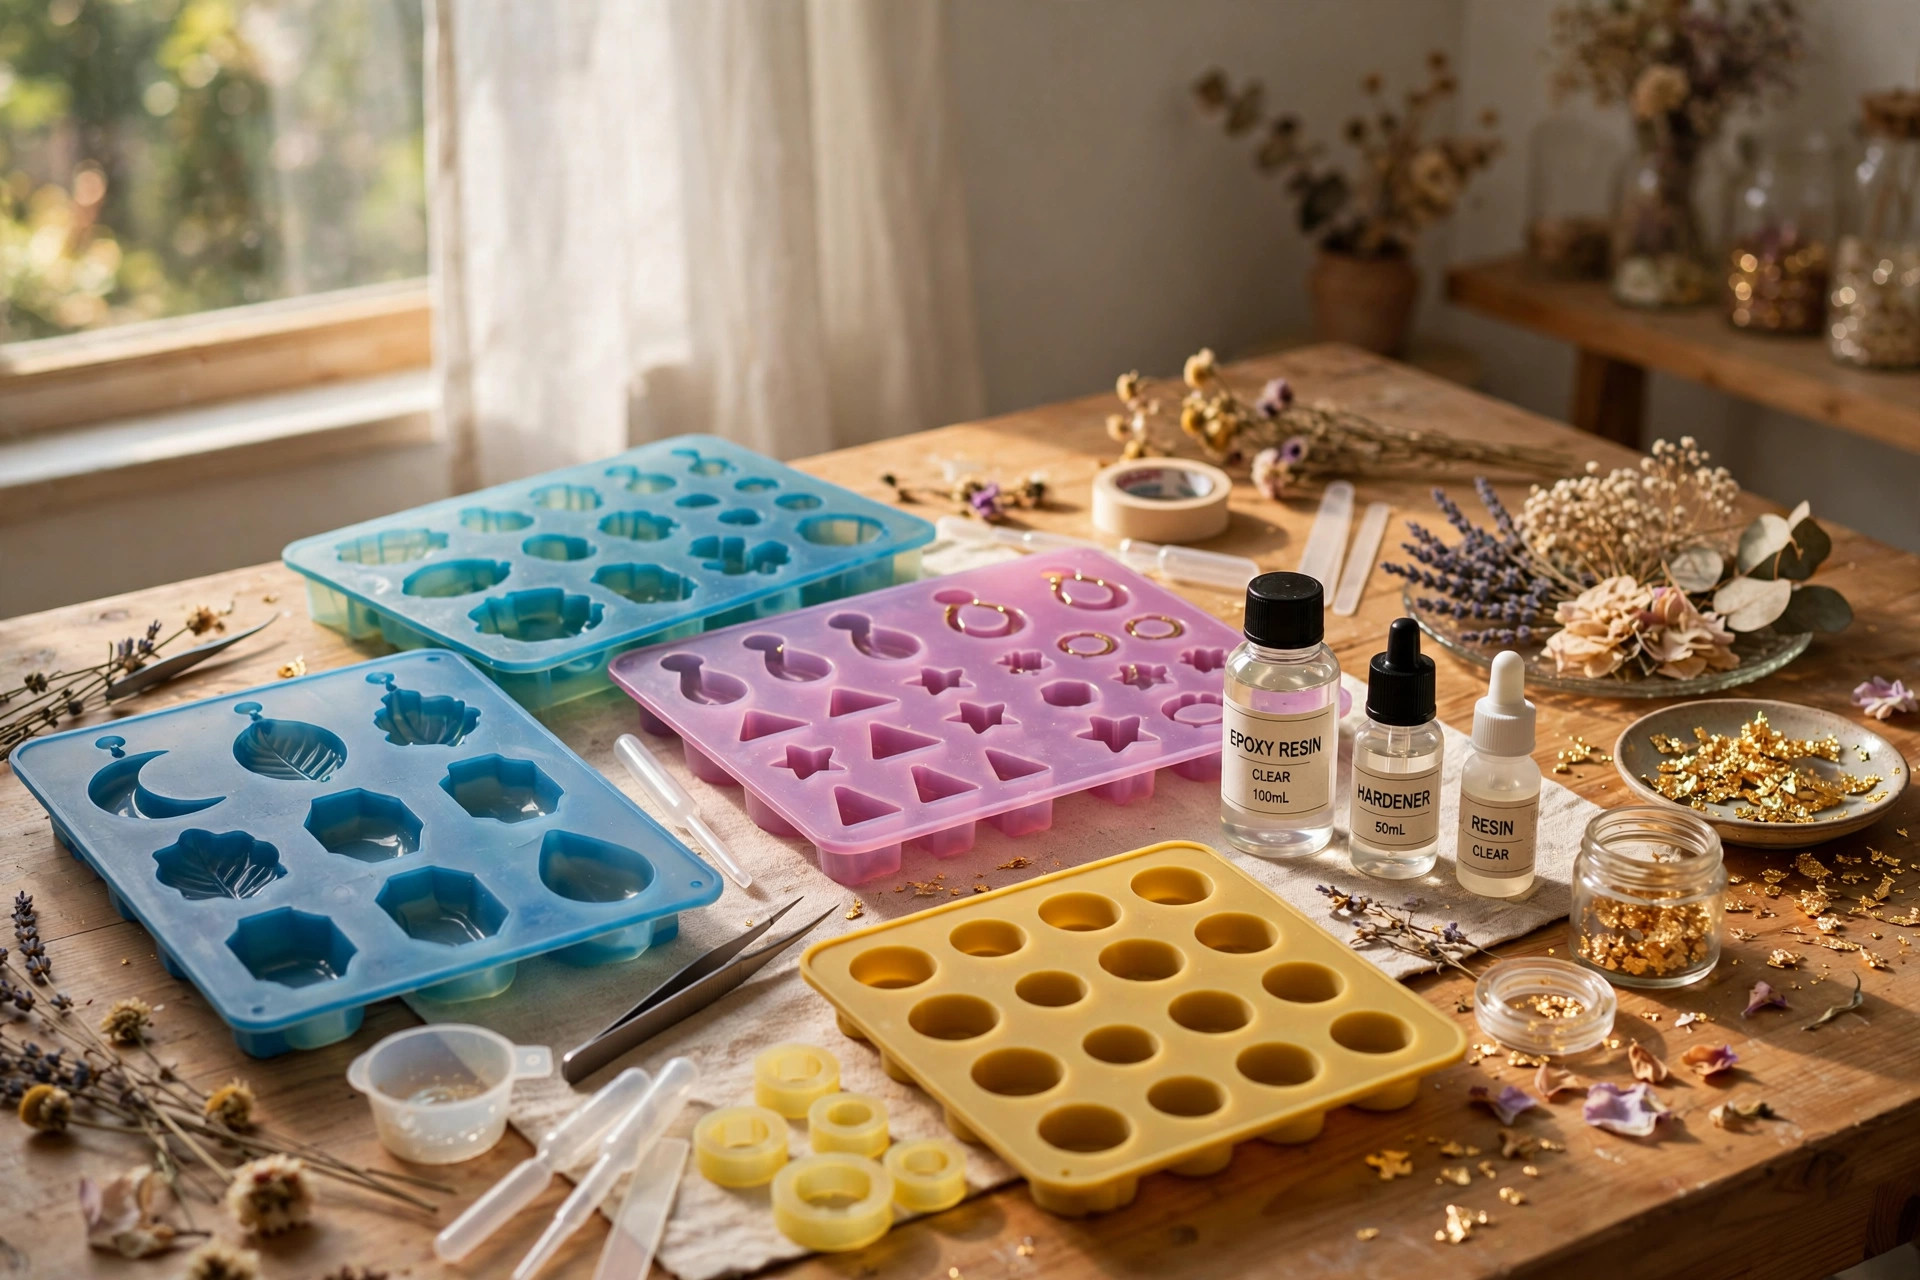

Resin jewelry making has won a large following among home crafters in recent years. The search for the best silicone molds for resin crafts jewelry often begins at the craft store or online, where rows of shapes, sizes, and price tags can confuse even a careful buyer. A mold is a simple tool. It is also the tool that decides the shape, the edge finish, and much of the beauty of the finished piece. A good mold gives clean lines and an easy release. A poor mold gives bubbles, torn edges, and wasted resin.
This guide walks through the subject step by step. It explains why molds matter, what to look for, which types suit jewelry work, what they cost, how to keep them, and how to stay safe. It is written for beginners, but it should serve anyone who wants better results from poured resin.
Why the Mold Matters
Resin is a liquid until it cures. It takes the exact shape and surface of the cavity it sits in. A glossy mold gives a glossy face. A dull mold gives a dull face. For that reason, the mold is as important as the resin itself.
Jewelry pieces are small, and small pieces show flaws fast. A bubble on a pendant sits front and center. A mold with smooth walls and a polished interior lowers the odds of such flaws and makes the piece easier to remove.
Molds also set the limits of your design. You cannot pour a shape you do not have. A small set of well-chosen molds lets you make pendants, rings, earrings, and beads. Choice matters more than count.
What to Look for When You Buy: Best Silicone Molds for Resin Crafts Jewelry
Silicone Quality
Not all silicone is equal. Food-grade silicone molds are common in crafts because they handle heat, bend without tearing, and release resin cleanly. Look for molds that feel smooth and firm, not sticky or flimsy. Cheap molds may tear after a few pours. They may also leave a cloudy film on the resin. Thicker walls last longer and hold their shape when moved.
Surface Finish
Hold the mold up to the light before you buy, if you can. The inside should shine. A polished interior gives a polished front face on the piece. A glossy mold saves hours of sanding and polishing later.
Detail and Edges
Look closely at the edges of each cavity. Sharp, clean edges mean sharp, clean pieces. Rounded or ragged edges will show in the cured resin. Fine detail lines should be crisp. If the sample photos look soft or blurry, the mold itself is likely worn or poorly made.
Size and Depth
Check the stated size in inches or millimeters. A mold that looks right in a photo may pour a piece far bigger or smaller than you expect. Shallow molds suit flat inlays. Deep molds suit bangles and beads that need body.
Flexibility
The best molds bend enough to pop a cured piece out with a light push. Good silicone molds seldom need any release agent at all.
Brand and Reviews
Established craft supply stores such as Michaels and Joann carry tested lines and show buyer reviews. Read the written comments. Look for notes about tearing, cloudiness, and ease of release after many pours.
Types of Silicone Molds for Jewelry
Pendant and Cabochon Molds
These are the workhorses of resin jewelry. Pendant molds come in rounds, ovals, teardrops, hexagons, and freeform shapes. Cabochon molds pour flat-backed domes that fit into ready-made settings. A starter set with six to ten pendant shapes covers most designs.
Ring and Bracelet Molds
Ring molds pour the band and the face in one cast, or the face alone for setting later. Bracelet and bangle molds need deeper pours and longer cure times. Because these pieces touch the skin all day, a smooth finish matters even more.
Earring Molds
Earring molds are small and light. Studs, drops, hoops, and dangles all have their own molds. Weight is the key issue. Keep drops thin and light so they feel comfortable on the ear.
Bead and Charm Molds
Bead molds pour rounds, cubes, and faceted shapes with a hole for stringing. Charm molds pour small figures, letters, and symbols. These molds often hold many cavities at once, which is handy for batch work.
Geode and Cluster Molds
Geode-style molds pour irregular, crystal-edged shapes that take gold flake and pigment well. They are popular for bold pendants. The rough edges can be sharp after curing, so plan for a light sanding pass on the back.
Alphabet and Number Molds
Letter molds let you pour names and initials for personalized jewelry. Small letter molds fit inside pendants as inlays. Larger ones pour standalone charms. They also pair well with gift projects like a diy keychain kit for resin and crafts gifts, since keychains and bag charms use the same shapes.
How to Choose the Right Set for Your Style
Start with your finished piece in mind. If you plan to sell on a handmade marketplace such as Etsy, study which shapes move well and pick molds that match. If you craft for fun, pick the shapes that please your own eye. There is no prize for owning every mold.
A sensible starter kit holds one pendant tray with several shapes, one earring set, and one small charm or bead tray. That is enough for months of learning. Many beginners pair these molds with a resin art kit for beginners jewelry making so the resin, pigments, and tools arrive matched to the work. Add ring or bangle molds only after you are comfortable with mixing, pouring, and curing. Each new shape teaches you something about bubbles, edges, and cure time, and the same skills carry into larger pours like a diy coasters kit for resin art beginners.
Consider the resin you use. UV resin cures in minutes under a lamp and suits shallow jewelry molds. Two-part epoxy resin suits deeper pours but needs a full day to cure. Very deep silicone molds can block UV light and leave the center soft when used with UV resin.
Think about your workspace as well. Large trays of molds need a flat, level table and a dust cover while they cure. Small molds fit on a desk corner.
Cost and Price
Silicone molds for resin jewelry are modest in price. A single small mold often sells for three to eight dollars. A multi-shape set of five to ten molds may run fifteen to forty dollars. Large professional sets with dozens of shapes can reach sixty dollars or more.
Price tracks quality, but not always. Some low-cost molds perform well. Read reviews before you pay extra. Online retailers such as Amazon list wide ranges, and the written reviews often name the exact flaws a buyer found after many pours.
The mold is only part of the cost. Resin, pigments, glitter, mixing cups, gloves, and a UV lamp or heat gun add up. A beginner often spends forty to eighty dollars on full supplies beyond the molds. Plan for that. It is cheaper to buy a small mold set and good resin than a large mold set and poor resin.
Molds pay for themselves over time. A ten-dollar pendant mold that survives fifty pours costs twenty cents per piece. Handle it well and it lasts.
Using Your Molds: A Simple Method
1. Set the mold on a level surface. Check with a small level or by eye from two sides. 2. Clean the mold. Wipe each cavity with a lint-free cloth. Dust is the enemy of a clear pour. 3. Mix the resin exactly as the maker directs. Measure by the stated ratio. Stir slowly to limit bubbles. 4. Pour in a thin stream from a low height. A slow pour traps less air than a fast one. 5. Pop surface bubbles with a quick pass of a heat gun or a toothpick. Work fast, since the resin starts to set. 6. Cover the mold to keep dust out. A simple cardboard box lid works. 7. Let it cure for the full stated time. Do not rush it. Under-cured resin stays tacky and bends. 8. Flex the mold gently to release the piece. Push from the back, never pry with tools.
Art supply retailers like Blick stock the mixing cups, stir sticks, and pigments that make this routine smooth. Once the habit is set, the whole process takes only minutes of active work per batch.
Care and Upkeep
Good care doubles or triples the life of a silicone mold. Wash molds in warm water with a drop of mild dish soap after each use. Rinse well and let them air dry face up. Never use rough scrub pads. They scratch the glossy interior, and each scratch shows on future pieces.
Store molds flat, away from direct sun and heat. Do not stack heavy items on them. Keep them away from sharp tools that could nick the silicone.
Keep molds away from uncured resin drips. Cured drips on the outside of a mold are harmless, but drips inside a cavity bond and ruin the finish. If a pour goes wrong, let the resin cure fully, then flex it out.
Some makers wipe molds with a thin layer of mold release between pours. Good silicone seldom needs it. If you do use a release agent, use very little. Heavy layers cloud the resin face.
Rotate your molds if you pour often. Using the same mold every day wears it faster. A small rotation of two or three favorite molds spreads the wear and keeps results steady.
Safety
Resin work calls for care. Two-part epoxy resin gives off fumes while mixing and curing. Work in a room with fresh air, or wear a respirator rated for organic vapors. UV resin has less odor but still calls for gloves and eye care under the lamp.
Wear nitrile gloves every time you handle liquid resin. Resin on skin can cause irritation, and repeated contact can lead to lasting sensitivity. If resin touches your skin, wash with soap and water.
Keep resin and molds away from children and pets. Small molds and cured bits are choking hazards. The U.S. Consumer Product Safety Commission at CPSC offers plain guidance on safe craft practice at home.
Store resin bottles upright, capped, and out of sunlight. Keep a trash bag and paper towels within reach for spills. Wipe spills at once, since cured resin is much harder to remove. Home improvement guides such as Family Handyman carry useful notes on workshop safety that apply to a craft corner as well.
Never pour resin down a drain. Wipe tools with paper towels and throw the towels in the trash. Cured resin is inert and safe to discard with household waste.
Common Problems and Fixes
Bubbles That Will Not Pop
Bubbles come from fast stirring, cold resin, or pouring from a height. Warm the resin bottles in warm water before mixing, stir slowly, and pour in thin layers. A quick pass with a heat gun clears surface bubbles.
Sticky or Tacky Pieces
Tacky cures come from wrong mix ratios, poor stirring, or cold rooms. Measure exactly, stir for the full stated time, and keep the curing area above about 70 degrees Fahrenheit.
Pieces That Will Not Release
A piece that sticks is often under-cured. Give it more time. If it still sticks, flex the mold from several angles. As a last step, place the mold in the freezer for fifteen minutes. The resin shrinks a little and often pops free.
Cloudy Finish
Cloudiness comes from matte or worn molds, moisture, or touching the piece before full cure. Pour only into dry molds. If a mold has gone dull with age, retire it to practice pours.
Warped Molds
Molds warp from heat, stacking, or storage on uneven surfaces. Store them flat and away from heat. A warped mold pours warped pieces.
Frequently Asked Questions
How long do silicone molds for resin jewelry last?
A good mold lasts for dozens of pours, often fifty or more, with basic care. Thin or cheap molds may tear after ten. Wash gently, store flat, and keep them out of heat, and they will serve you a long time.
Do I need mold release spray with silicone molds?
Usually not. Quality silicone releases cured resin on its own. If pieces stick, the cause is more often under-curing or a worn mold than a lack of spray.
Can I use the same molds for UV resin and epoxy resin?
Yes, in most cases. The limit is depth. Shallow jewelry molds work with UV resin. Deep molds need two-part epoxy, since UV light cannot reach the center of a thick pour.
Are silicone molds safe to use with food after resin use?
No. Once a mold has touched resin, keep it for crafts only. Resin leaves traces that do not belong near food. Buy separate molds for baking. Craft stores mark the difference clearly, and big-box home stores such as Home Depot stock both kinds in separate aisles.
What size mold should a beginner buy first?
Start with a pendant tray holding pieces about one to two inches across. That size is easy to pour, easy to demold, and easy to finish. Tiny stud molds are fiddly for first pours. Large bangle molds waste resin while you are still learning.
Where is the best place to buy silicone molds?
Craft chains, art supply shops, and online marketplaces all carry them. Compare a few sellers, read the written reviews, and favor shops with clear return policies.
A Short Final Word
The best silicone molds for resin crafts jewelry are not the costliest or the most numerous. They are the ones with smooth, glossy cavities, firm but flexible walls, and shapes that fit the pieces you truly want to make. Buy a small, sound set. Learn to mix, pour, and cure with care. Keep the molds clean and flat. Your tenth pendant will look far better than your first, and the molds will have earned their keep many times over.
Start simple, practice steady, and let each pour teach you something. Resin jewelry rewards patience.
References
Amazon. (n.d.). Online shopping. https://www.amazon.com Blick Art Materials. (n.d.). Art and craft supplies. https://www.dickblick.com Etsy. (n.d.). Handmade and craft marketplace. https://www.etsy.com Family Handyman. (n.d.). DIY home repair and maintenance. https://www.familyhandyman.com JOANN. (n.d.). Fabric and craft supplies. https://www.joann.com Michaels. (n.d.). Arts and crafts supplies. https://www.michaels.com The Home Depot. (n.d.). Home improvement products. https://www.homedepot.com U.S. Consumer Product Safety Commission. (n.d.). Product safety information. https://www.cpsc.gov
Was this guide helpful?

About Sarah Mitchell
The My Garden US editorial team writes practical, in-depth home and garden guides for American homeowners — tested advice, no fluff.
You May Also Like
Punch Needle Kit for Beginners Rug Making: A Complete Start-Up Guide
August 30, 2026 0 views
A DIY Birdhouse Kit for Kids Woodworking USA Families Can Build Together
June 21, 2026 0 views
Best Paper Cutter for Scrapbooking and Cards: A Practical Guide
August 1, 2026 0 views