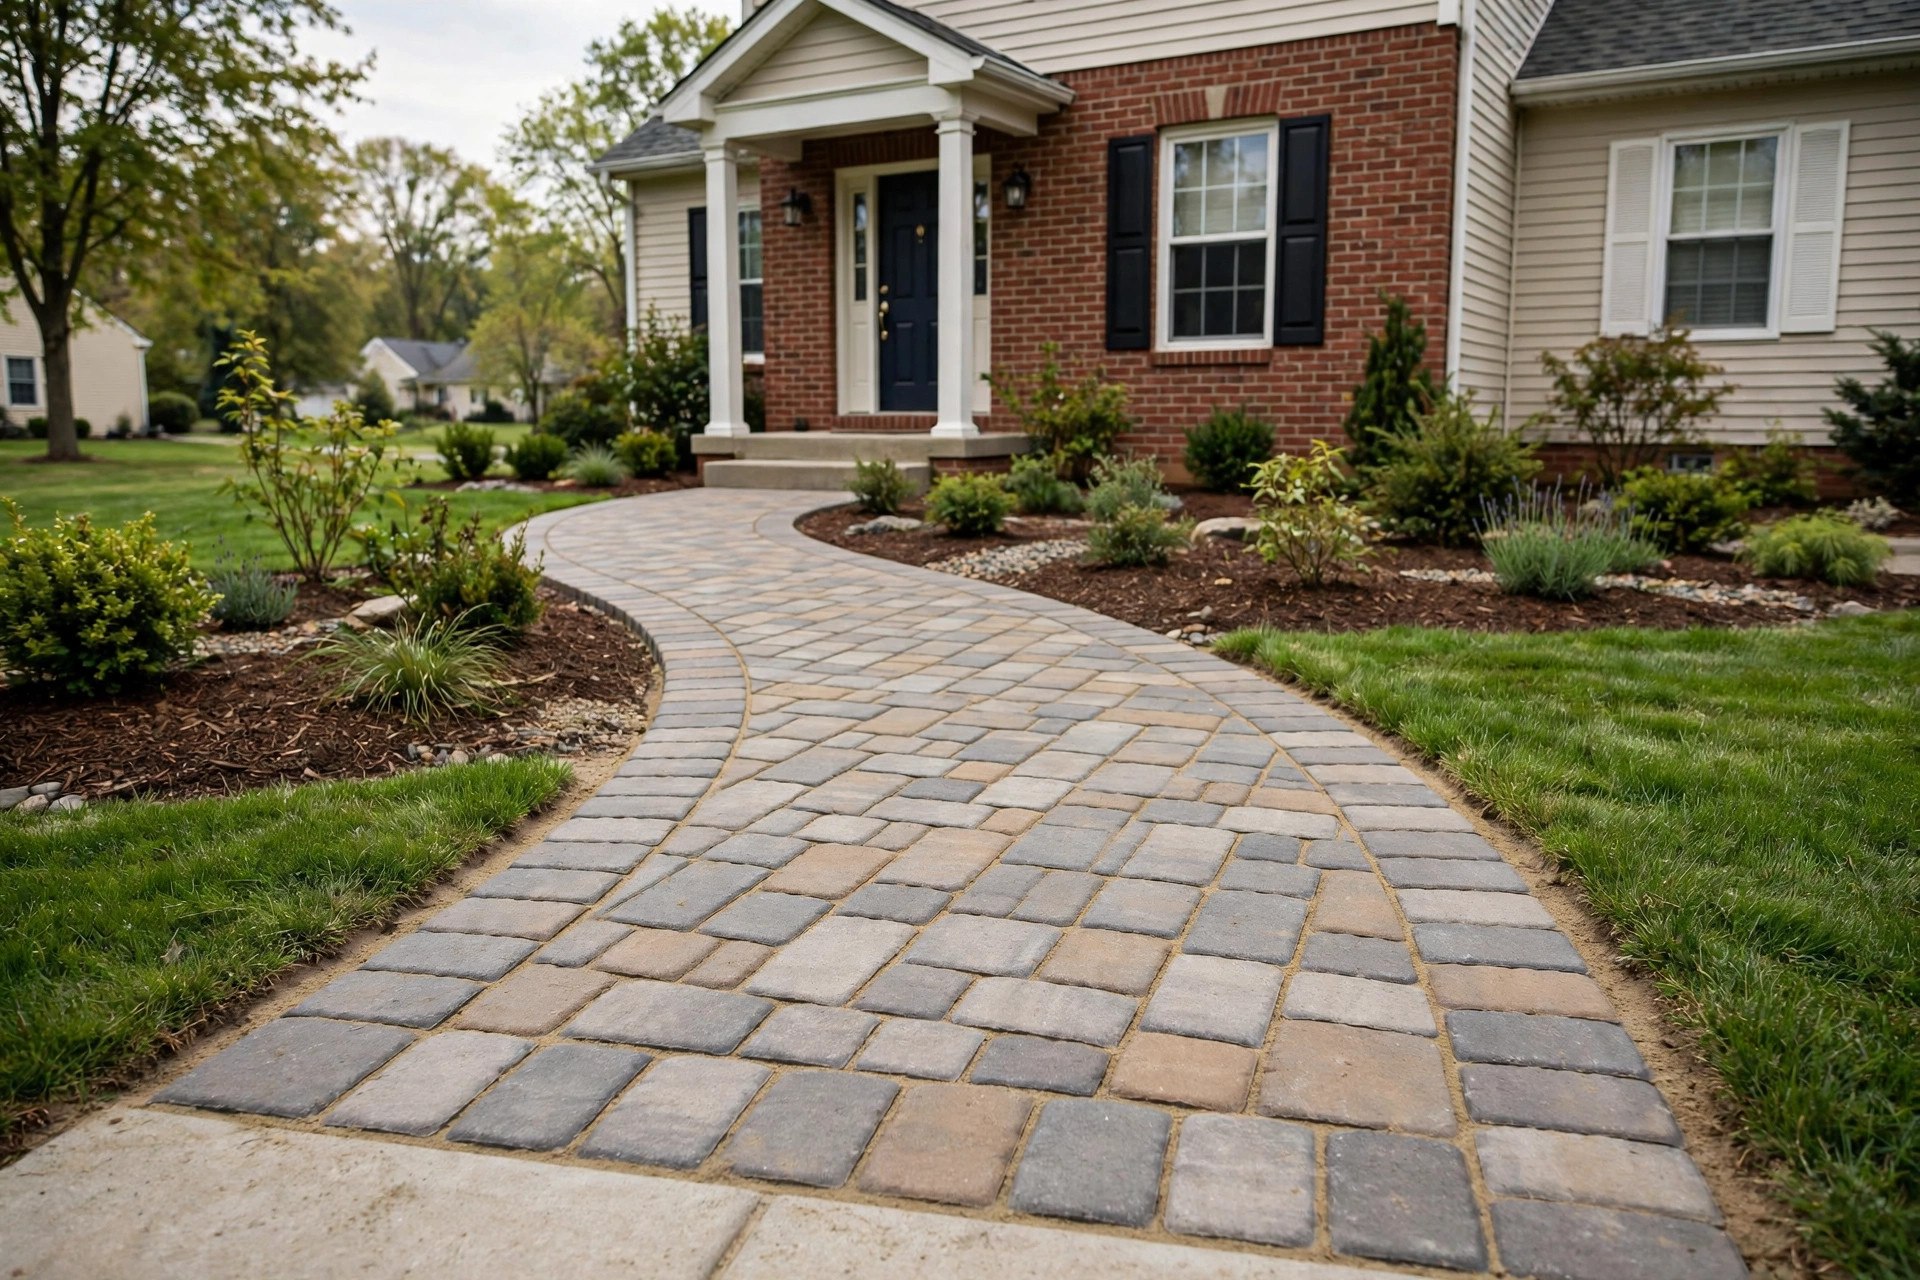

A Walkway That Welcomes
Every home needs a path to the front door. The best paver walkway installation for homeowners is the kind that looks fine, feels safe underfoot, and holds up for many years. A walkway is often the first part of a home that guests see. A plain cracked slab or a muddy trail tells a poor story. A neat row of pavers tells a better one. This guide explains what makes a good walkway, how to pick one, what it costs, and how to keep it in shape.
A walkway also serves a plain purpose. It keeps shoes clean on wet days. It gives visitors a clear route after dark. It can guide water away from the front steps. For these reasons, many families in the United States choose interlocking pavers over plain poured concrete. Home guides from The Home Depot show how common these projects have become in recent years.
Why a Paver Walkway Matters: Best Paver Walkway Installation for Homeowners
First Impressions
A home shows its care at the curb. A straight, level walkway with neat edges makes the whole front look tidy. This matters when friends visit. It matters more if the home is ever sold. Buyers often decide how they feel about a house before they reach the door. A strong walkway helps.
Safety and Ease of Use
Trips and falls happen on cracked or uneven paths. Pavers sit in a bed of sand and can be lifted and reset one at a time. That means repairs are simple. A broken slab of concrete must be torn out and poured again. With pavers, one stone can be swapped without touching the rest.
The surface of a paver also grips better than smooth concrete. On rainy days and winter mornings, that grip matters. Families with small children and older parents gain peace of mind from a walkway that stays level and sure.
Long Service Life
A walkway built the right way can last for decades. The stones themselves are dense and hard. They resist sun, rain, and frost. When the ground shifts a little, the joints between stones flex instead of cracking. This is why towns have used stone and brick paths for centuries. This Old House and similar renovation guides often note that a stone path, built well, outlasts the fence around it.
How to Choose the Right Walkway
Measure and Plan
Start with a tape measure. Most front walkways are three to four feet wide. That is enough for two people to walk side by side. Note where the path will start and end. Look at the slope of the yard. Water should drain away from the house, not toward it.
Mark the path with garden hose or stakes and string. Walk it for a few days. See if the curve feels natural. A gentle curve often looks nicer than a hard straight line, and it gives more room for flower beds on each side.
Check the Ground
Soil tells much of the story. Sandy soil drains fast but can wash out. Clay soil holds water and can swell. The installer should dig down four to six inches and set a firm bed of crushed stone. If the base is weak, the walkway will sink later. Ask how the base will be built. A good answer is a long one. Bob Vila and other home improvement sites stress the same point: the base decides how long any paver job will last.
Pick the Right Installer
The best paver walkway installation for homeowners depends more on the crew than on the stone. Ask neighbors who did their walks. Look at photos of past jobs. A trusted installer will offer a written plan, a clear price, and a warranty of at least a few years.
Ask three questions before you sign. How long will the job take? What base will you use? How will you handle drainage? If the answers are short or vague, keep looking. A quality crew is proud of its method. For more ideas on comparing local options, see our guide to best paver walkway installation near me.
Types and Options
Concrete Pavers
Concrete pavers are the most common choice in American yards. They come in many shapes, colors, and patterns. They are made in molds under high pressure, so each stone is the same size. This makes them easy to lay in neat patterns like herringbone or running bond.
Concrete pavers cost less than most stone. They can chip if struck hard, but single stones are easy to replace. Many makers now sell pavers with a worn, old-world face that looks like brick or slate.
Clay Brick Pavers
Brick has been used for paths for hundreds of years. It keeps its color for a very long time because the color runs through the whole brick. Brick gives a warm, old-fashioned look that suits many homes.
Brick costs more than plain concrete pavers. It can be slippery when wet if it is glazed, so ask for a rough-faced brick for outdoor walks. Like concrete pavers, bricks can be lifted and reset if they settle.
Natural Stone Pavers
Bluestone, slate, and granite pavers give a rich, natural look. No two stones are exactly alike. Natural stone lasts an extremely long time and stands up well to weather.
The price is the highest of the three groups. The stones vary in thickness, so a skilled crew is needed to set them level. For a small accent path near the door, natural stone can be worth the extra cost. For a long walk, most families choose concrete or brick.
Patterns and Borders
A soldier course border, a row of stones set on end along the edge, frames the walk and holds the inner stones in place. Inside the border, running bond and herringbone are the most common patterns. A basket weave can suit brick. Ask your installer to show samples laid out on the ground before work begins.
Cost and Price
What Drives the Cost
Labor and materials share the bill. The size of the walk, the type of paver, and the state of the soil all play a part. A straight walk on flat ground costs less than a curved walk on a slope. Removing an old concrete walk adds to the labor.
Most walkway jobs in the United States fall between ten and twenty dollars per square foot, installed. A fifty-foot walk that is three feet wide covers about one hundred fifty square feet, so a typical job may run from one thousand five hundred to three thousand dollars. Plain concrete pavers sit at the low end. Natural stone sits at the high end.
For a deeper look at how these numbers are built up, read our paver walkway installation cost guide usa.
Getting Fair Bids
Ask at least three installers for written bids. Each bid should list the paver brand and color, the depth of the base, the edging used, and the warranty. Compare line by line. A bid that is much lower than the others may skip base depth or use thinner stones.
Do not pay the full price up front. A common plan is one third at the start, one third at the midpoint, and the rest when the job is done and you are satisfied.
Where Money Is Well Spent
The base is the best place to spend. A deep, well-packed base keeps the walk level for years. Good edging is next. Plastic, steel, or concrete edging holds the stones in place so they do not drift apart. Skimping on these two parts leads to repairs later.
Installation Steps
Excavation
The crew marks the path and digs down four to six inches. All grass and soft soil come out. The bottom is packed firm.
Base and Bedding
Crushed stone goes in, two inches at a time, and is packed hard between layers. Lowe’s carries the base stone and sand needed for this step, and its project guides walk through the layering method. Then a one-inch layer of coarse sand is spread and smoothed. This sand bed is what the pavers sit on.
Laying and Cutting
Stones are set by hand in the chosen pattern. A string line keeps each course straight. Edge stones are cut with a saw to fit the curve or the border.
Edging and Sanding
Rigid edging is pinned along both sides. Then fine joint sand is swept into the cracks and the whole walk is run over with a plate compactor. The compacting locks the stones together. A sealant may be added last to guard against stains.
Care and Upkeep
Sweeping and Washing
Sweep the walk often. Leaves and dirt hold moisture and can stain the stones. Once or twice a year, wash the walk with a garden hose or a low-pressure washer. High pressure can blast joint sand out of the cracks, so keep the nozzle at a safe distance.
Weeds and Moss
Weeds may sprout in the joints. Pull them by hand when small. A stiff broom keeps moss from taking hold in shady spots. Polymeric sand, which hardens when wet, resists weeds better than plain sand and can be used at the next repair.
Resetting Sunken Stones
If a stone sinks, lift it with two putty knives, add sand under it, and set it back level. This is a simple task for a homeowner with no special tools. For larger sunken areas, call the installer if the job is still under warranty. Step-by-step reset advice appears in many DIY references, including Family Handyman.
Sealing
A sealer is not required, but it keeps colors rich and makes oil or leaf stains easier to clean. The Spruce notes that sealed pavers also resist the grime that settles into the stone over time. Sealers should be reapplied every three to five years. Apply on a dry day and keep foot traffic off until the maker says it is ready.
Safety
Keep the Surface Level
Walk the path after heavy rain or a hard freeze. Look for stones that rock or stick up. A rocking stone is a trip hazard and should be reset right away.
Light the Path
A walkway used after dark should have light. Low solar lights along the edges or a lamp by the door helps guests see each step. Lights also show off the walk at night.
Winter Care
Use sand for traction in ice rather than rock salt if the maker of your pavers advises it. Salt can wear some concrete pavers over many winters. Shovel with a plastic blade to avoid chipping the stone faces.
Drainage
The walk should slope a little, about one quarter inch per foot, away from the house. Standing water on the walk means the slope is wrong. Fix the slope before the base washes out.
Choosing a Contractor With Care
Read Past Reviews
Reviews from other homeowners are a useful guide. Look for notes about timeliness, cleanup, and how the crew handled problems. A few bad reviews among many good ones are normal. A pattern of the same complaint is a warning. Our page on top rated paver walkway installation reviews explains what to look for.
Ask for References
A seasoned installer can name recent jobs nearby. Drive by and look at the walks. Check that the edges are straight and the stones sit level. Ask the owners if the crew cleaned up each day.
Put It in Writing
The contract should state the start and end dates, the paver brand and color, the base depth, and the warranty terms. A written contract guards both sides and leaves no room for doubt.
Frequently Asked Questions
How long does a paver walkway last?
A walk built on a proper base can last thirty years or more. The stones resist weather well. Most fixes involve lifting and resetting a few stones, not replacing the walk.
Is a paver walkway better than poured concrete?
Each has its place. Concrete costs less at first. Pavers cost more but are easier to repair, offer more color choice, and handle ground movement without cracking. Over a long life, pavers often cost less in repairs.
Can I install a paver walkway myself?
A handy homeowner can build a short walk. The work is heavy and slow. Digging, hauling stone, and cutting pavers take real effort. For walks longer than a few feet or yards with poor drainage, a trained crew is the safer choice.
How long does installation take?
Most front walks take two to four days. A small straight walk may take one day. Curved walks with many cuts, or yards that need extra digging, take longer.
Do pavers need to be sealed?
Sealing is a choice, not a rule. A sealer deepens color and eases cleaning. Without it, the walk still works fine. Many owners seal once, then reseal every few years.
What color paver should I pick?
Pick a color that fits the house. Gray and tan suit brick homes. Homeowners often check James Hardie and CertainTeed color palettes to match walkway tones with their siding and trim.
A Short Final Word
The best paver walkway installation for homeowners is not the cheapest or the fanciest. It is the one built on a solid base, laid by a careful crew, and kept clean year after year. Plan the route, pick a material that suits your home, hire a crew with a good record, and write the details into a contract. Do these things, and your walkway will greet guests with pride for decades to come.
References
Bob Vila. (n.d.). Home improvement advice. https://www.bobvila.com CertainTeed. (n.d.). Building materials and exterior products. https://www.certainteed.com Family Handyman. (n.d.). DIY home repair and maintenance. https://www.familyhandyman.com James Hardie. (n.d.). Fiber cement siding and exterior products. https://www.jameshardie.com Lowe’s. (n.d.). Home improvement products. https://www.lowes.com The Home Depot. (n.d.). Home improvement products. https://www.homedepot.com The Spruce. (n.d.). Home and garden advice. https://www.thespruce.com This Old House. (n.d.). Home renovation guidance. https://www.thisoldhouse.com
Was this guide helpful?

About Lisa Anderson
The My Garden US editorial team writes practical, in-depth home and garden guides for American homeowners — tested advice, no fluff.
You May Also Like
Top Rated Brick Veneer Siding for USA Homes
January 29, 2026 0 views
Weather Resistant Basement Waterproofing Services Near Me
April 16, 2026 0 views
Stucco Exterior Repair Cost Guide USA: What Homeowners Should Know in 2026
August 4, 2026 0 views