
Introduction
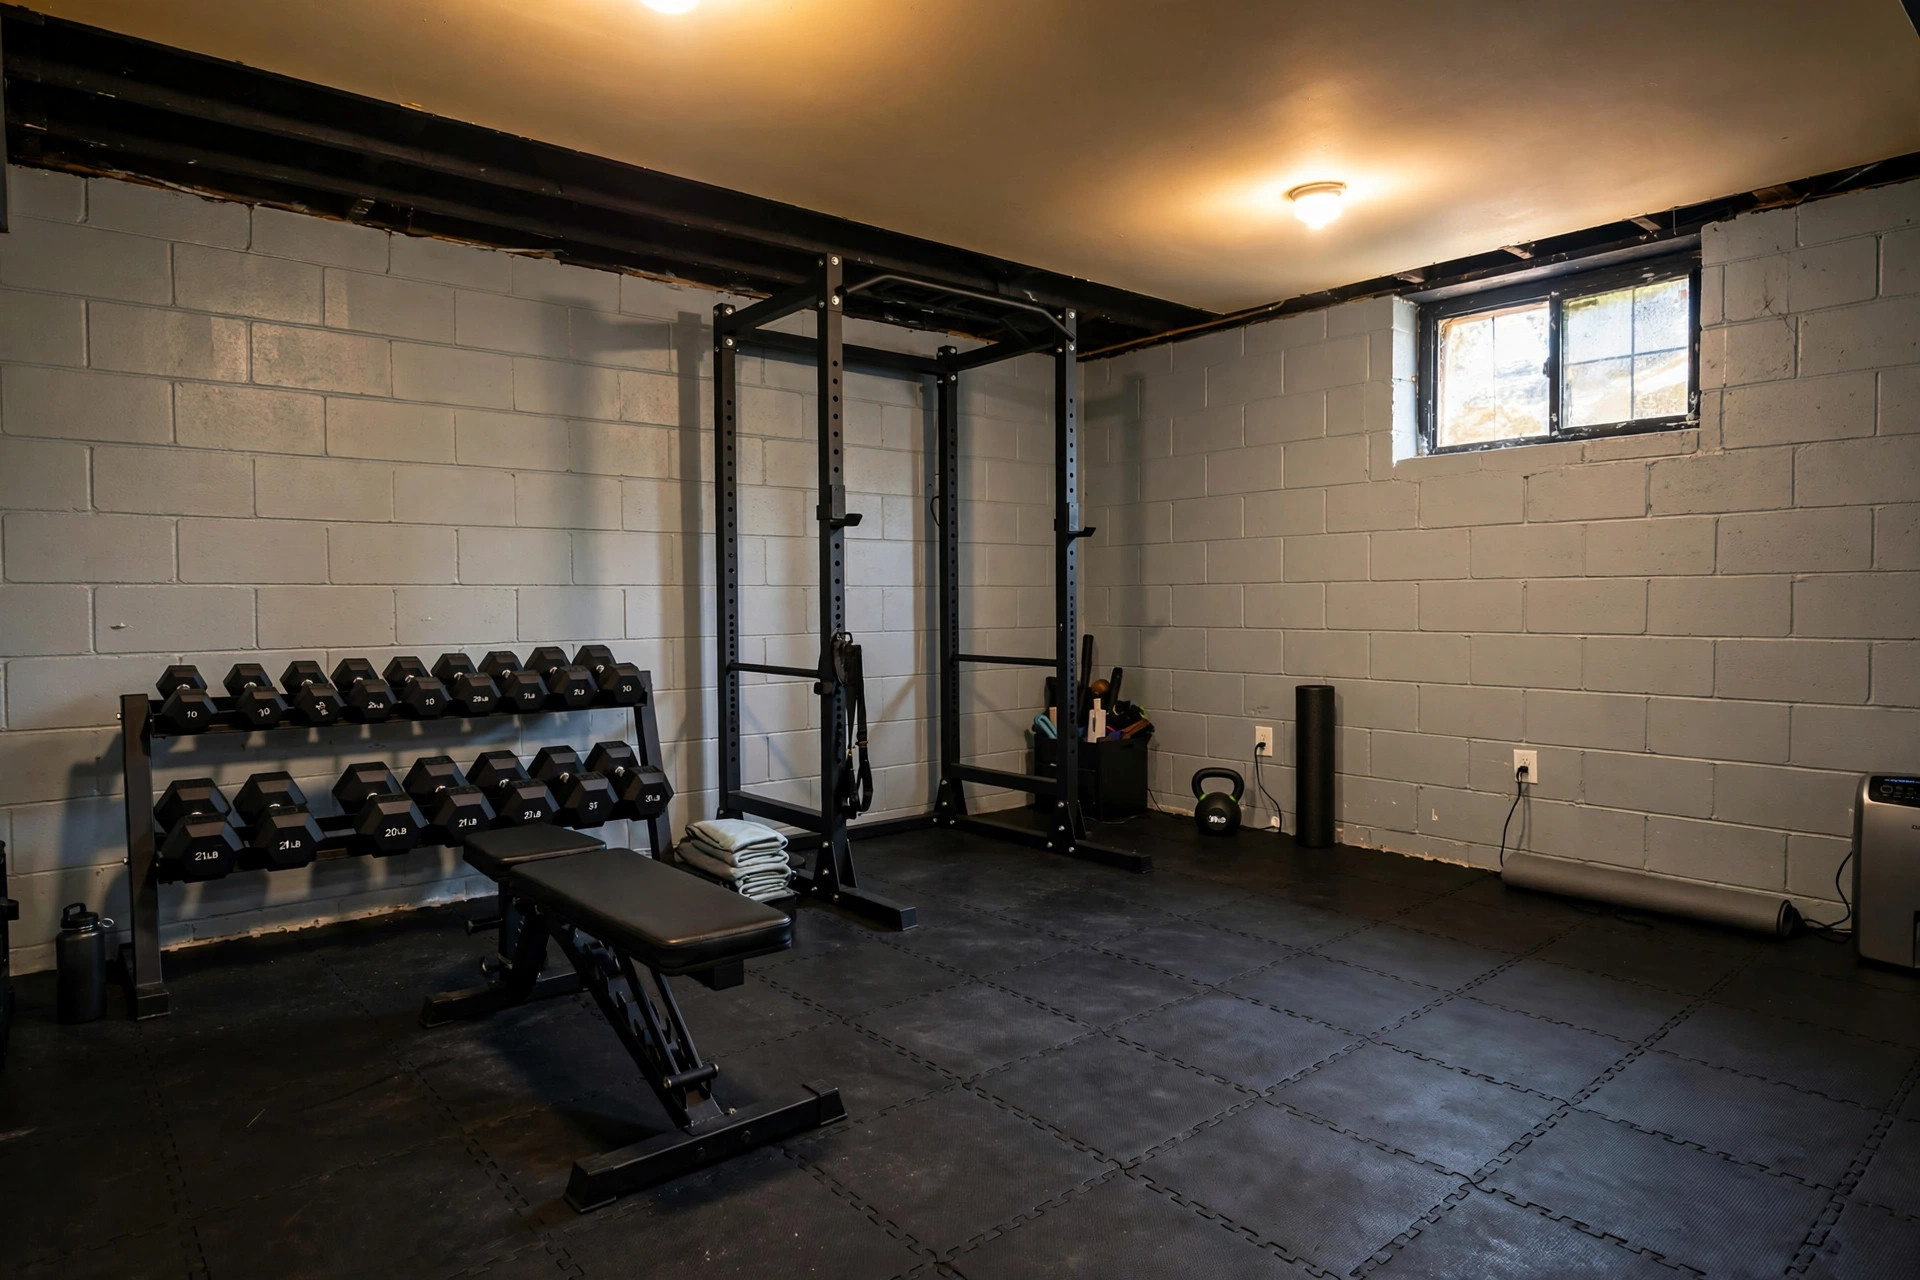
The best flooring for home gym basement usa setups starts with one simple fact. A basement is not like a room above ground. The floor sits on concrete. The air stays cool and damp. Weights hit hard. A plain concrete slab will crack, chip, and grow slick with sweat and moisture. The right floor changes all of that.
More Americans now train at home than ever before. The basement is the natural place. It is out of the way, cool in summer, and far from bedrooms. But it demands a floor that can take abuse. Dumbbells drop. Benches drag. Cardio machines shake. Moisture rises from below. A good gym floor protects the concrete, protects your equipment, and protects your body.
This guide walks through the choices in plain terms. You will learn which materials work best, what to pay, how to install them, and how to keep them in good shape. By the end you can pick with confidence.
Why Basement Gym Flooring Matters: Best Flooring for Home Gym Basement Usa
Concrete looks tough, but it is a poor training surface. It is hard on joints. It chips when plates fall. It gives no grip when shoes are damp. It also sweats. Moisture from the ground rises through concrete, and in a basement gym that moisture feeds mildew under mats and rugs.
A proper gym floor solves these problems at once. Rubber and foam cushion your knees and back. Thick tiles spread the force of dropped weights so the slab beneath does not crack. Many products have textured surfaces that grip shoes even when damp. Most modern gym flooring also resists mold, which matters in a below-grade room.
There is a noise factor too. Basements often sit under living rooms or bedrooms. A dropped dumbbell on bare concrete sends a sharp crack through the whole house. Rubber flooring soaks up that impact. Your family will thank you. So will your neighbors in a townhouse or row home.
Types of Gym Flooring for a Basement
Not every gym floor suits every basement. The main options are rubber, foam, vinyl, and carpet tiles. Each has clear strengths and clear limits.
Rubber Flooring
Rubber is the standard in commercial gyms, and for good reason. It is the best choice for most basement gyms with free weights. Rubber rolls and tiles come in thicknesses from 1/4 inch to 3/4 inch or more. The thicker the tile, the more impact it absorbs.
Rubber tiles lock together with interlocking edges or sit loose in a tight grid. Rolls cover large areas with few seams, which looks clean and keeps water from seeping under edges. Recycled rubber has a speckled look that hides dirt well. Virgin rubber costs more and has less odor, which matters in a closed basement. For walkways and stretching areas, 3/8-inch or 1/2-inch is enough. Rubber handles moisture well, but it is heavy. A 4×6 foot mat can weigh over 100 pounds, so plan your delivery and layout before you buy.
Foam Interlocking Tiles
Foam tiles are the budget favorite. They come in 2×2 foot squares with puzzle-piece edges. You press them together by hand. No glue. No tools. A child could install them.
Foam suits light training: yoga, stretching, bodyweight work, and light dumbbells. It is soft underfoot and warm, which feels good on cold concrete. Prices run far below rubber.
But foam has limits you must respect. It dents under heavy racks and tears under dropped plates. It is not for deadlifts or Olympic lifting. In a damp basement, cheap foam can trap moisture underneath. If you go this route, buy closed-cell EVA foam, which resists water better than open-cell types.
Luxury Vinyl Plank and Tile
Luxury vinyl plank has become a popular basement floor for good reason. It handles moisture, looks like wood or stone, and wipes clean in seconds. If your basement gym doubles as a family room or a home office corner, vinyl keeps the space looking like a finished room, not a warehouse.
Many vinyl products are 100 percent waterproof, which is a big plus on a concrete slab. See our guide to waterproof flooring for basements for more on moisture-ready options. The catch is impact. Vinyl is thin and hard. It will not protect concrete from dropped iron plates the way rubber does.
The fix is simple. Lay vinyl across the whole room for looks and moisture control, then add rubber mats or tiles in the lifting zone. You get the best of both worlds. Just make sure the vinyl is rated for the weight of your equipment, and check that heavy racks sit on rubber, not bare vinyl.
Carpet Tiles
Carpet tiles are soft, quiet, and warm. They come in squares that stick down with light adhesive or free-lay backing. If one stains, you lift it and swap in a spare. For a basement gym used mainly for cardio machines and stretching, carpet tiles work well and cost little.
The trade-off is hygiene and moisture. Basements run damp, and carpet holds that damp. Sweat and spills soak in. In a below-grade room, this can feed mildew unless the basement is well sealed and dehumidified. If you choose carpet tiles, run a dehumidifier and pick tiles made for commercial use, which resist stains and dry faster.
What to Look for When You Choose
Thickness comes first. For a lifting area, do not go below 1/2 inch of rubber. For general fitness, 3/8 inch is fine. Thin mats look like a deal until a plate cracks the concrete.
Moisture handling comes second. A basement floor must let the slab breathe or block moisture entirely. Rubber mats trap some moisture beneath them, so lift them now and then to check.
Grip is third. Sweaty shoes on smooth foam can slip. Look for textured surfaces, especially near free-weight stations. Rubber naturally grips well.
Odor is fourth and often ignored. Fresh rubber smells. In a basement with small windows, that smell lingers. Air new mats outside for a day or two before installing them. Low-VOC and virgin rubber products off-gas less.
Weight capacity is fifth. Check the product rating. A leg press or a loaded rack concentrates hundreds of pounds on small feet. Cheap foam will crush flat in weeks under such loads.
Ease of install is last but practical. Interlocking tiles need no glue and can move with you. Rolls need two people and careful cutting. Glue-down products are permanent and unforgiving of mistakes.
Cost and Price
Prices vary by material and thickness. Here are typical American retail ranges in 2026.
Foam interlocking tiles cost about $1 to $2.50 per square foot. A 200-square-foot room runs $200 to $500. This is the cheapest path to a covered floor.
Rubber tiles cost about $2.50 to $5 per square foot for 3/8-inch to 1/2-inch tiles. Thicker 3/4-inch tiles for heavy lifting run $4 to $7 per square foot. A 200-square-foot lifting area in 3/4-inch rubber can cost $800 to $1,400.
Rubber rolls cost about $2 to $4.50 per square foot depending on thickness. They cover large rooms fast, and fewer seams mean a cleaner look.
Luxury vinyl plank costs about $2.50 to $5 per square foot for the material, plus underlayment if needed. Professional install adds $2 to $4 per square foot. A vinyl floor with rubber mats in the lifting zone lands in the middle of the budget.
Carpet tiles cost about $1.50 to $4 per square foot. Commercial-grade tiles sit at the high end but last far longer.
Remember the extras. Concrete sealer costs little and takes an afternoon. A dehumidifier costs $200 to $300 but protects any floor you choose. Delivery fees for heavy rubber can surprise you, so ask before you order.
Installation Tips
Start with the slab. Sweep it clean, fill cracks, and roll on a concrete sealer. This step stops most moisture problems before they start.
Measure twice. Draw the room on paper and mark the rack, the platform, the cardio corner, and the walkways. Order 5 to 10 percent extra. Cuts waste material, and a spare tile or two saves you later.
Acclimate the flooring. Let tiles or planks sit in the basement for 48 hours before install.
For interlocking rubber or foam tiles, start in the center of the room and work outward. Tap seams tight with a rubber mallet. For rolls, unroll them and let them relax flat for a day before cutting. Use a sharp utility knife and a straight edge.
If you glue anything down, test a small area first. Basement slabs can hold moisture that weakens glue. Many gym floors work better loose-laid so you can lift them to check the slab each year.
Leave a small gap at walls for expansion. Cover the gap with baseboard or quarter-round trim for a finished look.
Care and Upkeep
Gym floors take sweat, dust, and chalk. A weekly routine keeps them sound.
Sweep or vacuum first. Grit grinds into rubber and scratches vinyl. A soft broom or a vacuum with the beater bar off works best. For a full-room refresh, see our roundup of luxury vinyl plank flooring reviews for care tips on the vinyl layer.
Mop rubber with warm water and a mild cleaner. Skip harsh solvents, which break down rubber over time. For vinyl, use a cleaner made for vinyl floors and a damp mop, never a soaking one.
Lift a few tiles twice a year and look at the slab. If you see dark spots or smell mustiness, the basement needs better drainage or a dehumidifier before the floor suffers. Catching moisture early saves the whole investment.
Replace damaged pieces fast. A torn foam tile lets water in. A curled vinyl plank trips feet. Keep spares from your original order so colors match.
Chalk users should sweep after each session. Chalk dust works into every seam and shortens the life of the finish.
Safety
A gym floor should make training safer, not add new risks.
Keep transitions flat. Where rubber meets vinyl or bare floor, use transition strips so shoes do not catch. A raised edge in a lifting area is a rolled ankle waiting to happen.
Anchor equipment. Benches and racks can walk on smooth floors during hard sets. Rubber grips well, but check heavy pieces now and then and reposition as needed.
Mind the air. Basements need fresh air when you train hard. Run a fan or crack a window. Rubber off-gassing plus hard breathing is a poor mix. If the basement has a furnace or water heater, keep the gym area clear of it and never block vents.
Light it well. Basements run dark. Poor light hides a loose tile or a spilled bottle. Bright, even lighting cuts trip risk and makes the space inviting.
Keep a first-aid kit and a phone nearby. This is plain common sense for any home gym, but basements are far from the front door.
If children or pets use the basement, choose pet friendly flooring options for the shared zones and keep the heavy lifting area clearly separate.
Frequently Asked Questions
Can I put gym flooring straight on basement concrete? Yes, in most cases. Clean the slab, seal it, and let it dry fully. Rubber and foam tiles lay right on sealed concrete. Vinyl plank usually needs an underlayment rated for below-grade use. If the basement floods or seeps, fix the water first. No floor survives standing water.
What is the best thickness for home gym flooring in a basement? For general fitness, 3/8 inch to 1/2 inch of rubber works well. For a power rack and free weights, use 3/4 inch under the lifting zone. Thicker is always safer for the slab, but it costs more and raises the floor height, which matters near doors.
Does rubber gym flooring smell in a basement? New rubber has a smell that is stronger in closed spaces. Recycled rubber smells more than virgin rubber. Air mats outside for one to two days before install, and run a fan in the basement for the first week. The odor fades with time.
Will gym flooring trap moisture in my basement? Any floor covering can trap some moisture against concrete. The fix is a sealed slab, good drainage outside the house, and a dehumidifier inside. Lift a tile now and then to check. If the slab stays dry, the floor stays sound.
Is foam or rubber better for a basement home gym? Foam wins on price and ease. Rubber wins on durability, weight handling, and lifespan. If you lift heavy or drop weights, choose rubber. If you do yoga, stretching, and light dumbbells, foam is fine and far cheaper.
How long does basement gym flooring last? Quality rubber lasts 10 to 20 years with basic care. Foam lasts 3 to 7 years under light use and far less under heavy weights.
A Final Word
The best flooring for home gym basement usa homes is not one single product. It is the right mix for your training, your slab, and your budget. Rubber rules the lifting zone. Vinyl or carpet can finish the rest of the room. Foam serves light training well and costs little.
Start with the slab. Seal it, dry it, and measure it. Choose thickness for the heaviest thing you will drop. Buy a little extra. Install with care. Then lift a tile now and then and make sure all is dry beneath. Do these simple things and your basement gym floor will serve you for years.
For more background, see The Spruce, The Home Depot, and Lowe’s. For more background, see LL Flooring, Shaw Floors, and Mohawk Flooring. Buying guides are also published by Daltile and This Old House.
References
Daltile. (n.d.). Ceramic and porcelain tile. https://www.daltile.com LL Flooring. (n.d.). Hardwood, vinyl, and tile flooring. https://www.llflooring.com Lowe’s. (n.d.). Home improvement products. https://www.lowes.com Mohawk Flooring. (n.d.). Flooring products. https://www.mohawkflooring.com Shaw Floors. (n.d.). Flooring products. https://www.shawfloors.com The Home Depot. (n.d.). Home improvement products. https://www.homedepot.com The Spruce. (n.d.). Home and garden advice. https://www.thespruce.com This Old House. (n.d.). Home renovation guidance. https://www.thisoldhouse.com
Was this guide helpful?

About Michael Thompson
The My Garden US editorial team writes practical, in-depth home and garden guides for American homeowners — tested advice, no fluff.
You May Also Like
Can You Install LVP Over Hardwood? A Full Guide for USA Homeowners
March 5, 2026 0 views
Shower Remodel Cost Breakdown for USA Homes
July 4, 2026 0 views
Recaulking Bathtub Cost Near Me: A Plain Guide to Prices and Choices
September 16, 2026 0 views