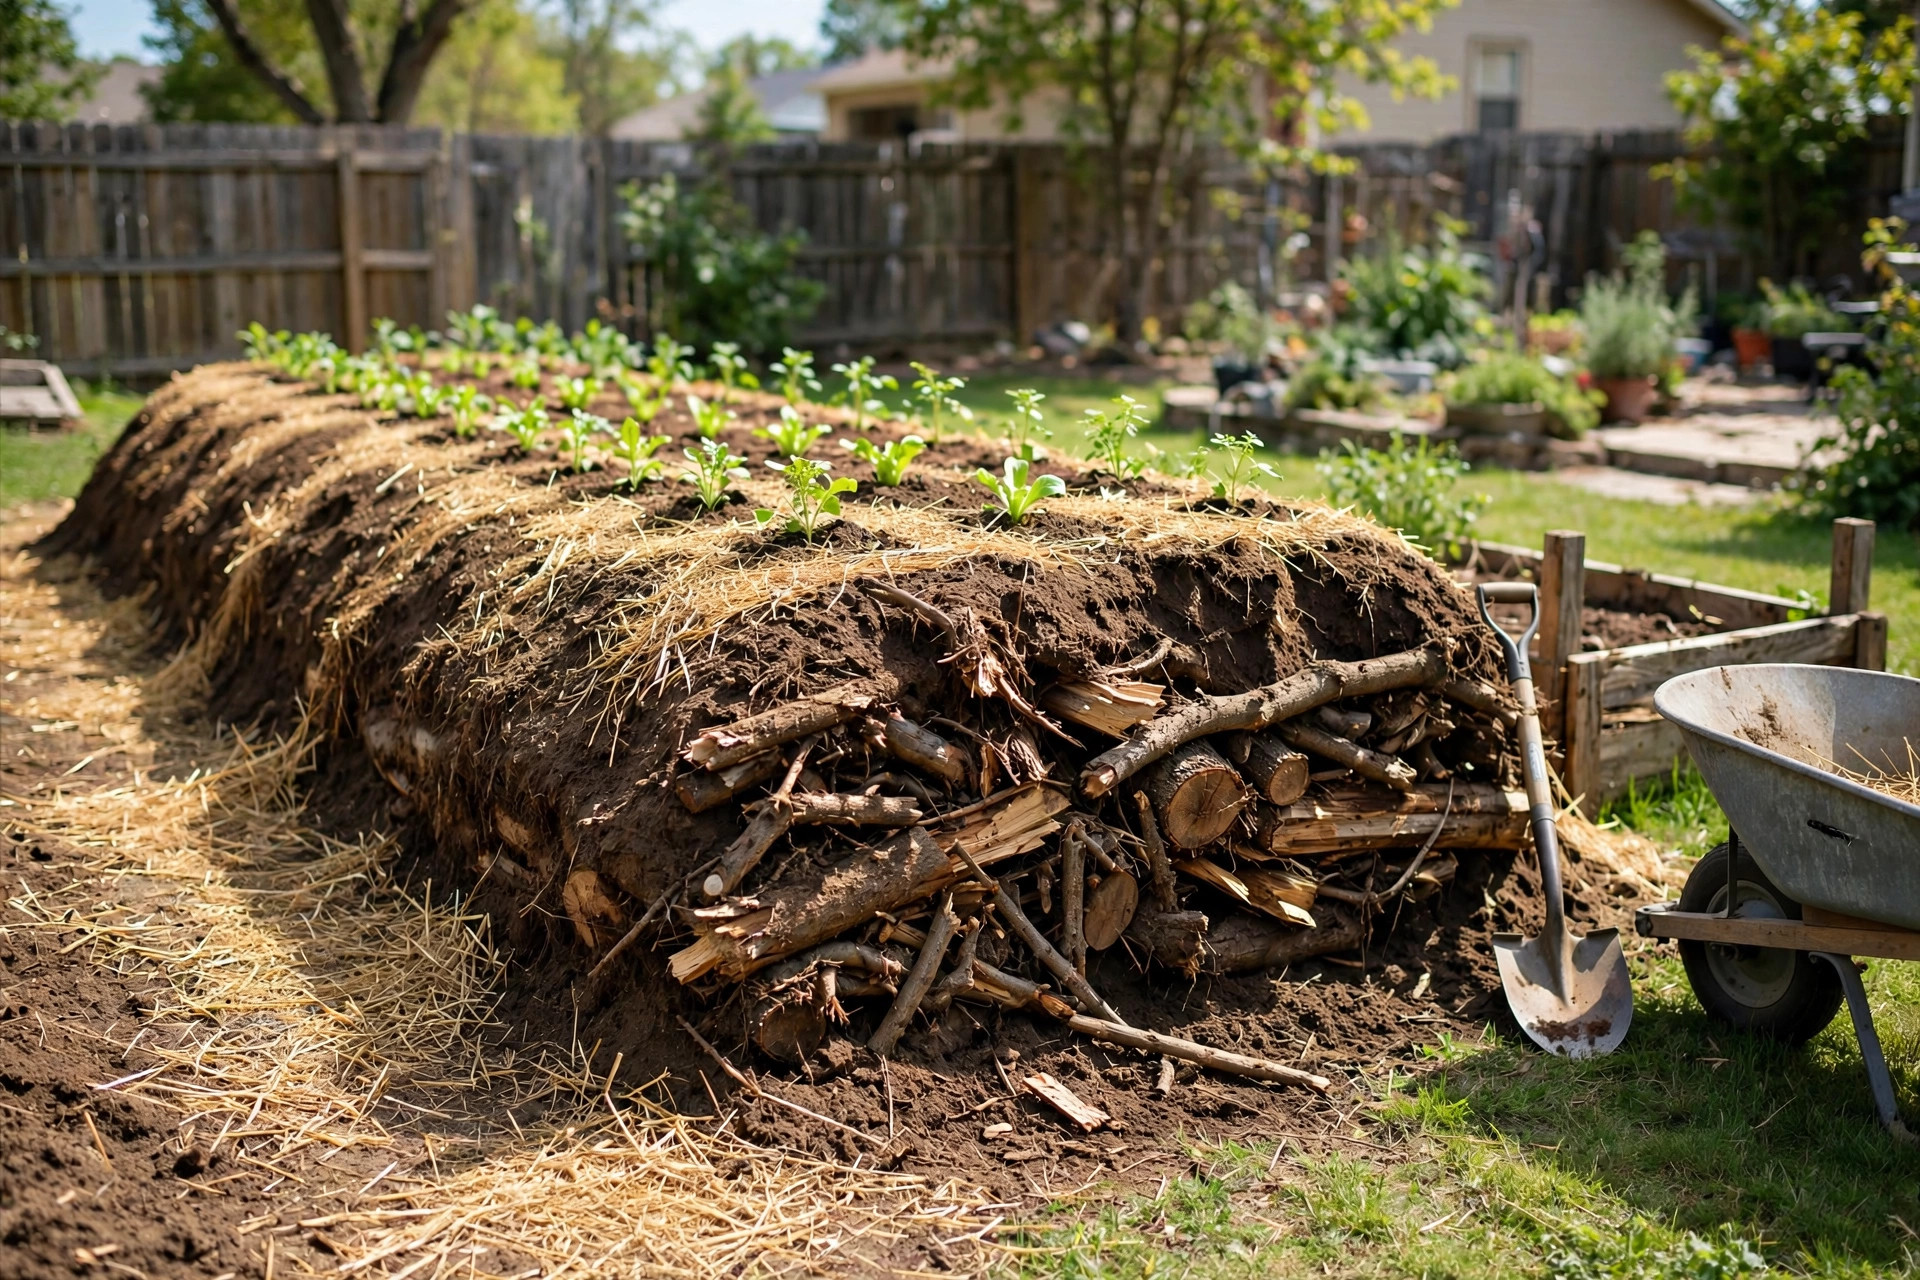
A hugelkultur raised bed is a garden bed built on top of buried wood. The word hugelkultur comes from German. It means “hill culture.” The method has been used in parts of Europe for hundreds of years. Gardeners fill a mound or a frame with logs, branches, leaves, and soil. The wood breaks down slowly over the years. As it breaks down, it feeds the soil. It also holds water like a sponge.
If you want to know how to build hugelkultur raised bed systems in your own yard, this guide walks you through the whole job: materials, spot, layer order, costs, upkeep, and safety. No special skill is needed. If you can dig, lift, and rake, you can build one.
Why a Hugelkultur Raised Bed Matters
A hugelkultur bed solves several common garden problems at once. First, it gives plants a deep, loose bed to grow in. The buried wood acts as a store of both food and water. As the logs rot, they release nutrients into the soil above them. At the same time, the soft wood absorbs rain and holds it for dry weeks. This means you water less often. Many gardeners find that an established hugel bed needs little or no watering after the first season.
Second, the bed is raised. A mound that stands three or four feet tall is easier to reach than flat ground. You bend less. You stretch less. This matters if you have a sore back or stiff knees. The raised shape also warms up earlier in spring. Seeds can go in sooner, and the growing season runs a little longer.
Third, the bed puts yard waste to good use. Fallen limbs, pruned branches, and old firewood have value here. Instead of hauling brush to the curb or burning it, you bury it under soil. It turns into plant food. This is a plain, practical kind of recycling. It also keeps the cost of fill material low, since wood you already own is free.
For more detail on what goes on top, see our raised garden bed soil mix recipe.
What to Look For in Materials: How to Build Hugelkultur Raised Bed
A hugelkultur bed is mostly wood. But not all wood works well. Here is what to look for in each layer, starting at the bottom.
Logs and thick branches. These form the base. Use logs that are at least four inches thick. Old, partly rotted logs are best. They break down faster than fresh-cut logs and already hold water. Hardwoods such as oak, maple, birch, poplar, and fruit wood are good choices. Avoid black walnut, which gives off a chemical that harms many plants. Avoid cedar and black locust for the base layer too, because they rot very slowly. Pine and fir are fine, though some gardeners worry that they make the soil acid. In a large mound, the effect is small and short-lived.
Small branches and twigs. These fill the gaps between the big logs. Brushwood packs down into the air pockets. It also breaks down faster than thick logs, so it feeds the bed sooner. Prunings from your own yard are perfect.
Green material. Grass clippings, fresh leaves, vegetable scraps, and fresh manure go in next. These add nitrogen. The nitrogen feeds the tiny life in the soil that breaks the wood down. Without enough nitrogen, the wood can steal nitrogen from your plants for the first year. A generous layer of green matter prevents this problem.
Compost. Aged compost sits above the wood layers. It gives young plants food right away while the wood below is still waking up. Home compost or bagged compost both work.
Topsoil. Six to ten inches of good soil covers everything. This is the layer your plants grow in. A blend of topsoil and compost works well. Sites such as Burpee and the Gardener’s Supply Company sell raised bed soil mixes, and Lowe’s carries bulk topsoil.
Tools. You will need a sharp shovel or spade, a wheelbarrow, a steel rake, and a pair of lopping shears for cutting branches. A sturdy fork helps move compost. A bow saw or pruning saw cuts logs to length. Fiskars and Corona Tools make saws and shears for this work, and Consumer Reports tests garden tools for sharpness and comfort.
How to Choose the Right Spot and Size
Location matters more than most people think. A hugel bed is hard to move once it is built. Choose well.
Pick a spot that gets at least six hours of sun a day. Vegetables need full sun. Watch your yard for a few days and note where the sun falls before you dig.
Keep the bed close to a water source. You must soak it well when you build it, and a nearby hose bib saves many trips.
Do not build where water pools after rain. A mound sheds water off its sides, but a bed sitting in a puddle stays too wet at the base. Level ground is best.
Make the bed no wider than four feet if you reach it from both sides, and no wider than two or three feet if a wall blocks one side. Length can be whatever your yard allows; eight to twelve feet is common. A tall bed of three to four feet holds more wood and needs less water later. A two-foot bed is easier to build and still works well.
In hot climates, run the long side north to south so one side does not bake in afternoon sun. The Spruce offers useful notes on garden bed placement for different regions.
Types and Options
Not every yard suits the same kind of hugel bed. Here are the three common forms.
The classic mound. This is the original form. You pile wood into a long mound and cover it with soil. No frame is needed. The mound is steep at first and settles over time. It is cheap to build because it needs no lumber. The sloped sides give you more planting surface than a flat bed of the same footprint. The downside is that the loose soil can wash off in heavy rain until plants take hold. Mulch the sides well in the first year.
The framed bed. This version sits inside a wooden or stone frame, like a normal raised bed, but the bottom half is filled with hugelkultur layers. The frame holds the soil in place. It looks tidy, which matters in a front yard or a shared garden. It costs more because you buy lumber and hardware. It also holds less wood than a free mound, so the water-saving effect is smaller.
The small hugel. This is a hugel bed in a large planter, half barrel, or fabric pot, built from small sticks, leaves, and soil. It works on a patio or balcony, where even a little buried wood feeds the soil and holds moisture.
Home project sites such as Family Handyman and Bob Vila show step-by-step photos of framed raised beds that you can adapt to hugel layers.
Building It Step by Step
Now the main work. Learning how to build hugelkultur raised bed layers in the right order is the heart of the job. Follow these steps.
Step 1: Mark the outline. Lay a garden hose or rope on the ground to mark the shape. Cut the grass or weeds inside the outline down to the ground.
Step 2: Dig a shallow trench. Dig down six to twelve inches inside the outline. Pile the sod and topsoil to one side for later use.
Step 3: Lay the big logs. Place the thickest logs in the trench, side by side. Pack them tight. Fill gaps with smaller branches. Aim for a base layer about two feet thick if you are building a tall mound, or about one foot thick for a low bed.
Step 4: Add brush and twigs. Cover the logs with branches and twigs, push them into every hole, and walk on the pile to pack it down.
Step 5: Soak everything. Water the pile until water runs out the sides. Wet wood starts rotting sooner. For later watering plans, read our guide on how to install raised bed irrigation.
Step 6: Add green material. Spread four to six inches of grass clippings, fresh leaves, or vegetable scraps over the wood. Add manure if you have it.
Step 7: Add compost. Spread three to four inches of finished compost over the green layer. Level it with a rake.
Step 8: Cover with soil. Shovel your saved topsoil back over the mound. Add extra topsoil or bagged mix until the bed is six to ten inches deep. See our raised garden bed soil mix recipe for exact ratios.
Step 9: Water again and mulch. Soak the whole bed one more time. Then cover the surface with three inches of straw or wood-chip mulch. The mulch holds moisture and stops the soil from washing away.
Step 10: Plant. Plant right away. In year one, grow hungry plants like squash, pumpkins, cucumbers, and corn. Skip deep root crops like carrots until the bed settles.
Cost and Price
A hugelkultur bed can cost almost nothing or a few hundred dollars. With fallen wood, your own compost, and soil on site, the only cost is your time plus a bag of straw mulch. Many gardeners build a full-size mound for under twenty dollars.
If you must buy materials, bagged topsoil and compost run a few dollars per bag, and a large bed may need twenty or more bags each. A framed version adds fifty to one hundred dollars for lumber and screws. The bed pays back over time through lower water bills and less fertilizer.
Care and Upkeep
A hugel bed is low work, but it is not no work. Here is what to do through the year.
First year. Water often. The wood is still dry inside, and the bed settles several inches. Top up soil where it sinks and add mulch over bare spots. If leaves turn pale yellow, side-dress with compost.
Later years. Water less. By year two or three, the wood holds water well. Top-dress with an inch of compost each spring and pull weeds while small.
Long term. The mound shrinks slowly as wood turns to soil. After five to ten years, add fresh compost and soil on top, or rebuild with a new wood core. A basic drip irrigation kit for raised beds puts water right at the roots if summer watering is still needed.
Safety
Garden work is safe work, but a few cautions apply.
Lift with care. Wet logs are heavy. Bend your knees, keep the load close to your body, and ask for help with the big pieces. A wheelbarrow beats carrying armloads across the yard.
Wear gloves. Splinters, thorns, and rough bark can cut your hands. Sturdy work gloves also protect you from blisters during a long day of shoveling.
Wear eye protection when sawing wood. Step carefully on the soft, uneven mound.
Use clean wood only. Do not use painted lumber, pressure-treated wood, or plywood near vegetables.
Keep the bed away from wooden fences and house foundations. A damp mound of rotting wood pressed against a fence post will shorten the life of the fence. Leave at least a foot of space, or build a framed bed with a gap.
Frequently Asked Questions
How long does a hugelkultur bed last? Thick hardwood logs break down slowly, so a tall bed can feed plants for ten to fifteen years. Softwood lasts five to eight years. When the wood is gone, the bed remains a deep, rich planting area.
Will the wood steal nitrogen from my plants? Fresh wood can tie up nitrogen in year one. Prevent this with a thick layer of green material and compost above the wood, and plant heavy feeders like squash. By year two, the wood gives back more than it took.
What wood should I avoid? Avoid black walnut, which releases a natural chemical that harms tomatoes, peppers, and many other plants. Avoid pressure-treated lumber, painted wood, and plywood. Very resinous fresh pine is usable but best mixed with other wood. When in doubt, use plain hardwood logs and branches from your own yard.
Can I build a hugelkultur bed in a dry climate? Yes. The buried wood stores water and releases it slowly. Soak the wood well when you build, mulch thickly, and water deeply in year one.
Do I need to dig a trench first? A shallow trench helps, but it is not required. The trench anchors the mound and gives you free topsoil. On rocky ground where digging is hard, you can skip the trench and build right on the surface. Just lay the logs on the ground and pile the layers on top.
Can I grow vegetables in the first year? Yes. Plant right away. Choose fast, hungry crops such as beans, squash, cucumbers, and leafy greens. Their roots will find the compost and soil layers. Skip deep root vegetables until the second year, when the bed has settled and the soil is deeper and more even.
A Final Word
A hugelkultur raised bed asks for one hard weekend and gives back years of easy gardening. You bury wood, you pile soil, and nature does the rest. The bed waters itself in dry spells. It feeds itself as the wood breaks down. It turns brush you would have thrown away into food on your table.
Start small if a full mound feels like too much. Build a short bed this season, learn how the layers settle, and build bigger next year. Pick a sunny spot, gather your wood, and begin.
References
Bob Vila. (n.d.). Home improvement advice. https://www.bobvila.com Burpee. (n.d.). Seeds, plants, and gardening supplies. https://www.burpee.com Consumer Reports. (n.d.). Product reviews and ratings. https://www.consumerreports.org Corona Tools. (n.d.). Garden and landscape tools. https://www.corona-tools.com Family Handyman. (n.d.). DIY home repair and maintenance. https://www.familyhandyman.com Fiskars. (n.d.). Garden and cutting tools. https://www.fiskars.com Gardener’s Supply Company. (n.d.). Gardening tools and supplies. https://www.gardeners.com Lowe’s. (n.d.). Home improvement products. https://www.lowes.com The Spruce. (n.d.). Home and garden advice. https://www.thespruce.com
Was this guide helpful?

About Robert Taylor
The My Garden US editorial team writes practical, in-depth home and garden guides for American homeowners — tested advice, no fluff.