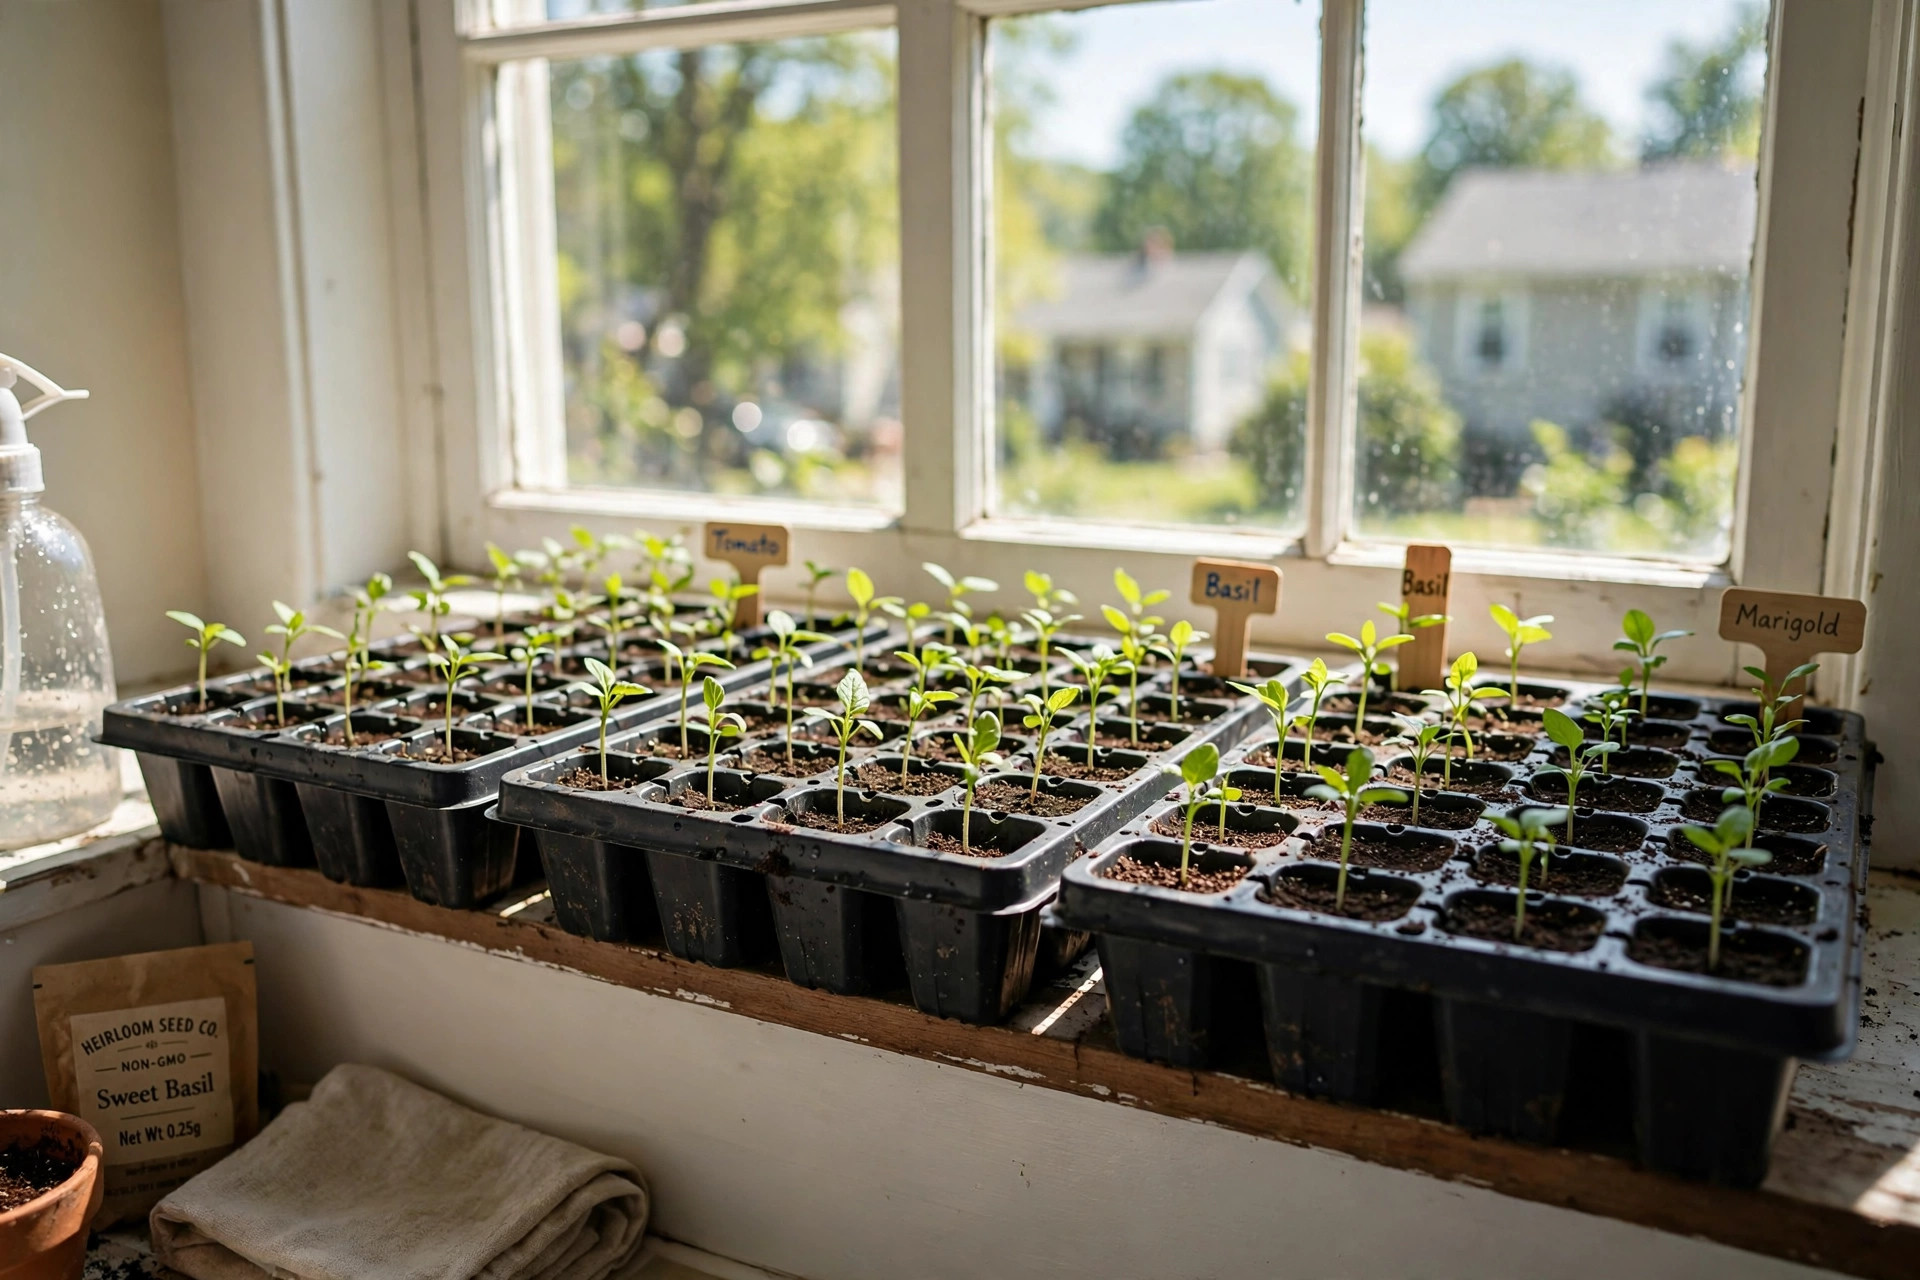

This seed starting trays reviews buying guide USA is written for the home gardener who wants to start seeds indoors. Spring comes fast. Seed packets sit on the shelf. A good tray turns those seeds into strong young plants. A bad tray turns them into weak stems that fall over and die. The difference is small. The right choice is easy when you know what to look for.
Reviews of seed starting trays can be hard to read. This guide keeps things plain. It covers tray types, cell sizes, prices, and care. It also answers the questions that gardeners ask most. By the end, you will know which tray fits your seeds, your budget, and your space.
Why Seed Starting Trays Matter
Seeds need warmth, light, and steady moisture to grow. A flat pan of soil cannot give each seed its own room. Seed starting trays fix this problem. Each small cell holds one plant. Roots grow down instead of sideways. The plants do not fight each other for food and water.
Starting seeds indoors gives you a head start on the season. In much of the USA, the growing season is short. Tomatoes, peppers, and eggplants need weeks of warm weather. When you start them inside in March, they are ready for the garden in May. A tray on a windowsill or under a grow light buys you that time.
Trays also save seed. Good seed costs money. A packet of heirloom seed can cost several dollars. When you plant seeds one per cell, you waste none. When you scatter them in a flat, many are lost. You can read more about choosing seed in our heirloom vegetable seeds buying guide.
Transplants from trays move well. The root ball holds together. The plant feels little shock when it moves to the garden. That shock can set a plant back by two weeks. Trays cut that loss to a day or two.
How to Choose: What to Look For: Seed Starting Trays Reviews Buying Guide Usa
Good reviews of seed starting trays look at the same few facts. Learn these facts and you can read any review with a clear eye.
Cell Size and Count
Trays come in many cell counts. Common counts are 24, 32, 50, 72, 128, and 200. The count tells you how many plants fit in one tray. It also tells you how big each cell is. A 24-cell tray has large cells. A 200-cell tray has tiny cells.
Large cells hold more soil. They suit big seeds like beans, squash, and sunflowers. They also suit slow plants like peppers that stay in the tray for many weeks. Small cells suit tiny seeds like lettuce, petunias, and herbs. They also suit plants that move out fast, like quick salad greens.
Most home gardeners do best with 72-cell seed starting trays. This is the middle road. The cells are big enough for tomatoes and peppers. The tray holds enough plants for a family garden. If you are new to seed starting, start here.
Depth matters too. Standard cells are about two inches deep. Long roots need deep cells. Sweet peas, morning glories, and many tree seeds like deep cells. For most flowers and vegetables, standard depth is fine.
Tray Material
Most trays are plastic. The plastic can be thick or thin. Thick trays last for years. Thin trays bend and crack. Reviews often note the thickness in mils or by feel. A good test is the flex test. Hold the tray by one edge. If it sags like a wet noodle, it is thin. If it holds its shape, it is thick.
Thick trays cost more at first. They cost less over time because you reuse them. Thin trays are cheap to buy but may need replacing each year.
Some trays use recycled plastic. This is a plus for the earth. Make sure the plastic is safe for plants. Food-grade polypropylene is the common safe choice.
Domes and Bottom Trays
Many seed starting trays come as a kit. The kit has a bottom tray, a cell insert, and a clear plastic dome. The bottom tray holds water. The cell insert holds the soil. The dome holds heat and moisture over the seeds.
Humidity domes help seeds sprout. Seeds like warm, damp air. A dome keeps that air in. Once seeds sprout, lift the dome a little each day. Take it off when the seedlings are up and green.
Check that the dome fits well. A loose dome lets heat escape. A dome with vents is best. You can open the vents a crack as the plants grow. Gardening Know How has plain how-to guides on hardening seedlings off the dome. Seed starting trays with humidity domes cost a little more than bare trays. The extra cost is worth it for new gardeners.
Types of Seed Starting Trays
Plastic Cell Trays
Plastic cell trays are the most common type. They are cheap. They are light. They come in every cell count. You can find them at garden centers, hardware stores, and big seed companies. Burpee and Park Seed both sell full lines of seed starting supplies, and their catalogs show the range of sizes on the market.
Pros of plastic cell trays: low price, many sizes, easy to find, easy to clean. Cons: thin ones break fast.
Look for trays with drainage holes in each cell. No holes means water sits in the soil. Sitting water rots seeds. This is the most common beginner mistake.
Biodegradable and Peat Trays
Biodegradable trays are made from peat, paper pulp, coconut fiber, or wood fiber. You plant the whole cell in the garden. The roots grow through the walls. There is no shock at moving time. This is a big plus for plants that hate root trouble, like melons and cucumbers.
Peat pots seedlings trays are a classic choice. Many gardeners have used them for decades. You can learn more in our peat pots seedlings buying guide. They work well but they have weak points. Peat pots dry out fast at the edges. They can grow mold in damp rooms. They can also be hard on the earth, since peat comes from bogs that grow back slowly. Coconut fiber pots, called coir pots, are a newer choice. They hold water longer and break down well in the soil.
Gurney’s garden guides often note that biodegradable pots suit gardeners who want to move plants out with zero root damage. If your main goal is easy planting, this type is worth a look.
Soil Blockers
A soil blocker is a tool, not a tray. You press wet soil mix into cubes. Seeds go in the cubes. The cubes sit in a flat tray. Roots stop at the edge of the cube and branch instead. This is called air pruning. It makes thick, healthy roots.
Soil blockers cost more than trays. The press tool can cost twenty dollars or more. But the blocks are free after that. You never buy trays again. Many market gardeners swear by them.
Self-Watering and Capillary Mats
Some kits add a capillary mat under the cells. Water moves up from the bottom tray into the soil. This is called bottom watering. It keeps leaves dry. Dry leaves mean less disease. These kits cost more. They are a good pick if you tend to overwater or if you travel and cannot water each day.
Cost and Price in the USA
Prices for seed starting trays vary by type, size, and where you buy. A single thin 72-cell insert can cost under two dollars at a big box store. A full kit with a thick tray, insert, and vented dome can cost ten to twenty dollars. Heavy-duty reusable trays can cost fifteen to thirty dollars each, but they last five years or more.
Bulk packs lower the unit price. A pack of ten 72-cell inserts often costs less per tray than one alone. If you plan a big garden, buy in bulk. If you are testing seed starting for the first time, buy one kit first.
Online prices are often lower than store prices, but shipping adds cost. Trays are light but bulky. Check the total with shipping before you buy.
Here is a plain rule. Spend a little more on the bottom tray and the dome. Spend less on the cell inserts. The bottom tray and dome last for years. The inserts wear out first. This split keeps your cost low over time.
Do not forget the soil mix. Seed starting mix is not garden soil. It is light and clean. A small bag costs five to ten dollars. One bag fills several 72-cell trays.
Care and Upkeep of Your Trays
Clean trays grow healthy plants. Dirty trays carry disease. Old soil can hold fungi that kill seedlings. This disease is called damping off. It makes young stems thin and brown at the base. Then the plant falls over and dies. Clean trays stop it before it starts.
Wash trays after each use. Knock out old soil. Soak the trays in warm water with a little dish soap for ten minutes. Scrub with a brush. Rinse well. Then soak for ten more minutes in a mix of one part household bleach to nine parts water. Rinse again and let them dry in the sun.
Store trays dry and out of direct sun. Stack them with paper between each tray if they are thin. Thin trays stick together and crack when you pull them apart.
Check trays each spring before you sow. Toss any tray with cracks in the cells. Toss any tray with white crust that will not wash off. That crust is old fertilizer salt.
Label everything. Use a garden marker on plastic plant tags. Write the seed name and the date. Many gardens fail because the gardener forgot what was planted where. The Old Farmer’s Almanac planting calendar is a handy place to note your start dates each year, and NIFA at the USDA offers free extension advice on indoor seed starting for every state.
Safety Tips
Seed starting is safe work, but a few simple rules keep you and your plants out of trouble.
Keep seed starting mix and fertilizer away from small children and pets. The mix is dusty. Dust in the lungs is bad for anyone. Work near an open window when you fill trays.
Read the label on any heat mat you use. Seed heat mats warm the soil to speed sprouting. They are safe when used as directed. Do not cover them with cloth. Do not let water pool on the cord. Unplug them when the seeds are up.
Wash your hands after handling soil mix and fertilizer. Keep chemicals locked up. Grow lights get hot. Keep them away from paper and cloth. Hang lights on chains so you can raise them as plants grow. A light that sits on dry leaves is a fire risk.
Ventilate your growing area. Warm, wet air grows mold. A small fan on low keeps air moving. Moving air also makes stems thick and strong. This is a trick that old greenhouse growers have used for years.
FAQ
How many seeds should I put in each cell?
Put one seed in each cell for large seeds like beans and squash. Put two or three seeds in each cell for tiny seeds like lettuce and herbs. Snip the extra seedlings with scissors and keep the strongest one. Do not pull them out. Pulling can tear the roots of the one you keep.
When should I start seeds indoors?
It depends on your last frost date and the seed type. Most vegetables need six to eight weeks indoors before the last frost. Tomatoes and peppers need eight weeks. Lettuce and herbs need only four. Read the seed packet. It tells you the weeks to count back. White Flower Farm and Proven Winners publish growing notes that help you time popular flowers, and the Monrovia site has plant care notes for many common garden plants.
Can I reuse seed starting trays?
Yes, if they are thick plastic and you clean them well. Wash, disinfect, and dry them as described above. Thin trays may last only one or two seasons. Biodegradable trays cannot be reused. They break down by design. When a tray is too cracked to hold soil, recycle it if your town takes that plastic.
Do I need a grow light, or is a windowsill enough?
A sunny south-facing windowsill can work for a few trays. Most windows do not give enough light. Seedlings stretch toward weak light and grow tall and thin. A simple shop light with daylight bulbs, hung two inches above the plants, gives far better results.
What soil mix should I use in seed starting trays?
Use a seed starting mix, not garden soil and not heavy potting mix. Seed starting mix is fine, light, and free of weed seeds. It holds water but drains well. If you grow herbs from seed, our organic herb seeds buying guide pairs well with a light, clean mix.
Why are my seedlings tall and floppy?
Tall, floppy seedlings need more light. Move the light closer. Add a fan on low to stir the air. Rooms above seventy-five degrees make seedlings grow fast and weak.
A Final Word
A seed starting tray is a simple tool. It does a simple job. It gives each seed a home with room to grow. Pick a 72-cell tray to start. Add a dome with vents. Use clean seed starting mix. Give the seedlings light and moving air. These few steps will carry most home gardens through spring.
Read reviews with the facts from this guide in your head. Check the cell count, the plastic thickness, the drainage, and the dome fit. Compare prices with shipping. Then buy the tray that fits your seeds and your space. The plants will do the rest.
References
Burpee. (n.d.). Seeds, plants, and gardening supplies. https://www.burpee.com Gardening Know How. (n.d.). Gardening guides and plant care. https://www.gardeningknowhow.com Gurney’s Seed & Nursery Co. (n.d.). Seeds, plants, and garden supplies. https://www.gurneys.com Monrovia. (n.d.). Plants for home gardens. https://www.monrovia.com National Institute of Food and Agriculture. (n.d.). Agricultural research and extension. https://www.nifa.usda.gov Park Seed. (n.d.). Seeds, plants, and gardening supplies. https://www.parkseed.com Proven Winners. (n.d.). Plants and gardening inspiration. https://www.provenwinners.com The Old Farmer’s Almanac. (n.d.). Gardening calendars and advice. https://www.almanac.com White Flower Farm. (n.d.). Plants, bulbs, and garden supplies. https://www.whiteflowerfarm.com
Was this guide helpful?

About James Carter
The My Garden US editorial team writes practical, in-depth home and garden guides for American homeowners — tested advice, no fluff.
You May Also Like
Succulent Variety Packs: A Practical Guide for Florida Homes
June 14, 2026 0 views
Lavender Seed Packets Reviews Buying Guide USA: How to Choose Seeds That Truly Sprout
May 8, 2026 0 views
Organic Herb Seeds Deals Near Me: A Simple Guide for American Gardeners
February 17, 2026 0 views