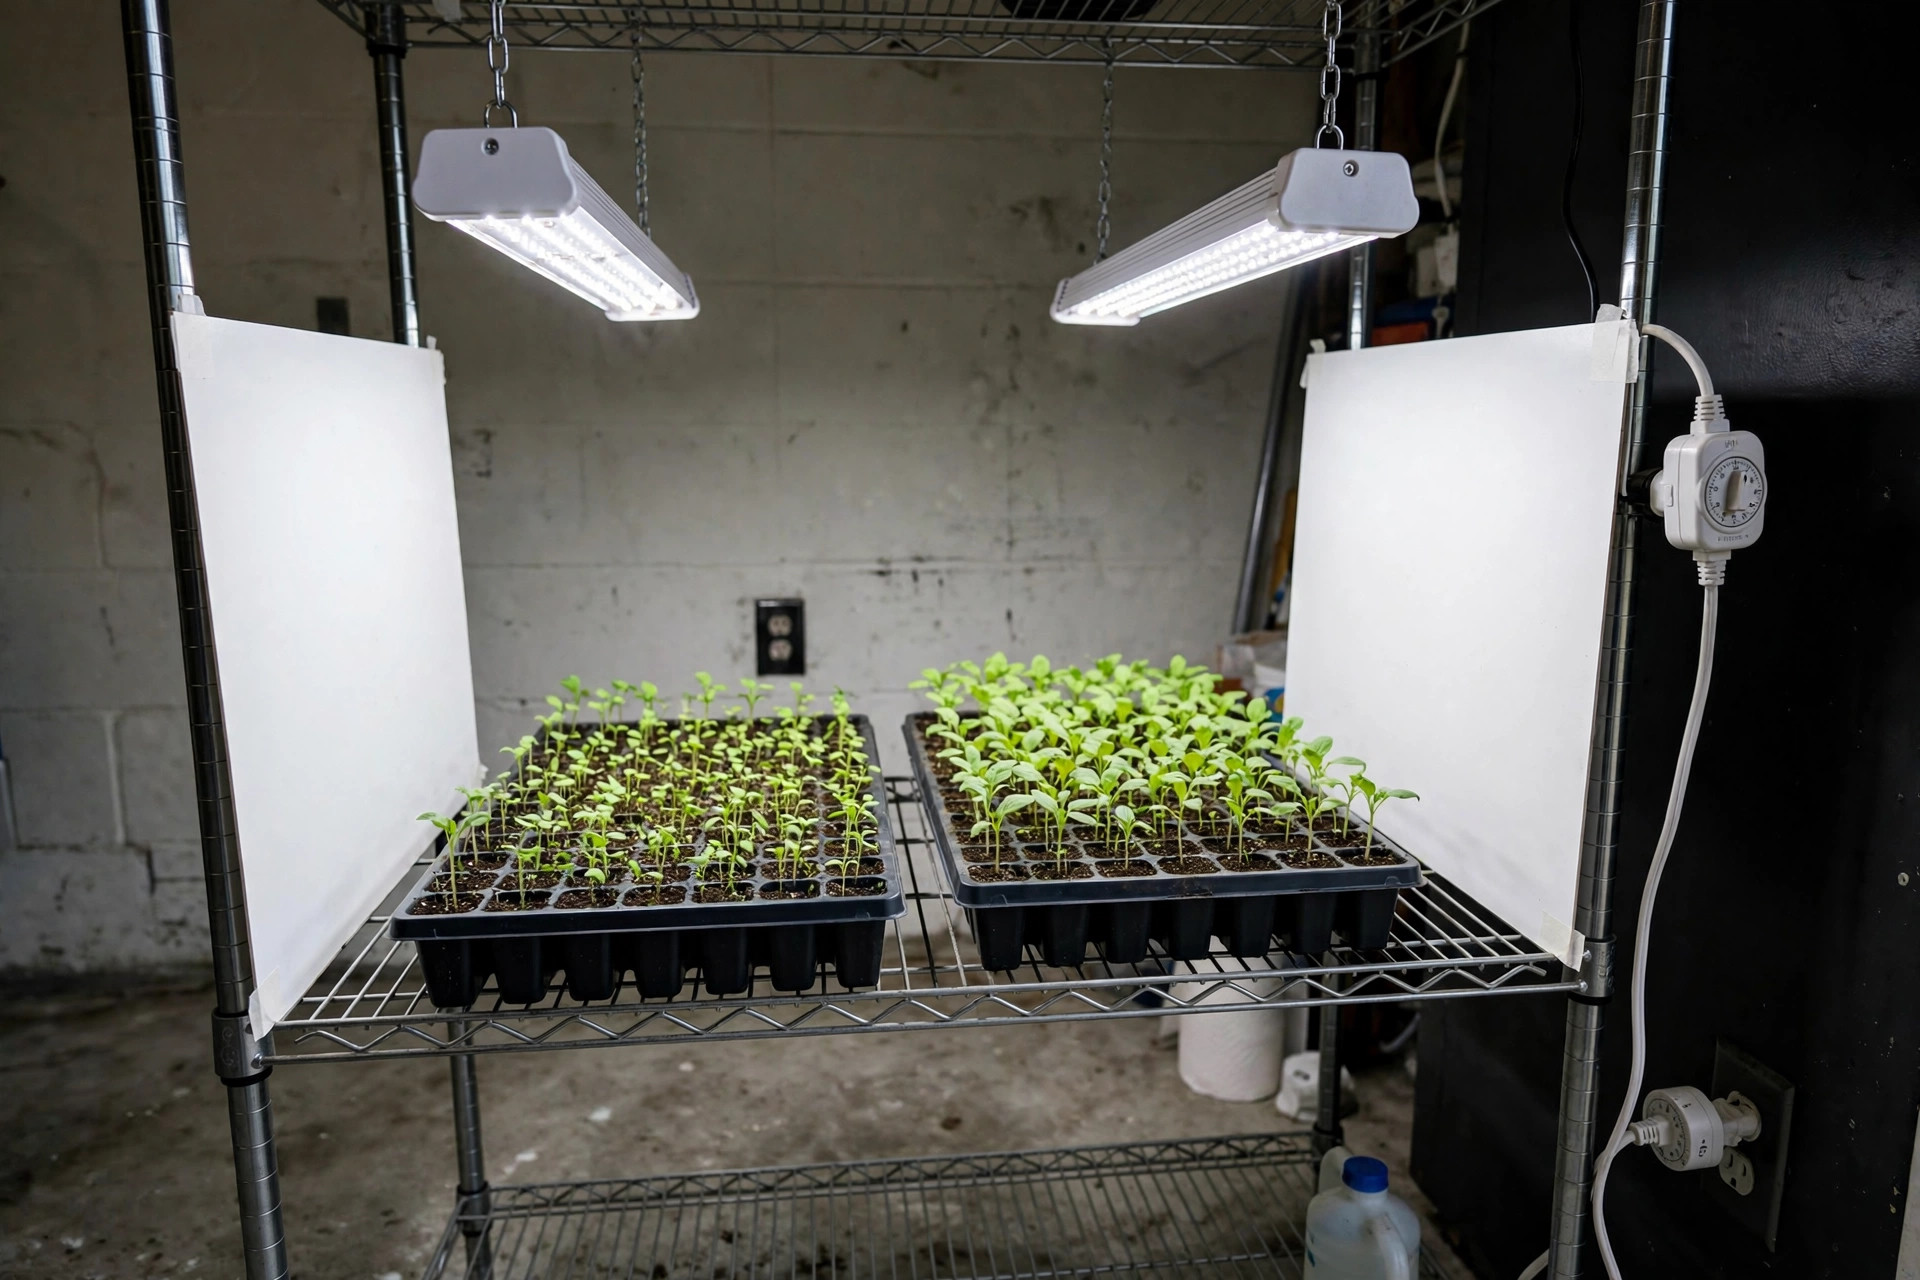
A good seed starting light setup for beginners is the single most important part of growing plants from seed indoors. Seed packets, trays, and potting mix all matter, but without enough light, seedlings grow tall, pale, and weak. With the right light, hung at the right height and kept on a steady schedule, the same seeds grow short, stocky, and green. This guide walks through every step in plain terms, so a first-time grower can build a working setup in one afternoon.
Most beginners start seeds on a windowsill. It seems natural. The window faces the sun, after all. But glass cuts the light by half or more. In winter and early spring, the days are short and the sun sits low. Seedlings on a sill stretch toward the window, bend sideways, and turn leggy. A simple electric light fixture solves the problem. It costs less than most people expect, and it works in any room, even a dark basement or a spare closet.
Why a Seed Starting Light Setup for Beginners Matters
Plants make their food from light. This is basic science, taught in every school. When a seed sprouts, it lives off the energy stored in the seed for only a few days. After that, it needs light to grow leaves and roots. Indoors, a window rarely gives enough light in late winter, which is exactly when most vegetable and flower seeds must be started.
Seedlings grown under a good light look different from the first week. The stems stay short and thick. The leaves open wide and turn deep green. The plants do not lean toward the window because the light comes straight down from above. Later, when these seedlings move outdoors, they adjust faster. They suffer less shock. They grow into stronger plants and give better harvests.
Beginners who skip the light often blame the seeds. They buy new seed packets or try new varieties. The real problem was the light. Once the light setup is right, success rates rise fast. This is the closest thing to a guarantee in home gardening.
For a broader look at indoor sowing, see our how to start seeds indoors guide. It covers timing, soil, and watering alongside light.
What to Look for in a Grow Light: Seed Starting Light Setup for Beginners
Choosing a light is simpler than the catalogs make it sound. Three things matter most: color, brightness, and coverage.
Light Color (Spectrum)
Plants need the full range of visible light. In the past, growers used special purple grow bulbs. Today, plain daylight tubes or LEDs work just as well for seedlings. Look for bulbs marked 5000K or 6500K, often called daylight or cool white. The number 5000K describes the color of the light. It matches a bright spring day. Avoid warm yellow bulbs marked 2700K for seed starting. They give too little of the blue light that keeps seedlings short and sturdy.
Full-spectrum LED grow lights, sold at stores like Home Depot, also work well. They cost more, but they use less power and last longer.
Brightness
Brightness is measured in lumens. A good rule for beginners: about 2000 to 3000 lumens per two-foot shelf of seedlings. Most four-foot shop light fixtures with two tubes give around 4000 to 5000 lumens. That is enough for one standard seed tray, or two smaller trays side by side. If the light looks dim to your eyes, it is far too dim for plants.
Size and Coverage
Match the light to the shelf. A four-foot fixture fits four-foot shelves and covers two standard trays. A two-foot fixture fits a table or a countertop. Buy the fixture to fit the space you have, not the space you wish you had. A small setup that runs well beats a large setup that never gets finished.
Types of Seed Starting Lights
Beginners have three common choices. All three can work. The best one is the one that fits your budget and your shelf.
LED Shop Lights
These are the most popular choice for first-time growers. A four-foot LED shop light sells for a modest price at hardware stores such as Lowe’s. It hangs from a shelf or a wire rack, plugs into a wall outlet, and needs no special wiring. Choose a model marked 5000K or higher. Mount it so you can raise it as the plants grow.
Shop lights spread light over a wide area. They run cool. You can hang two of them over a wide shelf for even coverage. Many experienced gardeners still use plain shop lights because they are cheap, simple, and effective.
Full-Spectrum LED Grow Lights
These fixtures are made for plants. They give strong light in the colors plants use most. They cost more than shop lights, but they use less electricity and last for years. Consumer testing groups like Consumer Reports rate lighting products on energy use and life span, which helps buyers compare models.
A full-spectrum LED panel is a good pick if you plan to start seeds every year for a long time. It is also a good pick if you want to grow herbs or greens indoors all winter, not just start seedlings in spring.
Fluorescent T5 and T8 Tubes
Fluorescent tubes were the standard for decades before LEDs took over. They still work fine for seed starting. T5 tubes are slim and bright. T8 tubes are thicker and cheaper. Both need a fixture with a ballast, which adds weight and cost.
Fluorescents run warmer than LEDs, so keep them a few inches farther from the leaves. They also fade over time. Replace the tubes every two or three seasons for best results. Garden writers at The Spruce still list fluorescent fixtures as a solid budget option.
How to Set Up Your Lights Step by Step
A working setup has five parts: a shelf or rack, the light fixture, chains or cords to hang it, a timer, and the seed trays. The whole job takes about an hour.
Hang the Light Low and Close
This is the rule beginners break most often. Hang the light two to four inches above the tops of the seedlings. Yes, that close. Light fades fast with distance. A fixture hung two feet above the tray gives only a small fraction of the light it gives at three inches. Keep the light close and raise it as the plants grow. Check the height every two or three days.
Use chains, S-hooks, or adjustable cords so the fixture can move up and down. Fixed mounts make the job harder. Wire storage racks, sold at home stores, make fine light stands. Drape the chains over the top shelf and hang the light under it.
Put the Lights on a Timer
Seedlings need 14 to 16 hours of light each day. Nobody wants to turn lights on and off by hand. A simple plug-in timer does the job. Set it to turn the lights on at six in the morning and off at ten at night. The dark hours matter too. Plants rest at night, and a full dark period keeps them healthy.
Keep the schedule steady. Do not change the hours from day to day. Seedlings respond to routine.
Add Light from the Sides
A little reflection helps. White walls, white poster board, or plain aluminum foil on the sides of the shelf bounce light back onto the plants. This keeps the seedlings on the edges from leaning inward. Mylar film works even better but costs more. Keep it simple the first year. A few sheets of white foam board will do.
Set the Trays and Watering Right
Lights cannot fix bad watering. Use trays with drainage holes and a humidity dome for germination. Read our seed starting trays with dome reviews before you buy. Once seeds sprout, remove the dome. Water from the bottom when the top of the soil feels dry. A small fan blowing gently across the seedlings for a few hours a day makes the stems stronger.
Warm soil speeds germination. If your room is cool, read our seedling heat mat for germination reviews to learn how mats warm the root zone.
Cost and Price of a Beginner Setup
A basic setup costs less than a bag of garden soil. Here is a rough guide to what beginners spend in the United States.
– One four-foot LED shop light: about 25 to 45 dollars. – Plug-in timer: about 10 to 15 dollars. – Wire shelf or simple wooden frame: about 30 to 60 dollars. – Seed trays, domes, and seed starting mix: about 20 to 30 dollars. – Seeds: a few dollars per packet.
The total for a one-tray starter setup often lands between 60 and 100 dollars. Larger setups with two or three shelves cost more, but each shelf after the first is cheaper because the timer and tools are already paid for.
Running cost is low. A modern LED shop light uses about 40 watts. At 16 hours a day, that is less than most table lamps. Over a two-month seed starting season, the electric bill barely moves. Energy guides from Bob Vila explain how small lighting loads add up, and the math favors LEDs strongly.
Do not buy the cheapest unlisted fixture you can find. Look for a UL or ETL safety mark on the box. A listed fixture has been tested for safe use. The small price difference buys real peace of mind.
Care and Upkeep of Your Light Setup
A light setup needs little care, but a few habits keep it working well.
Dust the tubes or the LED panel once a month. Dust blocks light. A dry cloth is enough. Wipe the reflective sides of the shelf at the same time.
Check the chains and hooks before each season. Metal fatigue is rare, but a loose hook can drop a fixture onto young plants. Tighten or replace anything that looks worn.
Watch the plants, not the calendar, to decide when to raise the light. When the top leaves sit within two inches of the tubes, raise the fixture. Fluorescent tubes run warm, so give them a bit more room than LEDs.
Store the setup clean and dry between seasons. Coil the cords. Cover the fixtures with an old sheet if the storage space is dusty. A setup stored well lasts many years.
Tool makers like Fiskars and Corona also stress that clean, well-kept gear lasts longer and works better. The same rule applies to lights.
Safety for a Home Light Setup
Electricity and water sit close together in seed starting. Treat the setup with care.
– Plug lights and timers into a ground-fault protected outlet, the kind with test and reset buttons. Most kitchens and bathrooms have them. A portable GFCI adapter works in other rooms. – Keep cords away from water. Never set a power strip on a wet tray or on the floor under the shelf. – Do not overload one outlet. Two or three LED fixtures on one circuit is fine in most homes. Space heaters and heat mats draw far more power, so plan the load. – Let bulbs cool before you touch them. Fluorescent tubes get warm in use. LEDs stay cooler but still warm up. – Keep the setup out of reach of small children and pets. A curious hand or paw can knock a tray into a live fixture.
Guidance from Gardener’s Supply and practical home projects at Family Handyman both stress the same basics: dry cords, stable shelves, and listed fixtures. Follow them and the setup is as safe as a reading lamp.
Frequently Asked Questions
How many hours of light do seedlings need each day?
Fourteen to sixteen hours is the standard answer. Set a timer and keep the hours the same every day. Seedlings also need eight hours of darkness to rest.
Can I use regular LED bulbs from the hardware store?
Yes, with care. A daylight bulb marked 5000K or 6500K works for seedlings if it is bright enough and hung close. Standard screw-in bulbs cover a small area, so they suit one small tray. For larger areas, a shop light or a grow panel gives more even coverage. Advice from Burpee on starting seeds indoors backs this up: brightness and closeness matter more than the label on the box.
How close should the light be to the seedlings?
Two to four inches above the tops of the plants for LEDs. Four to six inches for fluorescent tubes, which run warmer. Raise the light as the plants grow so the gap stays the same. If seedlings turn leggy and pale, the light is almost always too far away.
Do I need a heat mat as well as lights?
Not always. Heat mats warm the soil and speed germination, which helps in a cool room. Once seeds sprout and leaves open, the lights take over as the key tool. Many beginners use a mat for germination and then move trays under the lights. See our seedling heat mat for germination reviews for details.
Can seedlings get too much light?
Too much light is rare indoors. What hurts seedlings is heat from a fixture hung too close, or a light left on around the clock. Keep the 14 to 16 hour schedule and the proper gap, and the plants will be fine.
When should I move seedlings away from the lights?
Move them outdoors only after the weather is warm enough and after a week of hardening off. Hardening off means setting the plants outside for a few hours a day, longer each day, so they adjust to sun, wind, and cool nights. Seedlings raised under lights have never felt real sun. Direct outdoor sun can scorch them in hours. A slow move protects weeks of work.
A Final Word
A seed starting light setup for beginners does not need to be fancy. One daylight LED fixture, a timer, a shelf, and a few trays will grow hundreds of healthy seedlings. Hang the light low. Keep the schedule steady. Watch the plants and adjust. The first season teaches more than any article can. By the second season, the setup will feel like second nature, and the seedlings will show it.
References
Bob Vila. (n.d.). Home improvement advice. https://www.bobvila.com Burpee. (n.d.). Seeds, plants, and gardening supplies. https://www.burpee.com Consumer Reports. (n.d.). Product reviews and ratings. https://www.consumerreports.org Corona Tools. (n.d.). Garden and landscape tools. https://www.corona-tools.com Family Handyman. (n.d.). DIY home repair and maintenance. https://www.familyhandyman.com Fiskars. (n.d.). Garden and cutting tools. https://www.fiskars.com Gardener’s Supply Company. (n.d.). Gardening tools and supplies. https://www.gardeners.com Lowe’s. (n.d.). Home improvement products. https://www.lowes.com The Home Depot. (n.d.). Home improvement products. https://www.homedepot.com The Spruce. (n.d.). Home and garden advice. https://www.thespruce.com
Was this guide helpful?

About Michael Thompson
The My Garden US editorial team writes practical, in-depth home and garden guides for American homeowners — tested advice, no fluff.