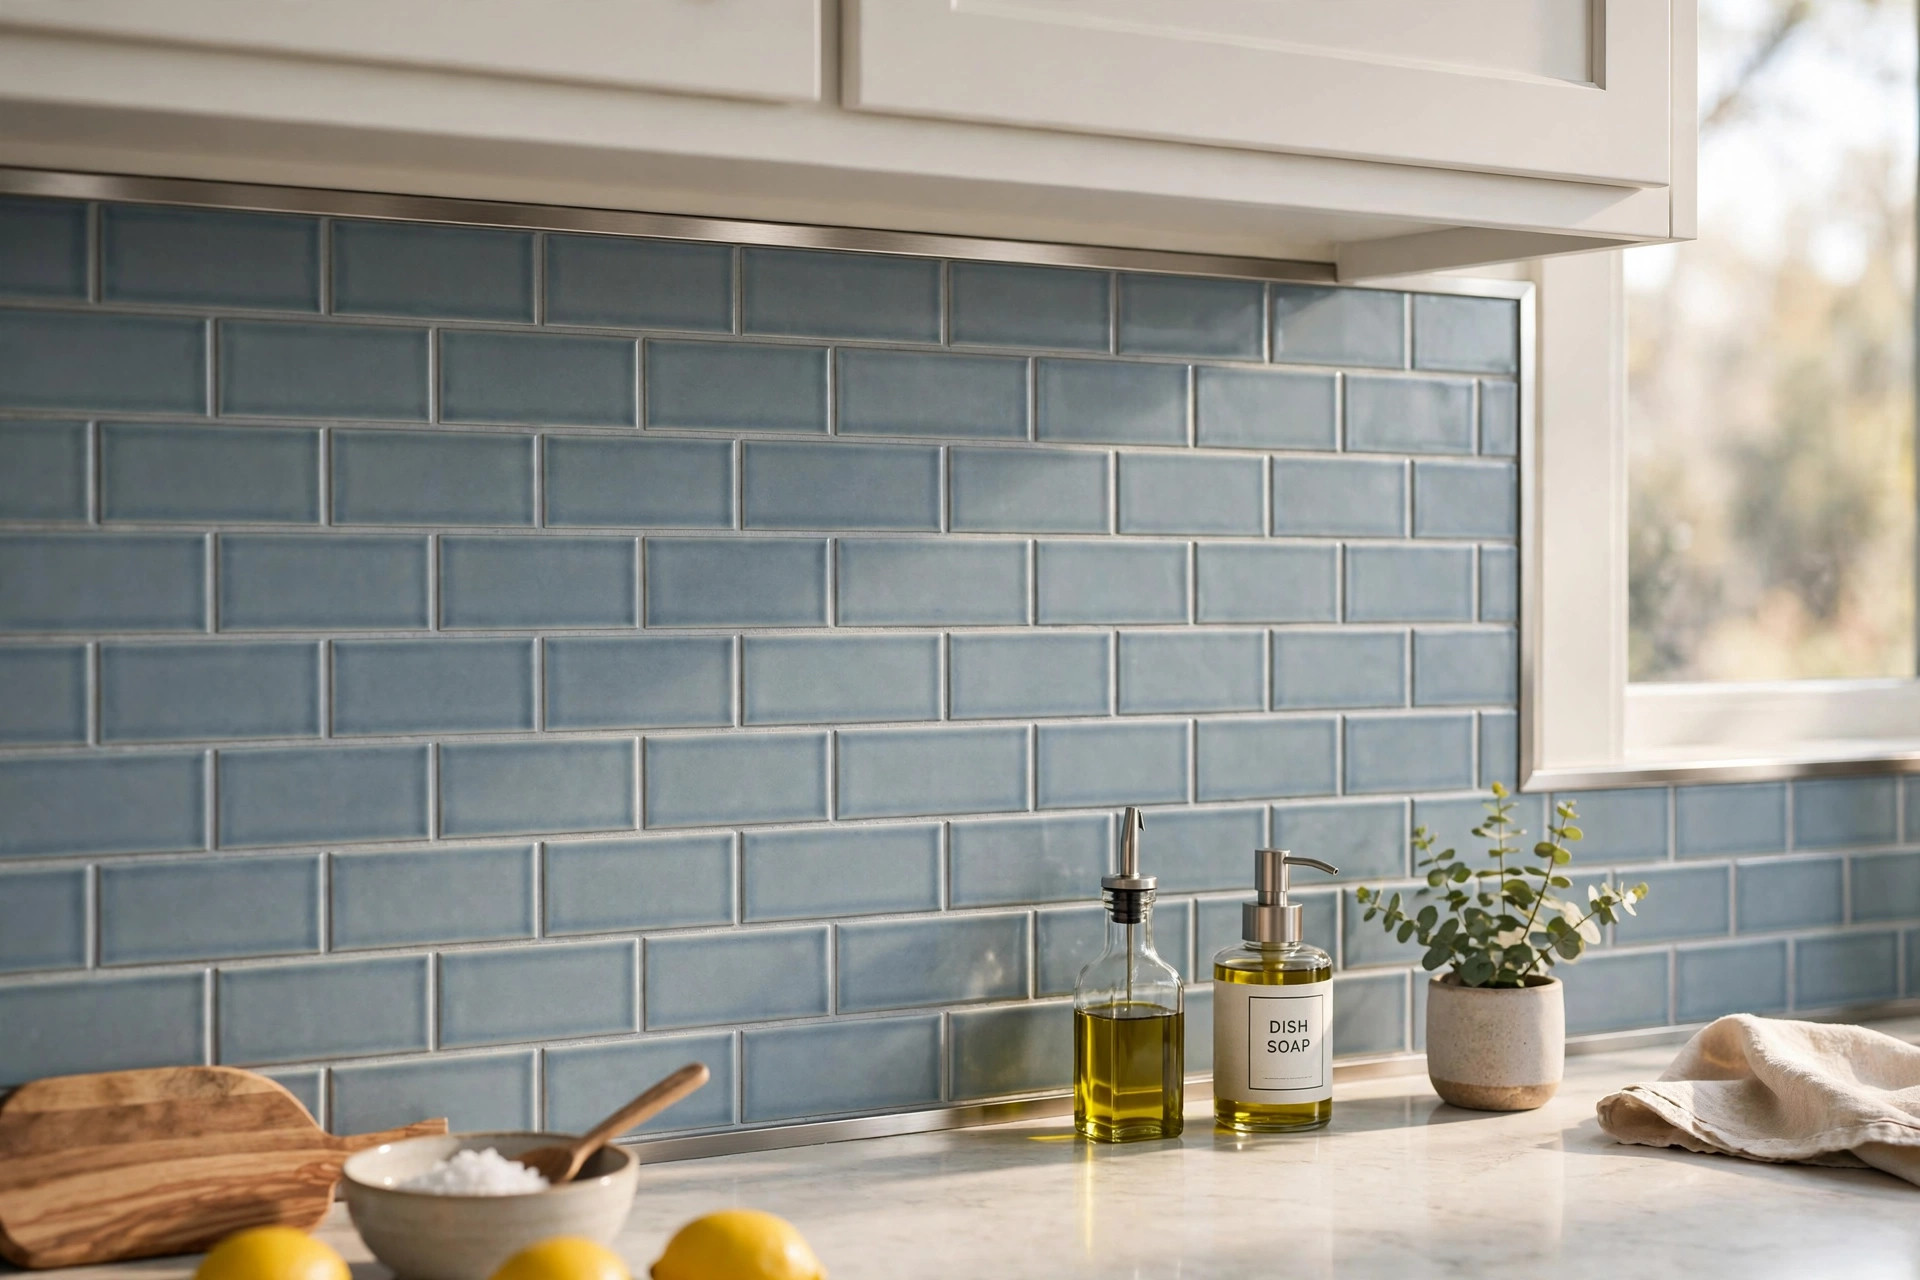

A tile backsplash changes the look of a whole kitchen. It protects the wall and it sets the mood of the room. But many people forget the last detail that makes the job look done. That detail is the edge trim. The best edge trim for tile backsplash usa kitchens gives a neat finished edge where the tile meets the wall. Without it, the raw tile edge shows and the work looks half done.
This guide explains edge trim in plain words. It covers why it matters, the types you can buy, how to choose, what it costs, how to keep it clean, and how to stay safe. It also answers common questions at the end. By the time you finish, you will know how to find the best edge trim for tile backsplash kitchens in the United States and how to pick the right one for your home.
Why Edge Trim Matters
A tile backsplash ends at the edge of a wall, under a cabinet, or beside a doorway. Tile edges are rough and thin. They chip with ease. They also catch dust and grease. Edge trim covers that raw edge with a smooth line. It keeps the tile safe and it keeps the wall clean.
A good trim also makes the tile look better. It frames the backsplash the way a frame holds a picture. Some trims shine like chrome. Some fade into the wall like white plastic. Some add a bold black line that sets off light tile. The right trim can lift a plain tile and make it look like a high end job.
Edge trim also helps in wet spots. Behind a stove, steam and heat hit the wall each day. Near a sink, water splashes the tile. A trim that seals the edge keeps water from getting behind the tile. That guards the wall board from rot and mold. A small metal strip can save you a large repair bill later.
What to Look For When You Choose: Best Edge Trim for Tile Backsplash Usa
Start with the thickness of your tile. Trim comes in sizes to match. A thin ceramic tile needs a slim trim. A thick stone or glass tile needs a deeper trim. Measure the tile edge in sixteenths of an inch. Most trims are made for tile from a quarter inch to a half inch thick. Bring one loose tile to the store and test the fit.
Next, think about the look. Hold the trim sample next to your tile in your own kitchen light. Morning sun and evening lamps change color more than you think. A brushed nickel trim looks soft in daylight and dark at night. White PVC trim melts into a white wall but stands out on dark grout. Choose what you want to see every day.
Then think about heat and water. Behind a gas range, the wall gets hot. Cheap plastic trim can warp or melt near a hot stove. Metal trim stands heat much better. In a rental or a low splash spot, plastic is fine and costs less. Near heat, choose metal or stone.
Last, think about who will set it. If you plan to do the job yourself, pick a trim that cuts with a simple hacksaw. Thin aluminum and plastic cut with ease. Thick stainless steel needs a wet saw or a metal blade. Hard brass can fight you in a small kitchen. Match the trim to your tools and your skill.
Types of Edge Trim
There are five main types on store shelves in the United States. Each has strong points and weak points.
Metal Trim
Metal trim is the most common pick. Aluminum is light, cheap, and easy to cut. It comes in silver, brushed nickel, chrome, bronze, and black. Stainless steel is harder and resists rust near sinks. Brass adds a warm gold tone that suits classic kitchens. Metal trim looks sharp and lasts long. It costs more than plastic but less than stone. For most homes, aluminum is the smart middle choice.
PVC and Plastic Trim
Plastic trim is the budget pick. It comes in white, black, and a few colors. It is light and easy to cut with a hand saw. It fits thin tile well. The weak point is heat and wear. It can yellow in sun and warp near a stove. It also shows scratches fast. Use plastic in a laundry room or a rental where cost rules. For a kitchen you use every day, metal is a better buy.
Stone and Marble Trim
Some tile lines sell matching stone trim. It is cut from the same stone as the tile. This gives a smooth, rich edge with no change in color. It is heavy and hard to cut. It also costs more than metal. Use it when your tile is natural stone and you want a high end look.
Ceramic Bullnose Tile
A bullnose tile is a tile with one rounded edge. It has been used for decades. You lay it as the last row where the backsplash ends. It needs no metal or plastic. The look is soft and classic. The catch is that not all tile lines make a bullnose piece to match. When they do, it is often the cheapest and simplest choice. For a deeper look at this older method, read our bullnose tile vs schluter trim comparison.
Schluter and Brand Name Profiles
Schluter is a well known brand name in tile trim. Its profiles are thin metal strips shaped to hold the tile edge. They come in many shapes and finishes. Other brands sell like shapes. These trims are made to fit exact tile depths. They cost more than plain aluminum trim. Many tile pros trust them because the fit is clean and the finish lasts.
Cost and Price in the United States
Prices run from very low to mid range. An eight foot stick of plastic trim costs a few dollars. A plain aluminum trim stick costs around ten to twenty dollars. Stainless steel and brand name profiles cost twenty to forty dollars per stick. Brass can cost more.
Most kitchens need only one or two sticks. Measure the full length of each exposed edge. Add ten percent for cuts and waste. For a small backsplash, total trim cost often lands under fifty dollars. That is a small part of a tile job but it makes a big part of the look.
Hired labor adds more. A tile setter may charge one to two dollars per foot to set trim, or fold it into the whole job price. Some setters prefer one trim type and may push you toward it. Ask for a price with and without the trim so you can compare. If you are setting tile yourself, the trim adds about an hour of work to a normal weekend job.
Where you shop changes the price too. Big home stores carry many trims at fair prices. Tile shops carry brand name profiles and can order special finishes. Online sellers list wide choice but you cannot hold the color in your hand. For help checking stock and prices near you, the buying guides at The Home Depot and Lowe’s are useful starting points.
Setting Edge Trim the Right Way
The trim goes in as you lay the tile. It does not go on after. Here is the basic order that tile pros use.
First, mark your line. The trim sits at the end of the tile run. Mark the wall with a level line so the trim runs straight. Second, set the trim in mortar. Trowel mortar on the wall, press the trim leg into it, and hold it straight. Third, lay tile up to the trim. Slide each tile into the trim channel so the tile edge hides inside. Fourth, clean as you go. Wipe mortar off the trim face with a damp sponge before it dries. Fifth, grout last. Run grout into the small joint between tile and trim.
Take care with corners. Inside corners can fold or meet in a miter. Outside corners need a clean forty five degree cut or a corner cap made for the trim. Test cuts on scrap first. If the corner looks bad, the whole job looks bad.
One common error is to set the trim too deep. The tile should sit just under the trim face. If the trim face stands proud of the tile, it will catch rags and looks clumsy. If it sits too deep, the tile edge shows. A small test run of three tiles tells you the right depth.
Care and Upkeep
Edge trim is easy to keep clean. Wipe it with a soft cloth and mild soap when you wipe the tile. Rinse and dry. Do not use steel wool or harsh scouring powder. It will scratch metal finishes and dull chrome fast.
In hard water areas, water spots build on bright trim. A mix of water and white vinegar cuts the spots. Test the mix on a hidden spot first. Dry the trim after cleaning so spots do not come back.
Check the grout line at the trim once a year. Grout shrinks and cracks with time. A cracked line lets water in. Re-caulk or re-grout small cracks with matching material. For more on small tile repairs around the home, see our guide to the best carpet cleaner for pet stains usa for how we test home products the same careful way.
Plastic trim may yellow after years in sun. It cannot be polished back. When it looks tired, swap the stick for a new one. Metal trim lasts far longer but can dent if hit hard. A dented stick is best replaced.
Safety
Tile trim is safe when set right, but keep a few points in mind. Cut metal trim with care. Fresh cut edges are sharp as a knife. Wear work gloves and file cut ends smooth with a metal file.
Near a stove, keep plastic trim away from direct heat. The heat from a gas range can warp plastic over time. Metal trim has no such risk. Behind a range, also keep the trim from touching bare flame or hot pots.
Some trim uses lead-free metal but old cheap imports may not say. Buy trim from a known brand and a known store. The safety guides at LL Flooring and The Spruce explain what to check on product labels.
Dust from cutting stone trim can harm your lungs. Wear a dust mask when you cut stone. For plastic and soft aluminum, a simple mask is enough. Keep the work area clean and keep small children and pets away while you cut.
FAQ
What is the best edge trim for a glass tile backsplash?
Metal trim works best with glass tile. Glass edges are fragile and show every flaw. A thin aluminum or stainless profile hides the edge and holds it safe. Pick a trim depth that matches the glass. For a clean look, match the trim finish to your faucet.
Can I put edge trim on an old backsplash?
No. Trim must set in mortar while the tile is laid. You cannot add it to a finished backsplash without pulling tile. If your old backsplash has raw edges, the fix is to remove the last row and relay it with trim, or cover the edge with a wood or metal strip nailed to the wall.
Which is better, bullnose tile or metal trim?
Both are good. Bullnose tile suits classic styles and costs less when your tile line makes it. Metal trim suits modern styles and fits any tile. If your tile has no matching bullnose, metal trim is the clear pick.
Does edge trim work with uneven handmade tile?
Yes, with care. Handmade tile varies in thickness. Buy trim made for the thickest tile you have. Use a little more mortar to fill the gap on thinner spots. Some pros use a wider trim channel for handmade tile so the fit is not too tight.
How do I match trim color to my faucet?
Bring a small piece of your faucet trim or a clear photo to the store. Hold trim samples next to it in your kitchen light. Brushed nickel trim pairs with brushed nickel faucets. Matte black trim pairs with black faucets. When in doubt, brushed nickel hides wear best.
Is plastic edge trim ever the right pick?
Yes. In a rental, a laundry room, or a spot far from heat, plastic trim saves money and does the job. It is light and easy for a first time tile job. For a main kitchen, most pros advise metal for its longer life and better look.
A Short Final Word
The search for the best edge trim for tile backsplash usa projects ends with three simple steps. Measure your tile. Pick a finish you like in your own light. Set the trim with care while the tile goes up. Metal trim wins for most kitchens. Plastic trim wins on cost. Stone trim and bullnose tile suit special looks.
A small strip of trim makes a big change. It guards the tile edge, keeps water out, and gives the backsplash a finished face. Spend a little extra time on this last detail and your tile work will look like a pro did it.
For more help planning the whole room, the kitchen project guides at This Old House walk through full remodels step by step. You can compare tile and stone choices at Daltile, Shaw Floors, and Mohawk Flooring. The trim selection guides at Bob Vila and Family Handyman show photos of each type set in real kitchens.
References
Bob Vila. (n.d.). Home improvement advice. https://www.bobvila.com Daltile. (n.d.). Ceramic and porcelain tile. https://www.daltile.com Family Handyman. (n.d.). DIY home repair and maintenance. https://www.familyhandyman.com LL Flooring. (n.d.). Hardwood, vinyl, and tile flooring. https://www.llflooring.com Lowe’s. (n.d.). Home improvement products. https://www.lowes.com Mohawk Flooring. (n.d.). Flooring products. https://www.mohawkflooring.com Shaw Floors. (n.d.). Flooring products. https://www.shawfloors.com The Home Depot. (n.d.). Home improvement products. https://www.homedepot.com The Spruce. (n.d.). Home and garden advice. https://www.thespruce.com This Old House. (n.d.). Home renovation guidance. https://www.thisoldhouse.com
Was this guide helpful?

About Sarah Mitchell
The My Garden US editorial team writes practical, in-depth home and garden guides for American homeowners — tested advice, no fluff.
You May Also Like

Can You Install LVP Over Hardwood? A Full Guide for USA Homeowners
March 5, 2026 0 views
Waterproof Vinyl Flooring for Kitchen Reviews: What Real Buyers Say
April 23, 2026 0 views
Flooring That Increases Home Value Most in the USA
July 26, 2026 0 views