
A bead loom kit for bracelet making beginners takes the guesswork out of a brand new hobby. Instead of buying a loom, beads, thread, and needles one by one, you open a single box and start work the same day. Loom beading is one of the oldest forms of beadwork in the world. It turns small glass beads into neat, even bands. With a good beginner kit, your first bracelet can be finished in a single weekend. This guide explains what a kit should hold, how to pick the right one for your needs, and how to weave your first bracelet step by step.
Why a Bead Loom Kit Is the Best Way to Start
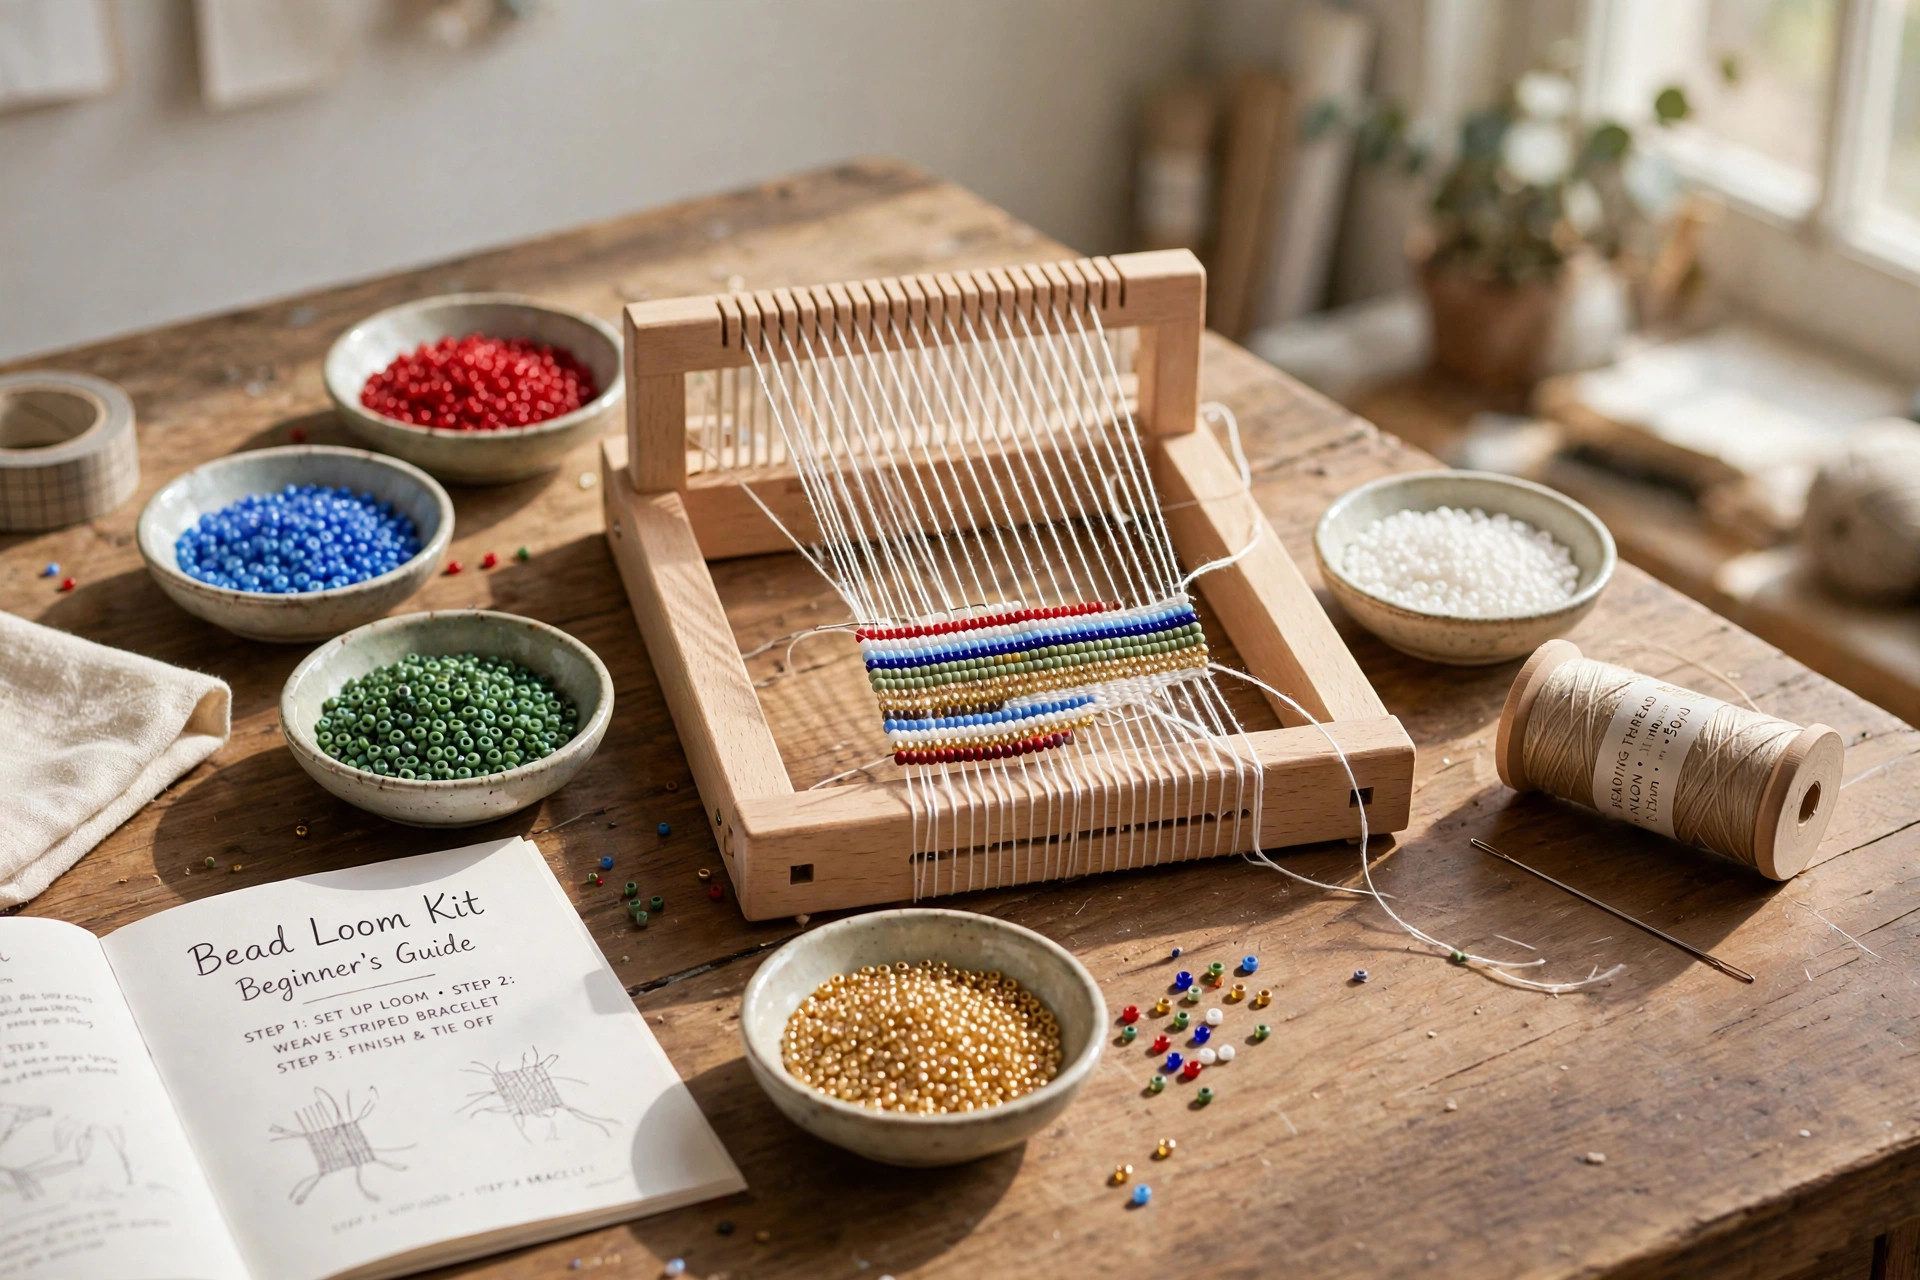
A loom does one simple job. It holds a set of straight threads, called warps, under firm tension. You weave a second thread, called the weft, back and forth through the warps, and each pass locks one row of beads in place. Because the loom keeps every thread straight, your rows stay even without years of practice. Loom work looks tidy from the first try.
A kit matters because the parts must match. The loom must suit the bead size. The needle must fit through the beads. The thread must be strong enough to hold the bracelet together for years. When beginners buy parts separately, something often does not fit. A kit made for beginners solves this problem in advance. Every piece inside was chosen to work with every other piece. That is the whole point of a starter kit. A kit also lowers the cost of trying. You do not need to spend much to find out if you enjoy the craft. Many crafters who start with a basic kit go on to try other fiber crafts, such as a weaving loom kit for beginners for making small wall art pieces.
What to Look for in a Beginner Kit: Bead Loom Kit for Bracelet Making Beginners
Not all kits are equal. Some are made for children and hold large plastic beads. Others are made for adults and hold tiny glass seed beads. Read the box before you buy. Look for these points.
The Loom Itself
The loom is the heart of the kit. For bracelet work, a small loom is enough. Most beginner looms handle pieces up to eight or nine inches long. That length covers almost every wrist size. Some looms have a fixed width. Others let you adjust the width with sliding bars. An adjustable loom is worth a little extra money. It lets you make narrow bracelets and wider cuffs on the same tool.
Check how the loom is made. Plastic looms are light and cheap. They work well for a first project. Wooden looms are heavier and steadier. They do not slide around on the table while you work. Metal looms last the longest, but they cost more and rarely appear in beginner kits. Any of the three will make a fine first bracelet. Big craft stores such as Michaels and Joann stock several beginner looms, so you can compare them in person before you decide.
Good beginner looms have notches, pegs, or springs that grip the warp threads and keep them from slipping. If the warps slip, your rows will be uneven.
Beads and Thread
Most beginner kits use seed beads. These are small glass beads with a hole through the middle. Size 11/0 is the most common choice for bracelets. The beads are small enough to look refined but large enough to handle with normal fingers. Some kits include larger 8/0 beads instead. These are easier for children and for adults with stiff hands.
Check the bead colors. A good kit gives you at least five or six colors. That is enough to make simple stripes, diamonds, and zigzag patterns. Kits with only two colors limit what you can learn.
Thread matters more than most beginners expect. The thread holds the whole bracelet together. Cheap thread frays, stretches, or snaps after a few months of wear. Good kits include beading thread such as nylon or a bonded cord made for beadwork. The kit should also include a fine beading needle that passes through a seed bead twice.
Finally, look for findings. Findings are the metal parts that finish a bracelet, such as clasps, jump rings, and end bars. A true all-in-one kit includes them. Without findings, you will weave a beautiful band of beads and have no way to wear it.
Types of Bead Loom Kits
Shops group bead loom kits in a few common ways. Knowing the types helps you pick the right one.
Wooden Frame Looms
Wooden looms are the classic choice. They are sturdy, quiet, and pleasant to hold. A wooden loom paired with a wooden bead kit for making garlands and other crafts can keep a crafter busy through a whole holiday season.
Metal and Adjustable Looms
Metal looms often come with sliding end bars. You can set the width for a slim bracelet today and a wide cuff tomorrow. They are a good pick if you are not sure what size projects you will enjoy.
All-in-One Starter Kits
These kits bundle the loom with beads, thread, needles, findings, and printed pattern cards. Some even include a small instruction book. They are the easiest way to begin because nothing extra is needed. Many all-in-one kits are aimed at younger crafters. A friendship bracelet kit for kids is a close cousin, and children who enjoy one often enjoy the other. When buying for a child, pick a kit with larger beads and blunt needles, and plan to sit with them for the first session. When the kit beads run low, refill packs from art supply retailers keep the craft going.
Cost and Price
A bead loom kit for bracelet making beginners is one of the cheapest crafts to start. Basic plastic loom kits often sell for ten to twenty dollars. These include the loom, a small set of beads, thread, and a needle. They are perfect for testing whether you like the craft.
Mid-range kits cost twenty to forty dollars. They usually have a wooden or metal loom, more bead colors, better thread, and proper findings. Most adult beginners are happiest in this range. The tools last longer, and the finished bracelets look better.
Deluxe kits can cost fifty dollars or more. They may add specialty beads, extra pattern books, and storage cases. They are a fine gift, but they are not needed to learn. Start simple. Spend more only after you finish your first three or four bracelets and know you want to continue.
Big-box retailers such as Walmart often carry the lowest prices on basic kits, while craft specialty stores offer more variety.
How to Use Your Bead Loom: The Basic Steps
Setting up the loom is the hardest part of the craft, and it still takes only about fifteen minutes. Follow these steps.
Step 1: String the warps. Cut one long piece of thread for every bead column in your pattern, plus one extra. Most beginner bracelets use eight to twelve columns. Anchor one end at the loom, run the threads across to the other end, and lock them into the notches. Keep the tension firm and even, like guitar strings. Loose warps make wavy bracelets.
Step 2: Thread your needle. Cut a working length of weft thread about as long as your arm. Longer thread tangles. Thread the needle and tie the end to the first warp on one side. Leave a tail of a few inches for finishing later.
Step 3: Pick up the first row. Slide one bead onto the needle for each warp column, in the order your pattern shows. Eight columns means eight beads. Check the order twice. Mistakes in the first row show up in the whole bracelet.
Step 4: Weave the row. Pass the needle under all the warps, then push each bead up so it sits between two warps. Now pass the needle back through all the beads, this time going over the warps. Pull the thread snug, but not so tight that the bracelet curls.
Step 5: Repeat. Pick up the next row of beads and weave it the same way. Row by row, the pattern grows, and after ten or fifteen rows you will fall into a steady rhythm.
Step 6: Finish the ends. When the band is long enough to wrap your wrist, weave the weft thread back through the last few rows to lock it. Then tie off the warp ends in pairs, trim them, and attach your clasp with the findings from the kit. Your bracelet is done.
If you want extra guidance, craft how-to sites like The Spruce publish free beading tutorials with photos. Seeing each step in pictures can clear up any confusion.
Care and Upkeep
Beadwork supplies last for years if you store them well. Keep seed beads in small lidded boxes or jars, sorted by color. A spilled bag of mixed beads is almost impossible to sort again. Many beaders use tackle boxes or pill organizers for this job, with one compartment per color.
Store thread away from sunlight. Sunlight weakens nylon thread over time. Keep it in a drawer or a closed box. Keep the loom somewhere it will not get knocked off a shelf. A cracked wooden loom can still work, but a bent metal bar will never hold even tension again.
Wipe the loom with a dry cloth now and then. Dust in the notches can make warps slip. If you bead near a window, close the bead lids when you take a break. A gust of wind can scatter a thousand tiny beads across the room in one second.
For the finished bracelets, a little care goes a long way. Wipe them with a soft dry cloth after wearing. Keep them away from perfume, lotion, and swimming pools. Chemicals dull the glass finish. Store each bracelet flat or hanging, not crushed in a drawer. If you want ideas for organizing a whole craft corner, DIY publications such as This Old House, Bob Vila, and Family Handyman share practical workshop storage projects that work well for craft supplies.
Safety
Bead looming is a safe craft, but a few rules keep it that way. Seed beads are a choking hazard for small children and pets. Always bead at a table, and sweep the floor when you finish. Keep bead containers closed and out of reach of toddlers. If you are buying a kit for a child under eight, choose one with large wooden or plastic beads and stay in the room while they work.
Needles are sharp. Store them in a pincushion or a needle case, never loose in a bead box.
Good light protects your eyes. Beads are small, and hours of close work can cause eye strain and headaches. Work near a window in daylight, or use a bright desk lamp. A basic task lamp from a home improvement store costs little and makes a big difference. Take a short break every half hour. Stand up, look across the room, and roll your shoulders. Your neck will thank you.
Frequently Asked Questions
What size beads work best in a beginner bead loom kit? Size 11/0 seed beads are the standard choice. They are small enough for detailed patterns but large enough to handle. Children and true beginners may prefer larger 8/0 beads, which are easier to pick up and thread.
How long does it take to weave a bracelet? A first bracelet usually takes three to five hours, including setup time. After two or three projects, most beaders finish a simple bracelet in about two hours. Complex patterns with many color changes take longer.
Can children use a bead loom kit? Yes, with supervision. Pick a kit made for kids, with larger beads and simple patterns. Children around eight and older can usually manage a basic loom with an adult nearby for the setup. The craft builds patience and fine motor skills.
Do I need a pattern to start? A pattern helps, but stripes need no chart at all. Just alternate two or three colors and you will get a bracelet that looks intentional. Most kits include a few printed patterns. Once you understand how rows work, you can draw your own patterns on graph paper. Each square is one bead.
What thread should I use for loom bracelets? Use thread made for beadwork, not sewing thread. Nylon beading thread and bonded bead cord are the two common choices. Both are strong and resist fraying. The kit thread is fine to start with. When you buy more, match the thread weight to your bead size so the needle still passes through easily.
How do I finish the ends so the bracelet does not fall apart? Weave the working thread back through several finished rows before cutting it. Tie warp threads off in pairs with square knots, add a drop of clear craft glue to each knot, and let it dry fully. Then attach the clasp. A well-finished bracelet can be worn daily for years.
Where can I find more patterns and inspiration? Pattern books are sold wherever craft supplies are sold. Online, handmade marketplaces such as Etsy offer thousands of downloadable bead loom patterns from independent designers, from simple stripes to complex pictorial designs. Free patterns also appear on craft blogs and in library books on beadwork.
A Short Final Word
A bead loom kit for bracelet making beginners is a small box with a big payoff. For the price of a restaurant meal, you get a tool, a skill, and a stack of handmade gifts by the end of the month. Start with a simple pattern. Keep your tension even. Finish what you start. Pick up a kit, clear a table, and weave your first row today.
References
Blick Art Materials. (n.d.). Art and craft supplies. https://www.dickblick.com Bob Vila. (n.d.). Home improvement advice. https://www.bobvila.com Etsy. (n.d.). Handmade and craft marketplace. https://www.etsy.com Family Handyman. (n.d.). DIY home repair and maintenance. https://www.familyhandyman.com JOANN. (n.d.). Fabric and craft supplies. https://www.joann.com Michaels. (n.d.). Arts and crafts supplies. https://www.michaels.com The Home Depot. (n.d.). Home improvement products. https://www.homedepot.com The Spruce. (n.d.). Home and garden advice. https://www.thespruce.com This Old House. (n.d.). Home renovation guidance. https://www.thisoldhouse.com Walmart. (n.d.). Everyday low prices. https://www.walmart.com
Was this guide helpful?

About James Carter
The My Garden US editorial team writes practical, in-depth home and garden guides for American homeowners — tested advice, no fluff.
You May Also Like
Bead Stringing Wire for Necklace Making Crafts: A Plain Guide
June 15, 2026 0 views
How to Choose the Best Heat Gun for Embossing and Crafts
October 4, 2026 1 views
Wood Craft Sticks for Popsicle Art Projects: A Complete Guide
June 22, 2026 0 views