Introduction
The best vapor barrier for crawl space USA homeowners is a thick, strong sheet of polyethylene that keeps ground moisture out of the home. A crawl space is the low area under a house, between the ground and the floor above. Bare soil lets water vapor rise into this space day and night. Over time, that damp air can rot wood, grow mold, and invite pests. A vapor barrier is a sheet of plastic laid over the soil. It blocks most of the moisture from rising. This one sheet can protect the floor joists, the insulation, and the air inside the home.
Why a Crawl Space Vapor Barrier Matters: Best Vapor Barrier for Crawl Space Usa
Most homes with crawl spaces have bare dirt floors. Soil holds water. As the ground warms, water leaves the soil as vapor and moves upward. In a closed crawl space, this vapor has nowhere to go. It collects on cool wood and metal parts. Wood that stays damp begins to rot. Rot weakens floor joists and support beams. Damp air also feeds mold. Mold grows fast in dark, warm, wet places. It can spread along floor joists and up into wall cavities. Some molds harm people with allergies and breathing problems. A good vapor barrier cuts off the main source of this moisture. It does not remove all moisture, but it removes the largest share. Damp crawl spaces also cost energy.
Pests like damp places too. Termites, ants, and some beetles prefer wet wood. A dry crawl space is less inviting to them. This protects the structure of the house. In short, the best vapor barrier for crawl space USA use is one of the cheapest ways to protect a whole house.
How to Choose the Best Vapor Barrier
Thickness in Mils
Thickness is measured in mils. A mil is one thousandth of an inch. Common options are 6, 10, 12, and 20 mil. A 6-mil sheet is the minimum allowed by many local codes. It is thin. It tears easily on rocks and sharp debris. It works for a simple, clean crawl space with no foot traffic.
A 10-mil or 12-mil sheet is a better pick for most homes. It resists tears and punctures. It holds up when a worker must crawl over it to service pipes or ducts. A 20-mil liner is the strongest common choice. It is used in full encapsulation work, where the whole crawl space is sealed. It is stiff and hard to cut, but it lasts longest.
For most buyers, a 10-mil or 12-mil reinforced sheet is the sweet spot. It costs more than 6-mil film, but it lasts far longer.
Reinforced Versus Plain
Plain polyethylene is a single layer of plastic. Reinforced sheeting has a grid of strong threads bonded between two layers of plastic. This reinforcement stops small tears from spreading. It also adds strength against punctures. In a crawl space with stones, roots, or old concrete rubble, reinforced sheeting is worth the extra cost. Plain film is fine only on smooth, well-prepared ground.
Seams, Overlaps, and Sealing
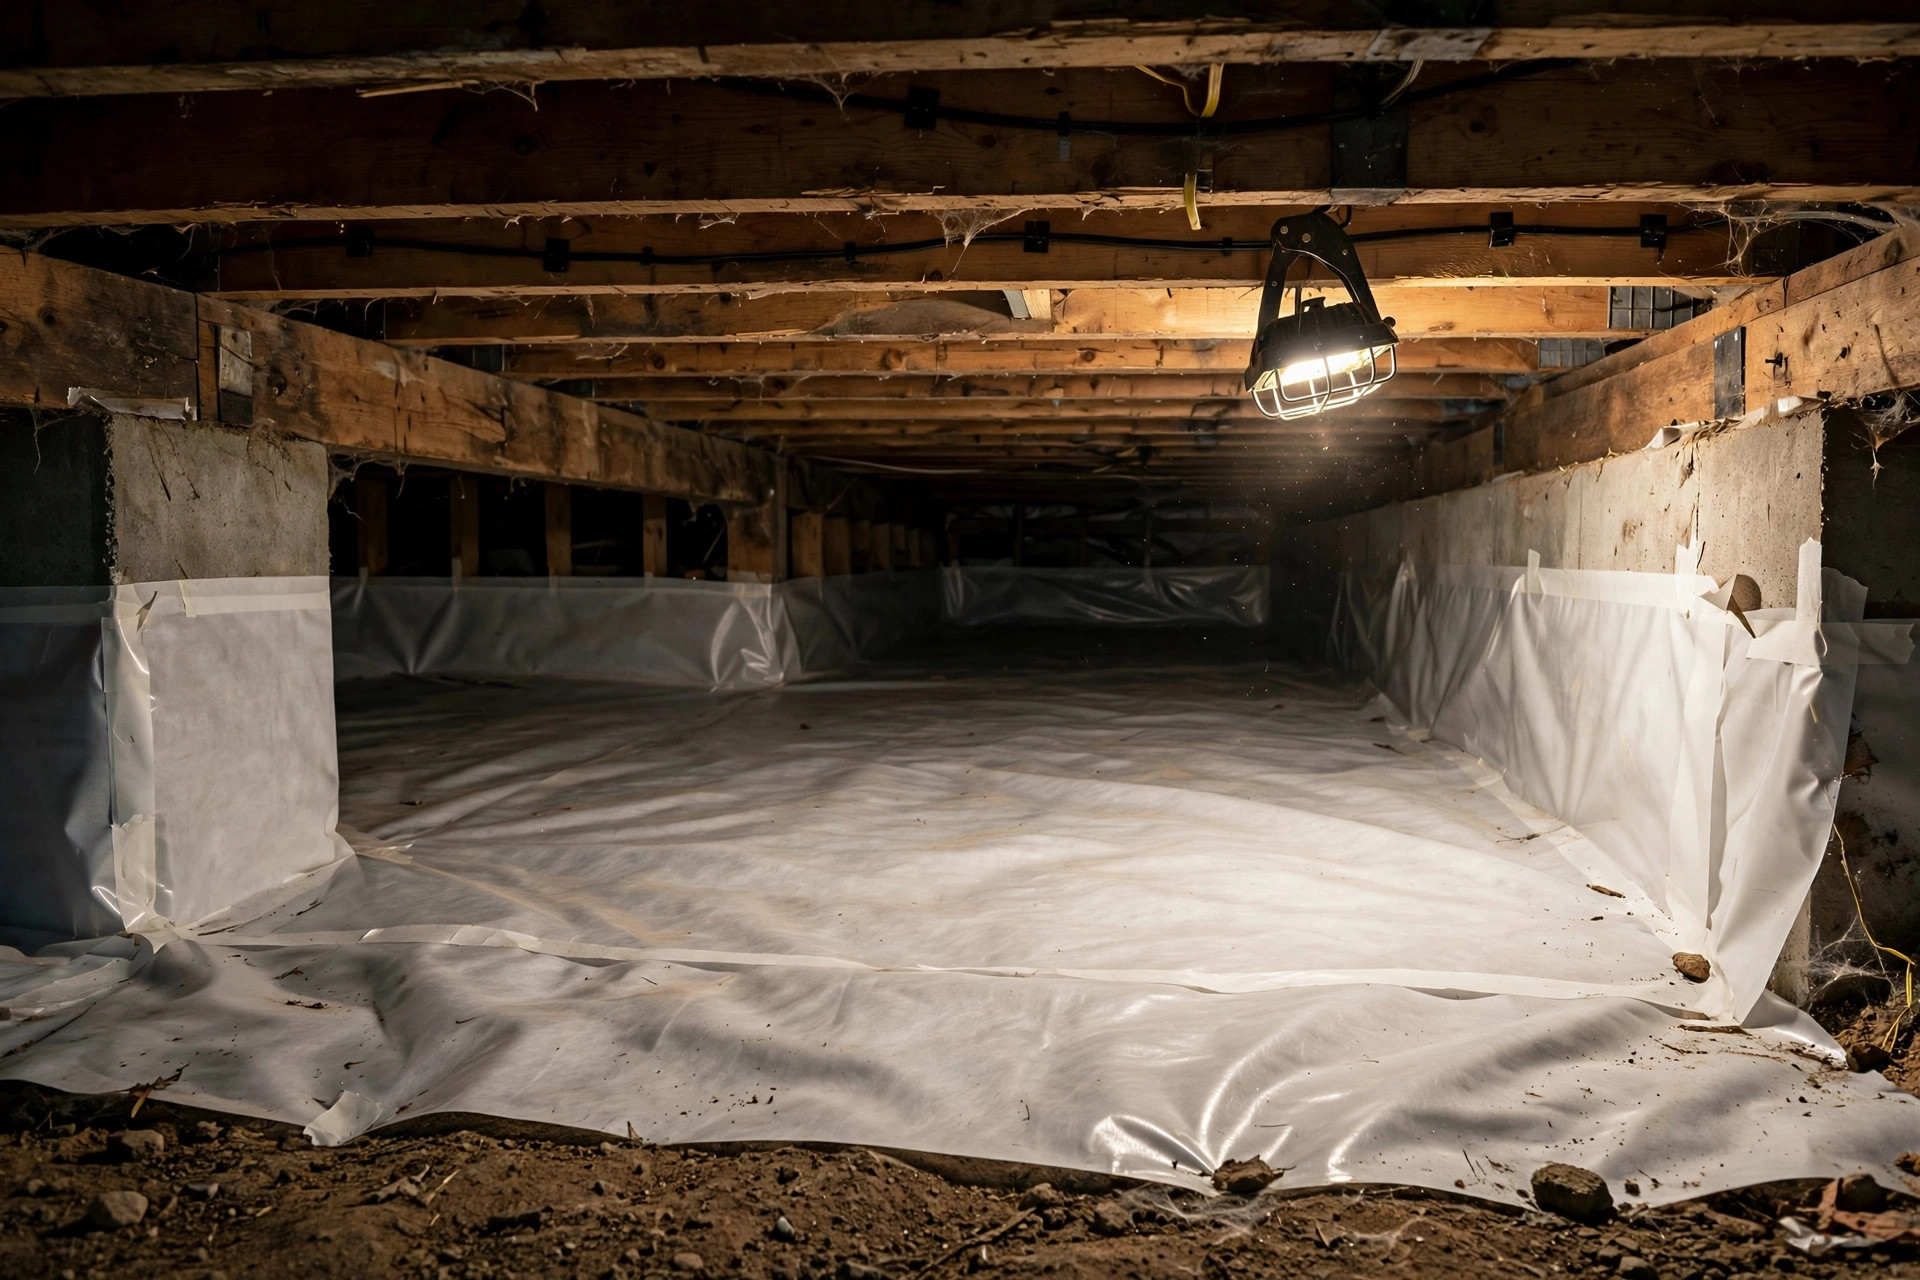
The best vapor barrier for crawl space USA projects is only as good as its seams. Sheets come in rolls. Each roll has a fixed width, often 10 or 13 feet. Large crawl spaces need several rolls. Where two sheets meet, they must overlap by at least 12 inches. The overlap must then be sealed with seam tape made for vapor barriers. Ordinary duct tape will fail. It loses its grip in damp conditions within months. Use tape rated for polyethylene vapor barriers.
The sheet must also run up the foundation walls by at least 6 inches and be sealed to the wall. Around piers, pipes, and support posts, the sheet must be cut close and sealed with tape and caulk. Gaps at these points let moisture through. A careful seal is what separates a good job from a poor one.
Warranty and Rating
Some makers rate their liners for 20 or 25 years. Others offer no warranty at all. A written warranty is a sign of a better product. Look for products tested to meet ASTM E1745, the common test standard for plastic water vapor retarders. Products that meet this standard have passed tests for puncture strength, water vapor transmission, and tensile strength.
Types of Crawl Space Vapor Barriers
Standard Polyethylene Sheeting
Standard polyethylene sheeting is the most common type. It is sold in rolls at home centers. Thicknesses range from 6 to 20 mil. It is usually black or white. White sheeting brightens the crawl space and makes leaks and damage easy to see. Black sheeting blocks light and looks less dirty over time. Home Depot and Lowe’s both stock several thicknesses of this sheeting.
String-Reinforced Liners
These liners have a woven grid of polyester cord between layers of polyethylene. They are sold in 10, 12, and 20 mil weights. The grid makes them very hard to tear. They are the common choice for professional encapsulation jobs. They cost more per square foot, but they rarely need replacement.
Encapsulation-Grade Liners
Encapsulation-grade liners are heavy, often 20 mil, and made for full crawl space encapsulation. Encapsulation means sealing the whole space: floor, walls, and vents. These liners come with strong warranties, sometimes 25 years. They pair with sealed vents, a dehumidifier, and sometimes a crawl space dehumidifier or other drying equipment. Homeowners planning full encapsulation should read about crawl space encapsulation cost per square foot before they buy.
Pre-Cut and Kits
Some sellers offer pre-cut sheets and kits sized for common crawl space areas. Kits often include seam tape and wall fasteners. They suit small, simple crawl spaces. For large or odd-shaped spaces, buying rolls is cheaper.
Cost and Price
Cost depends on thickness, size, and whether the work is done by the homeowner or a contractor. As a rough guide, plain 6-mil polyethylene costs the least per square foot. A 10-mil or 12-mil reinforced sheet costs roughly two to three times more per square foot. A 20-mil encapsulation liner costs the most, often several times the price of plain film.
Do-it-yourself costs include the sheeting, seam tape, wall fasteners, and caulk. For a 1,000 square foot crawl space, materials for a basic 10-mil job often run a few hundred dollars. A 20-mil reinforced liner with all sealing supplies can run into the low thousands for the same area.
Professional installation adds labor. Contractors usually quote per square foot. Prices vary by region and by how much preparation the space needs. A crawl space full of debris, standing water, or mold will cost more to prepare. Full encapsulation, which adds wall liners, sealed vents, and a dehumidifier, costs the most of all. Homeowners who want the full picture should compare crawl space encapsulation cost per square foot with the price of a simple floor-only barrier.
Buying materials from a plumbing or building supplier keeps costs down. Home Depot and Lowe’s carry common sizes. Specialty encapsulation liners may need to come from online suppliers.
Installation: Step by Step
Step 1: Prepare the Space
Clear all debris, trash, and old fallen insulation from the crawl space. Rake the ground smooth. Remove sharp rocks, roots, and old wood scraps. If there is standing water, find the source first. A vapor barrier does not fix leaks. Fix grading outside the house so water runs away from the foundation. Check gutters and downspouts. If the space floods in heavy rain, a sump pump may be needed before any liner goes down. Homeowners can compare the best sump pump for crawl space usa options for this purpose.
Inspect plumbing lines for leaks. Valves and fittings from makers like Moen, Delta Faucet, and Kohler last long, but old fittings still fail. Fix every leak before covering the ground. Water trapped under a new liner will cause more harm than good.
Step 2: Test for Radon
Before sealing the space, test for radon. Radon is a natural gas that rises from soil. It can build up in closed crawl spaces and enter the home. The U.S. Environmental Protection Agency urges every homeowner to test. Low-cost test kits are sold at home centers. If levels are high, a radon vent system should go in before or during encapsulation work.
Step 3: Lay the Sheets
Start at one end of the crawl space. Unroll the first sheet along the wall. Run the sheet up the foundation wall at least 6 inches. Overlap each new sheet by 12 inches or more. Keep the sheets flat and free of wrinkles where possible. Cut openings for piers and pipes as tight as possible.
Step 4: Seal Everything
Tape every seam with vapor barrier seam tape. Press the tape down hard. Run a bead of caulk or sealant where the sheet meets the wall, then press the sheet into it. Seal around every pier, pipe, and post. Tape alone may not hold on rough concrete. In those spots, add a fastener or a second layer of tape. Family Handyman and This Old House both publish detailed do-it-yourself guides for this sealing work.
Step 5: Add Drying Help
A vapor barrier stops ground moisture. It does not dry the air. In humid regions, add a dehumidifier rated for crawl spaces. Read crawl space dehumidifier reviews 2026 usa to pick one sized for the space. Check that vents are in good shape. In full encapsulation, vents are sealed shut and the dehumidifier does all the work.
Care and Upkeep
A vapor barrier needs little care, but it does need checks. Inspect it once a year. Look for tears, pulled seams, and water pooling on top. Water on top of the liner means a leak above, from a pipe or from the wall. Find the source and fix it. Small tears can be patched with a piece of liner and seam tape. Cut a patch that extends at least 6 inches past the tear on all sides. Tape all edges.
Keep the space clear of stored items that can press or cut the liner. Do not store sharp tools or heavy boxes on it. If a worker must enter the space, ask them to take care around the sheets. A 20-mil liner will shrug off most foot traffic. A 6-mil sheet will not.
Watch humidity. A simple humidity gauge in the crawl space shows whether the barrier is doing its job. Relative humidity should stay below 60 percent most of the year. If it climbs higher, add or upgrade the dehumidifier. Standing water under the liner is a warning sign. It means water is entering from outside or from a leak. Do not ignore it. Homeowners who want cleaner tap water as part of the same healthy-home effort can look at Aquasana for whole-house filtration options.
Safety
Crawl spaces can hold hazards. Wear gloves, a dust mask or respirator, and eye protection when working under the house. Old fiberglass insulation sheds fibers that irritate skin and lungs. Mold spores can harm breathing. A respirator rated for dust and mold is the safe choice.
Watch for electrical hazards. Wires may hang low or rest on the ground. Do not cut or pull wires. If wiring looks damaged, call an electrician. Watch for gas lines too. If you smell gas, leave the space at once and call the gas company from outside.
Ventilate the space while working. A fan set at the crawl space opening moves fresh air through. Take breaks. Crawl spaces get hot in summer. Heat and poor air can cause dizziness. Never work alone under a house if you can avoid it. Keep a phone within reach.
Radon is a quiet risk. Test before a full seal-up, as the EPA advises. If a radon system is installed, the vapor barrier work must fit around it. The vent pipe for the radon system must stay clear and sealed.
Frequently Asked Questions
What mil thickness is best for a crawl space vapor barrier?
For most homes, 10 or 12 mil reinforced sheeting is the best balance of cost and strength. Six-mil film meets many codes but tears easily. Twenty-mil liners are the strongest and are the standard for full encapsulation. Choose based on foot traffic, ground conditions, and budget.
Can I install a vapor barrier myself?
Yes, in most cases. A basic floor-only barrier is a common do-it-yourself project. It takes a weekend for an average crawl space. Full encapsulation with wall liners, sealed vents, and a dehumidifier is harder and is often left to professionals.
How long does a crawl space vapor barrier last?
A quality reinforced liner can last 20 to 25 years or more. Thin 6-mil film may need replacement in 5 to 10 years, especially if it is walked on or exposed to sharp debris. Annual checks catch damage early.
Does a vapor barrier help with mold?
Yes. Mold needs moisture to grow. A sealed vapor barrier cuts off the largest moisture source in most crawl spaces: the soil. It works best paired with dry air, which a dehumidifier provides in humid climates.
Should the vapor barrier go on the ground or the ceiling of the crawl space?
On the ground. The barrier must cover the soil to stop moisture from rising. In full encapsulation, liners also run up the walls. Ceiling placement is not standard and does not stop ground moisture.
Will a vapor barrier lower my energy bills?
It can. Dry insulation works better than wet insulation. Dry floor joists and ducts lose less heat. Many homeowners report warmer floors in winter after the barrier goes in. The savings grow in humid regions where the crawl space stayed wet before.
A Short Final Word
The best vapor barrier for crawl space USA homes is the one that fits the space, the climate, and the budget. Thick reinforced sheeting, careful seams, and sealed edges matter more than the brand name on the roll. Pair the barrier with dry air and honest yearly checks, and the house above will be healthier for it.
References
Aquasana. (n.d.). Water filtration systems. https://www.aquasana.com Delta Faucet. (n.d.). Kitchen and bathroom faucets. https://www.deltafaucet.com Family Handyman. (n.d.). DIY home repair and maintenance. https://www.familyhandyman.com Kohler. (n.d.). Bathroom and kitchen fixtures. https://www.kohler.com Lowe’s. (n.d.). Home improvement products. https://www.lowes.com Moen. (n.d.). Faucets and plumbing fixtures. https://www.moen.com The Home Depot. (n.d.). Home improvement products. https://www.homedepot.com This Old House. (n.d.). Home renovation guidance. https://www.thisoldhouse.com U.S. Environmental Protection Agency. (n.d.). Protecting human health and the environment. https://www.epa.gov
Was this guide helpful?

About Sarah Mitchell
The My Garden US editorial team writes practical, in-depth home and garden guides for American homeowners — tested advice, no fluff.