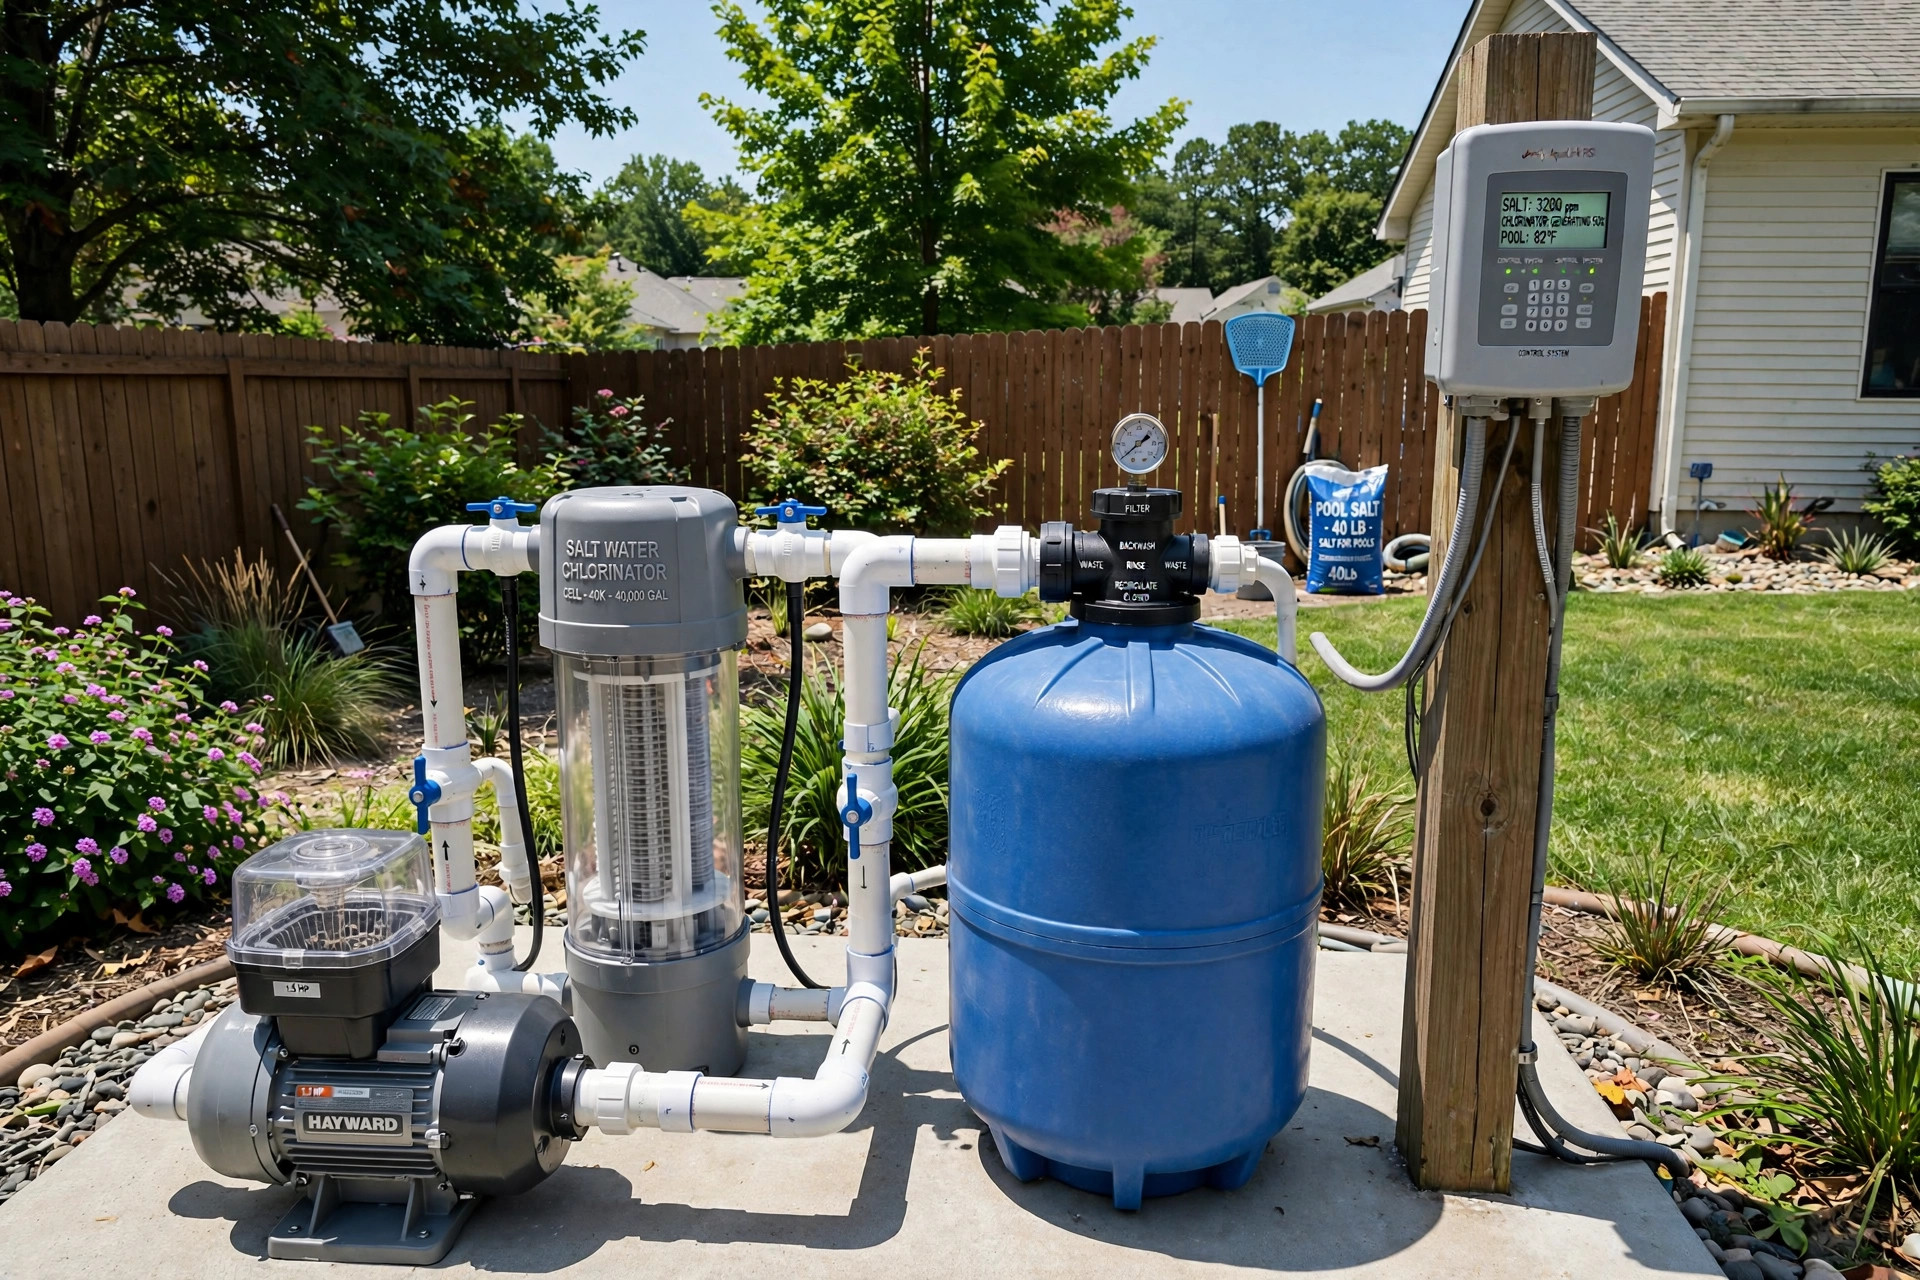

Many pool owners want to learn how to install salt water chlorinator systems on their own. The task looks hard from the outside. In truth, a handy homeowner can finish the job in one weekend. This guide walks you through the full process. You will learn what parts you need, how to size the unit, how to plumb it in, how to wire the power box, and how to start the system. Read the whole guide before you pick up a tool.
Why a Salt Water Chlorinator Matters
A salt water chlorinator turns ordinary pool salt into chlorine. The control box sends a small electric current through a cell. The current breaks the salt apart. The freed chlorine keeps the pool water clean and safe. Then the cycle starts again.
Most owners choose salt water for the feel of the water. The water feels soft on the skin. It does not burn the eyes the way a heavy dose of pool tablets can. The smell of strong chlorine drops as well.
A salt system also cuts down on daily work. You no longer haul buckets of chlorine tablets from the store each month. The machine makes chlorine every day the pump runs. You still test the water each week. But the daily dosing is gone. That is the main reason owners learn salt water vs chlorine pool pros cons before they make the change.
Before You Begin: Tools and Parts: How to Install Salt Water Chlorinator
Gather everything before you start. A trip to the store in the middle of the job is the fastest way to lose a day. Here is a full list.
Parts you must have:
– A salt water chlorinator kit. The kit holds the control box, the cell, and the cell unions. Buy a kit rated for your pool size. Most brands, such as Pentair and Hayward, list the pool size right on the box. – Schedule 40 PVC pipe and fittings. Match the pipe size to your current plumbing. Most home pools use 1.5 inch or 2 inch pipe. – PVC primer and cement. – Pool salt. Use pool grade salt, not table salt or rock salt, from any pool supply store. You will need about one 40 pound bag for every 3,200 gallons to reach 3,000 parts per million. Check the maker chart for your exact pool. – A check valve, if the kit does not include one. The check valve keeps salted water from backing up into the heater. – Basic electrical parts: a breaker of the right size, outdoor rated wire, and a weatherproof junction box, if your local code calls for one.
Tools you should have:
– A hacksaw or PVC pipe cutter. – A tape measure and a marker. – A screwdriver set and a wrench. – A drill with a masonry bit, for mounting the box on a wall. – A multimeter to check voltage. – PVC reamer or sandpaper to smooth cut edges. – Teflon tape for threaded fittings.
Set all of this out on the equipment pad. Open the kit and check the parts list in the manual. If a part is missing, call the maker before you cut any pipe.
How to Choose the Right Size
Size matters more than price. A cell that is too small will run at full power all day and wear out fast. A cell that is too large costs more up front but works less hard and lasts longer.
Read the maker rating for gallons. Then buy one size up from what you need. A pool that holds 20,000 gallons should use a unit rated for 40,000 gallons. The larger cell runs at a low setting and still keeps the chlorine level steady.
Also check the kit’s voltage. Most control boxes work on both 110 and 220 volts. Match the box to the voltage of your pool timer and pump. If your pump runs on 220 volts, set the box for 220 volts. The manual shows a switch or jumper inside the box.
Finally, look at the salt level range. Most cells want 3,000 to 3,500 parts per million. Know the range before you buy salt.
Step by Step: How to Install a Salt Water Chlorinator
Step 1: Turn Off All Power
Safety comes first. Go to the main panel and switch off the breaker for the pool pump. Then switch off any other breaker that feeds the equipment pad. Tape the breakers in the off position. Hang a note on the panel so nobody turns them back on while you work. Test with the multimeter. The wires must read zero volts before you touch them. The Consumer Product Safety Commission warns that pool equipment pads mix water and power in one place, so this step must never be skipped.
Step 2: Plan the Plumbing Route
The cell goes after the filter and after the heater. Water must flow from the pump, through the filter, through the heater, through the cell, and then back to the pool. That order is fixed.
Hold the cell in place on the return pipe. Mark the pipe on both sides. You need a straight run of pipe at least as long as the cell plus the two unions. Most cells need about 12 inches of straight pipe. Leave room for the cell to be unscrewed later.
Step 3: Cut and Plumb the Cell
Cut the pipe at your marks. Ream the cut ends smooth. Dry fit the unions and the cell before you glue. The flow arrow on the cell must point toward the pool. When the fit is right, prime and glue each joint. Push each fitting on with a quarter turn and hold it for 30 seconds.
Let the joints cure for the time shown on the cement can. Two hours is common. Some cement needs four hours. Do not rush this step. A joint that cures under pressure will leak.
Step 4: Mount the Control Box
Pick a spot for the control box at least five feet from the pool edge. Most local codes call for that distance. The box should sit in shade if possible. Sun and heat shorten the life of the electronics.
Hold the box against the wall or a post. Mark the screw holes. Drill and set the anchors. Mount the box level. The front door must open all the way. You will need clear access for the readings and the output dial.
Step 5: Wire the Control Box
Open the box and read the wiring diagram. Wire the box to a breaker of the size shown in the manual. A common size is 20 amps. Run the wire through conduit if the code in your area calls for it.
If you want the chlorinator to run only when the pump runs, wire the box to the load side of the pump timer. This is the standard setup. The chlorinator then shuts off with the pump. This keeps the cell from making chlorine in a pipe with no flow.
Tighten every terminal. Loose wires cause heat. Heat causes failures. Close the box and move on to plumbing checks before you restore power.
Step 6: Restore Power and Test for Leaks
Remove the tape and switch the breakers back on. Start the pump. Walk the new joints and look for drips. A slow drip at a union can often be fixed with one more quarter turn of the union nut. A drip at a glued joint means the joint must be cut out and redone. There is no patch for a bad glue joint.
Watch the control box. The display should light up. The flow light should come on when water moves through the cell. If the flow light stays off, check the flow switch and the wiring. Do not run the cell with no flow.
Step 7: Add the Salt
Test the water first. Know the current salt level, the pH, and the free chlorine. Only then add salt. Scatter the bags around the pool edge. Brush the salt toward the drain until it dissolves. Keep the pump running for 24 hours so the salt mixes well.
Step 8: Set the Output and Balance the Water
Turn the output dial to the mid point. Test the free chlorine after two days. Raise or lower the output until the chlorine holds at 1 to 3 parts per million.
Balance the pH next. Salt systems tend to push pH up. Test the pH each week and keep it between 7.2 and 7.8. Our guide to how to lower pool ph levels safely covers the exact steps.
Cost and Price Breakdown
The full cost of how to install a salt water chlorinator has three parts: the kit, the install parts, and the salt. The kit is the largest cost by far.
A quality chlorinator kit for a home pool costs between 600 and 1,500 dollars. Larger cells cost more. Well known makers sell through pool supply stores and big retailers like Home Depot.
If you hire a pro for the install, labor adds 300 to 600 dollars in most markets. Many owners do the plumbing themselves and hire an electrician for the wiring only. That middle path cuts the labor bill in half. Our salt water pool conversion cost guide breaks down every line item in more detail.
Year to year, a salt pool costs less to run than a tablet pool. Salt is cheap. Tablets are not. The cell must be replaced every three to seven years. A replacement cell costs 400 to 800 dollars.
Care and Upkeep Through the Season
A salt system needs less work than a tablet system, but it is not work free. Put these tasks on a simple list and the cell will last for years.
Each week: Test free chlorine, pH, and alkalinity. Adjust the output dial or the pH as needed. Empty the skimmer baskets. Glance at the cell through the clear housing. A light white crust on the plates is normal.
Each month: Test the salt level with a salt test strip or meter. Test the stabilizer level too. Salt pools need stabilizer, just like tablet pools. Keep it near 60 to 80 parts per million. Brush the pool walls.
Each season: Remove the cell and soak it in a mild acid wash if scale has built up. Mix one part acid to four parts water. Soak for 15 minutes. Rinse well. Never scrape the plates with a metal tool.
In winter, follow your normal closing routine. Drain the cell housing if the manual calls for it. Store the cell indoors in cold climates. Freezing water inside the housing can crack it.
Safety Notes You Must Not Skip
Pool work has real risks. Electricity and water share the same pad. Pool salt and acid are chemicals. Treat both with respect.
First, always kill the power before you touch any wire. Test the wires with a meter. Never trust the switch position alone.
Second, bond and ground the equipment to code. Local codes differ. When in doubt, hire a licensed electrician.
Third, store pool salt and acid in a dry place, away from children and pets. The Environmental Protection Agency notes that pool chemicals can harm people and the local water supply when handled wrong. Keep bags off the ground and off wet floors.
Fourth, never look into the cell while it is powered on. The cell makes chlorine gas inside the housing. The gas is safe when it stays in the water line.
Fifth, keep the control box closed and dry. Water in the box will void the warranty. It can also short the board.
Frequently Asked Questions
Can I install a salt water chlorinator on an above ground pool?
Yes. Many makers sell kits sized for above ground pools. The steps are the same. The cell goes after the filter on the return line. Make sure the kit rating covers your pool volume.
Do I need a plumber or an electrician?
A handy owner can do the plumbing. The cuts and glue joints are simple. The wiring is the risk. If you have never wired a 220 volt circuit, hire an electrician.
How long does the install take?
Plan a full weekend. Plumbing takes three to four hours. Wiring takes one to two hours. The glue must cure for hours. The salt needs 24 hours to mix. You cannot rush the cure time or the mix time.
Will salt water damage my pool equipment?
Salt can speed up rust on cheap metal parts. Ladders, light screws, and heater parts need a look each season. Most modern heaters and rails are made to stand up to salt water. Replace cheap screws with stainless steel ones.
Can I switch back to tablets later?
Yes. Turn the chlorinator off at the box. Let the salt level fall on its own through rain and backwash. You can then run tablets as before. The cell can stay in the line.
How do I know the cell is working?
Watch three signs. First, the control box display shows output and salt readings. Second, the free chlorine test holds steady between 1 and 3 parts per million. Third, the water stays clear week after week. If chlorine falls to zero and the output is already high, the cell may be scaled or worn out. Clean it first.
Final Word
Learning how to install a salt water chlorinator pays off every swim season. The water feels better. The weekly work drops. The cost evens out within a few years. Take it one step at a time. Size the unit right. Plumb it after the heater. Wire it safe. Add the salt slow. Then test the water each week and enjoy the soft, clear result. Guides from The Spruce, Swim University, and makers like Bullfrog Spas and Hot Spring offer more detail if you want to read further before you start.
References
Bullfrog Spas. (n.d.). Hot tubs and spas. https://www.bullfrogspas.com Hayward. (n.d.). Pool equipment and automation. https://www.hayward-pool.com Hot Spring Spas. (n.d.). Hot tubs and spas. https://www.hotspring.com Leslie’s Pool Supplies. (n.d.). Pool supplies and equipment. https://www.lesliespool.com Pentair. (n.d.). Pool and spa equipment. https://www.pentair.com Pool Warehouse. (n.d.). Pool equipment and supplies. https://www.poolwarehouse.com Swim University. (n.d.). Pool and hot tub care guides. https://www.swimuniversity.com The Home Depot. (n.d.). Home improvement products. https://www.homedepot.com The Spruce. (n.d.). Home and garden advice. https://www.thespruce.com U.S. Consumer Product Safety Commission. (n.d.). Product safety information. https://www.cpsc.gov U.S. Environmental Protection Agency. (n.d.). Protecting human health and the environment. https://www.epa.gov
Was this guide helpful?

About Emily Rodriguez
The My Garden US editorial team writes practical, in-depth home and garden guides for American homeowners — tested advice, no fluff.
You May Also Like
Best Pool Vacuum Hose for Inground Pools: A Complete Buying Guide
June 27, 2026 0 views
Best Pool Winter Cover for Inground Pools: A Simple Buying Guide
July 8, 2026 0 views
Hot Tub Jet Replacement Guide for Homeowners
January 23, 2026 0 views