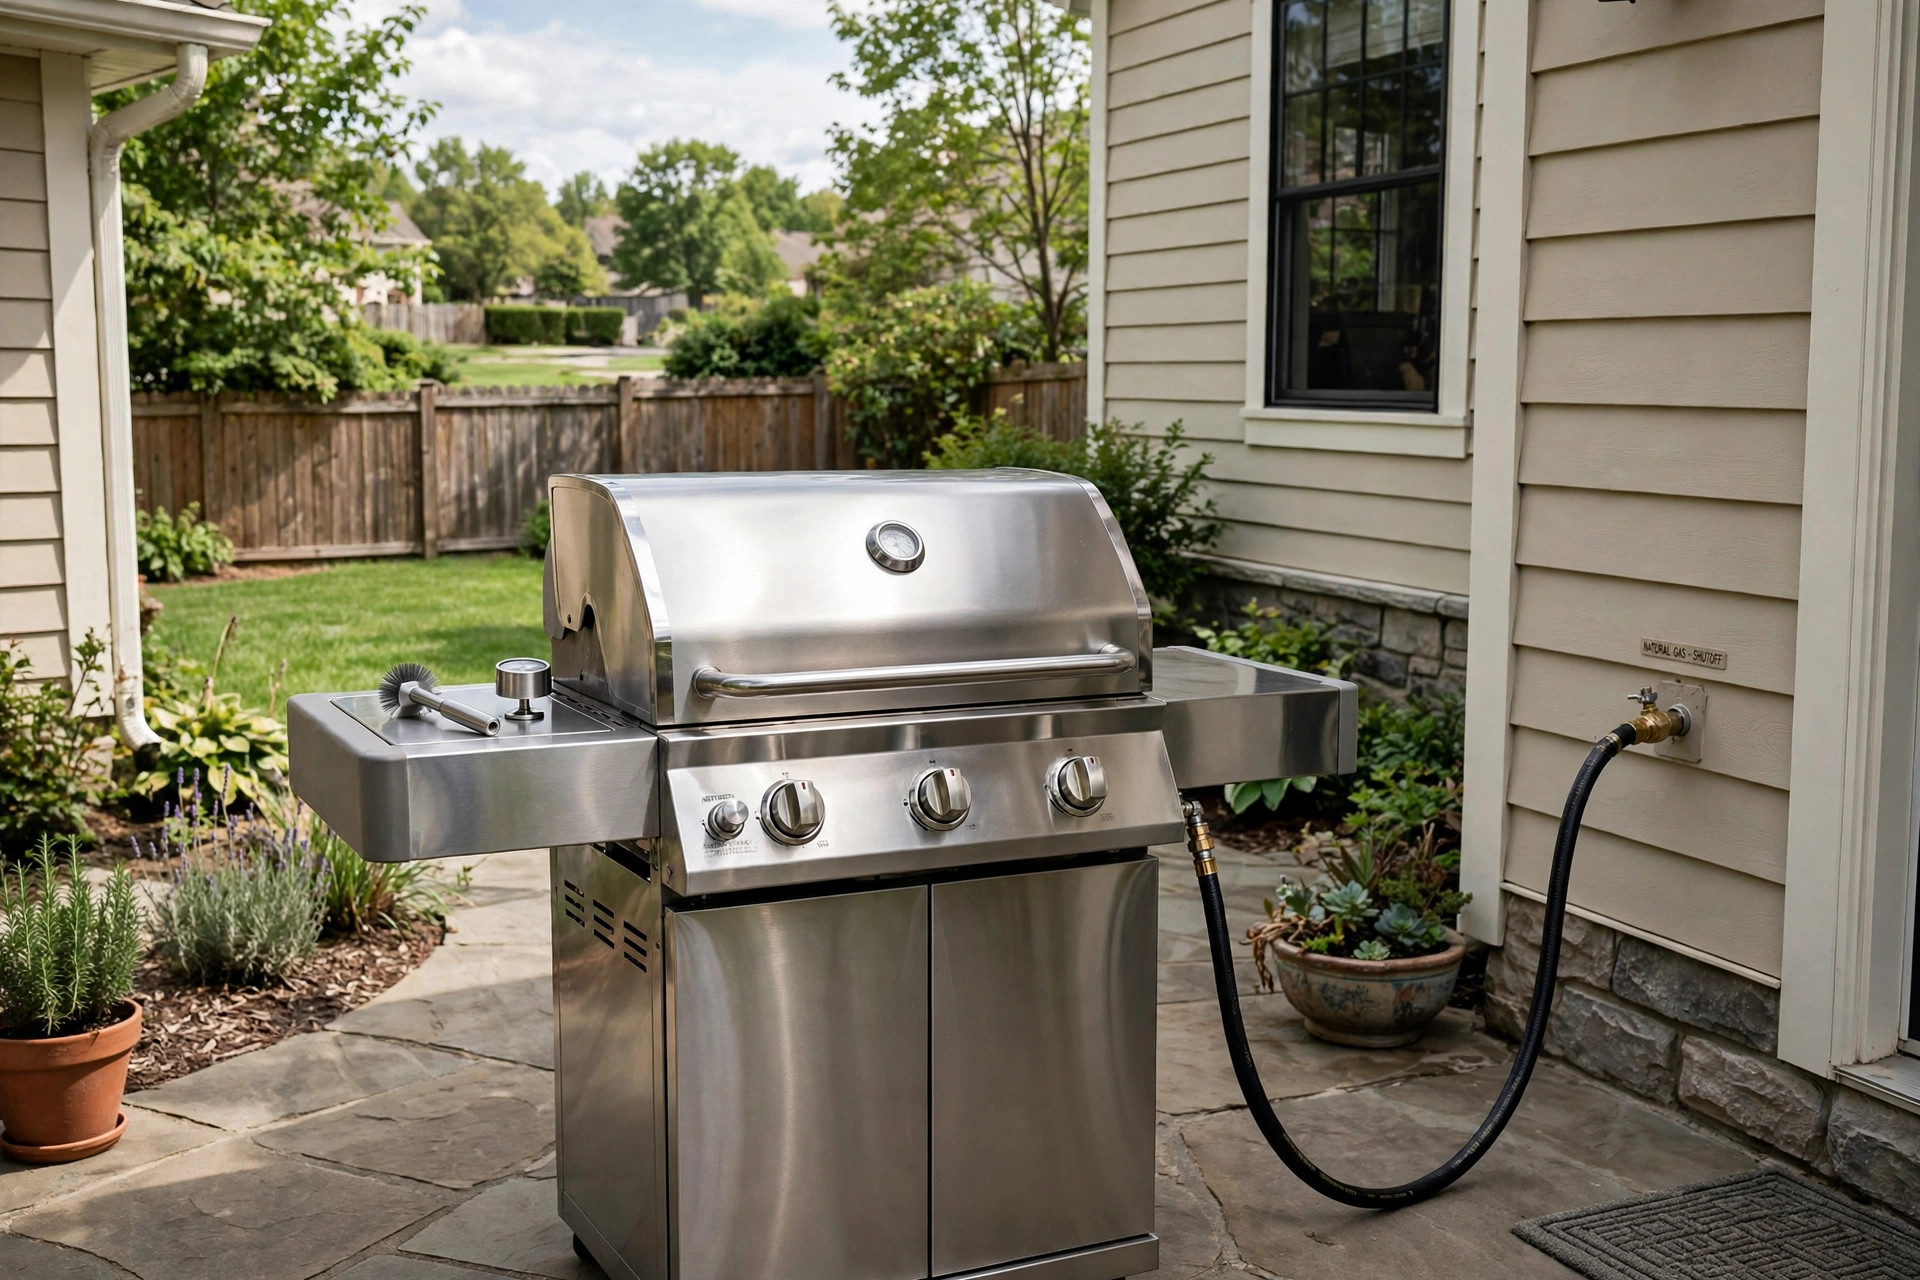

Many grill owners grow tired of propane tanks. The tanks run out mid-cook. They are heavy to carry and cost money to refill. If your home has a natural gas line, you can learn how to convert grill to natural gas and leave the tank behind. The change gives you steady fuel straight from your house. This guide walks through the full process in plain steps: the parts, the tools, the cost, the safety rules, and the upkeep that follows.
Should You Convert? Why It Matters
A natural gas hookup changes the way you grill. You never lift a tank again. You never run out of fuel during a long smoke. The gas comes from the same line that heats your home or runs your water heater. It flows at steady pressure, so your grill lights the same way every time.
Natural gas also costs less than propane in most areas. A propane refill can cost twenty dollars or more for a standard tank. A natural gas line charges by the amount used, and the rate is often far lower per cook. Over a full grilling season, the savings add up. Families that grill several times a week see the largest benefit.
There are trade-offs. A natural gas grill cannot move. It stays where the gas line reaches. Natural gas also burns slightly cooler than propane, so searing can take a little longer. Most owners accept the trade for the convenience.
Check your grill before you start. Not every grill can be converted. Most major gas grill brands sell conversion kits for their own models. Weber and Char-Broil, for example, list kits and parts that fit their grills. If your grill is very old or came with no gas option, conversion may not be possible. The safest rule is simple: use only a kit made for your exact grill model.
What to Know Before You Begin: How to Convert Grill to Natural Gas
First, check your home. You need a natural gas line that reaches your grilling spot. Many patios have a capped stub. If yours does not, a licensed plumber can run a new line, though local codes may require a permit. Call your gas company or city office before any pipe work.
Read your grill manual. It tells you whether the maker allows conversion. It may also name the exact kit to buy. Using the wrong kit can damage the grill or void the warranty. When in doubt, call the maker. Their customer service lines handle this question every day. Guidance on this topic is also easy to find on sites like The Spruce Eats, which publishes plain-language grilling how-to guides.
Propane is stored as a liquid under high pressure. Natural gas arrives as a gas under low pressure. The grill therefore needs different burner orifices, the small brass fittings where gas enters each burner. Natural gas orifices have a larger hole, and the kit also swaps the hose for one that fits your home line.
Never convert a charcoal grill or a pellet grill. Those cookers are built for solid fuel, and gas parts do not fit them. Pellet grill owners face different questions, and Traeger explains the fuel needs of its own line. Stick to gas grills only for this project.
Parts and Tools You Need
A conversion kit is the heart of the job. Most kits include new burner orifices, a natural gas hose, a quick-connect fitting, and a gas valve or regulator suited to house pressure. Some kits also include a new control knob label. Buy the kit that matches your brand and model. Kits from Napoleon fit Napoleon grills. Kits from Broil King fit Broil King grills. Cross-brand parts rarely line up, so stay with your maker.
Beyond the kit, gather a few tools. You will need an adjustable wrench, a small socket set, a screwdriver, and pipe thread sealant rated for gas. Teflon tape made for gas lines also works, but it must be the yellow type, not the white type used for water pipes. Keep a spray bottle of soapy water ready. You will use it to test every joint for leaks at the end.
One more item matters: a shutoff valve at the gas line. Your home line should have one within reach of the grill. If it does not, have a plumber add one. You must be able to stop the gas flow in seconds.
While you have the grill open, it is a good time for maintenance. Read up on cleaning gas grill burners so the burners run clean after the swap. Clean burners light faster and heat more evenly.
Step by Step: How to Convert Grill to Natural Gas
Turn off all gas first. If the grill still has a propane tank attached, close the tank valve and remove the tank. Move the tank far from your work area. Make sure the home gas shutoff at the patio is closed too.
Let the grill cool fully if it was used recently. Then remove the cooking grates and the flavorizer bars or heat tents. Set them aside. You now see the burners and the manifold, which is the pipe that feeds gas to each burner.
Remove the burners. Most lift out after you take out a pin or screw at the back. A quick phone photo helps you seat them again later.
Find the orifices. Each burner has a small brass fitting at its inlet, screwed into the manifold. Unscrew them with a wrench or socket. Keep the old propane orifices in a labeled bag. You may want them if you ever convert back.
Install the new natural gas orifices from the kit. Thread each one in by hand first to avoid cross-threading. Then tighten gently with the wrench. Do not overtighten. Brass strips easily.
Swap the hose and regulator. Remove the propane hose and regulator from the manifold. Attach the natural gas hose from the kit. Apply yellow gas-rated thread sealant to the male threads. Connect the quick-connect fitting if your kit includes one. This fitting lets you plug the grill into the house line and unplug it for winter.
If the kit includes a new gas valve, swap it now, following the kit instructions for your model. Each brand places the valve a little differently.
Reinstall the burners, heat tents, and grates. Check that every burner sits straight on its orifice.
Test for leaks now. Connect the hose, open the shutoff valve, and spray soapy water on every joint you touched. Bubbles mean a leak. If you see any, close the gas, tighten the joint, and test again. This is the most important step of the job. Take your time with it.
Light the grill with the lid open. Turn one burner to high and press the igniter. The flame should be mostly blue with small yellow tips. If it is very yellow and lazy, or lifts off the burner, shut down and recheck the orifices. When all burners light well, heat the grill for ten minutes.
Types of Conversion Kits
Most makers offer two paths. The first is a brand conversion kit. This kit comes from the grill maker and fits one model or model family. It includes every part matched to that grill. This is the path most owners should take. It keeps the warranty intact and the fit exact.
The second is a universal kit. Third-party companies sell these with a range of orifice sizes and adapters. They cost less but demand more skill, since you must pick the right orifice for each burner. A wrong size makes the flame too hot or too weak. For most homeowners, the brand kit is worth the higher price.
Some grills are sold as convertible and come with both orifice sets in the box. Check the parts bag that came with your grill before you buy a kit.
Specialty grills follow their own rules. A ceramic cooker from Big Green Egg, for instance, burns charcoal and has no gas parts at all. Conversion applies only to gas grills with a propane setup.
Cost and Price
A brand conversion kit usually costs between forty and one hundred fifty dollars. The price depends on the maker and the number of burners. A four-burner grill needs more orifices than a two-burner model, so the kit costs more.
The larger cost is the gas line. If your patio already has a capped natural gas stub, the line cost is zero. If a plumber must run a new line from the house, expect several hundred dollars. The distance matters. A short run along an outside wall costs less than a long run under a patio. Get two quotes from licensed plumbers before you agree.
Permits add a small fee in some cities. Your plumber usually handles the permit and the inspection. Ask about it in your quote so there are no surprises.
After the work, running costs drop. Natural gas is cheaper than propane in most regions, and many owners recover the kit cost in one or two seasons. Consumer Reports tracks grill performance and running costs, and its ratings can help you judge the long-term value of your setup.
Do not forget the small extras. Yellow gas thread sealant, a new grill cover, and maybe a longer hose add twenty to fifty dollars. A parts retailer like The Home Depot stocks all of these on the shelf.
Care and Upkeep
A natural gas grill needs the same care as any gas grill. Clean the grates while warm after each cook, and empty the grease tray often. Built-up grease is the top cause of grill fires.
Check the burners twice a season. Spiders nest in burner tubes, and a blocked tube makes a weak flame. Remove the burners, brush them out, and clear the ports with a thin wire. This keeps heat even across the grate.
Inspect the hose once a year. Look for cracks, wear, or soft spots. The quick-connect fitting should click firmly into the house outlet. If the hose feels stiff or damaged, replace it. Hoses are cheap. Gas leaks are not.
At the end of the season, follow a proper shutdown routine. Guides on how to winterize gas grill for storage walk through the full checklist. Disconnect the quick-connect, cap the house line, and cover the grill. Store the cover tight so wind cannot lift it.
Watch the flame color during the season. A healthy natural gas flame is blue with small yellow tips. A flame that turns mostly yellow may signal dirty burners or a spider nest. Clean the burners and test again.
Safety
If you smell gas at any point, stop. Close the shutoff valve, step away, and do not light anything. Call your gas company from a safe distance. They treat every leak call as urgent.
Work only with the gas off. Double-check the shutoff before you loosen any fitting. Keep the work area free of open flame. Do not smoke near the grill while you work.
Use the leak test every time. Spray soapy water on each joint after any change. No bubbles means no leak. Skipping this test is the most common mistake, and it is the most dangerous one.
Swapping orifices and hoses on the grill is a homeowner-level job. Running new pipe inside the house is not. Hire a licensed plumber for line work. Many cities require it by law.
Keep children and pets away while you work and while the gas is on for testing. Store tools and small brass fittings out of reach. The orifices are tiny and easy to lose, so keep them in a tray.
Check your local rules. Some towns require a permit even for the grill-side work. Others want the finished job inspected. A quick call to the building department answers the question in minutes.
Frequently Asked Questions
Can any gas grill be converted to natural gas? No. Only grills whose maker offers a conversion kit for that model convert safely. Check your manual or call the maker. If no kit exists, buy a grill made for natural gas instead.
Does natural gas grill as hot as propane? Almost. Natural gas burns a little cooler, so searing may take a bit longer. Most cooks notice no real difference for burgers, chicken, or vegetables. Preheat the grill fully and the results match propane closely.
How long does the conversion take? The grill-side work takes one to two hours for a first-timer. Most of that time goes to removing burners and testing for leaks. A plumber-run new gas line is a separate job.
Will conversion void my warranty? Using the maker’s own kit usually keeps the warranty valid. Using a universal third-party kit may void it. Read the warranty terms in your manual. When in doubt, call the maker before you buy parts.
Do I need a new regulator for natural gas? Your home line already regulates the gas pressure, so the propane regulator must come off. Most kits include the correct valve or fitting for house pressure. Follow the kit instructions exactly, since each model differs a little.
Can I convert back to propane later? Yes, if you keep the old parts. Save the propane orifices, hose, and regulator in a labeled bag. Reversing the steps puts the grill back on propane. Some owners keep both setups for moves between homes.
A Short Final Word
Learning how to convert grill to natural gas is a weekend project with a long payoff. You trade tank runs for a steady line. You trade refill bills for a lower fuel cost. The work is simple if you follow the steps and test every joint. Use the right kit for your model. Keep the gas off while you work. Call a plumber for the line itself. Then enjoy a grill that is always ready, always fueled, and always hot when you are.
References
Big Green Egg. (n.d.). Kamado grills and outdoor cooking. https://www.biggreenegg.com Broil King. (n.d.). Gas and charcoal grills. https://www.broilkingbbq.com Char-Broil. (n.d.). Gas and charcoal grills. https://www.charbroil.com Consumer Reports. (n.d.). Product reviews and ratings. https://www.consumerreports.org Napoleon. (n.d.). Fireplaces, grills, and heating products. https://www.napoleon.com The Home Depot. (n.d.). Home improvement products. https://www.homedepot.com The Spruce Eats. (n.d.). Recipes and cooking guides. https://www.thespruceeats.com Traeger. (n.d.). Wood pellet grills. https://www.traeger.com Weber. (n.d.). Grills and outdoor cooking. https://www.weber.com
Was this guide helpful?

About Robert Taylor
The My Garden US editorial team writes practical, in-depth home and garden guides for American homeowners — tested advice, no fluff.
You May Also Like
Best Outdoor Ice Chest for Parties: How to Choose and Use One
March 6, 2026 0 views
Best Smoker Cover Waterproof Heavy Duty: A Buyer’s Guide
August 9, 2026 0 views
The Best Outdoor Pizza Oven Under 400 Dollars
January 10, 2026 0 views