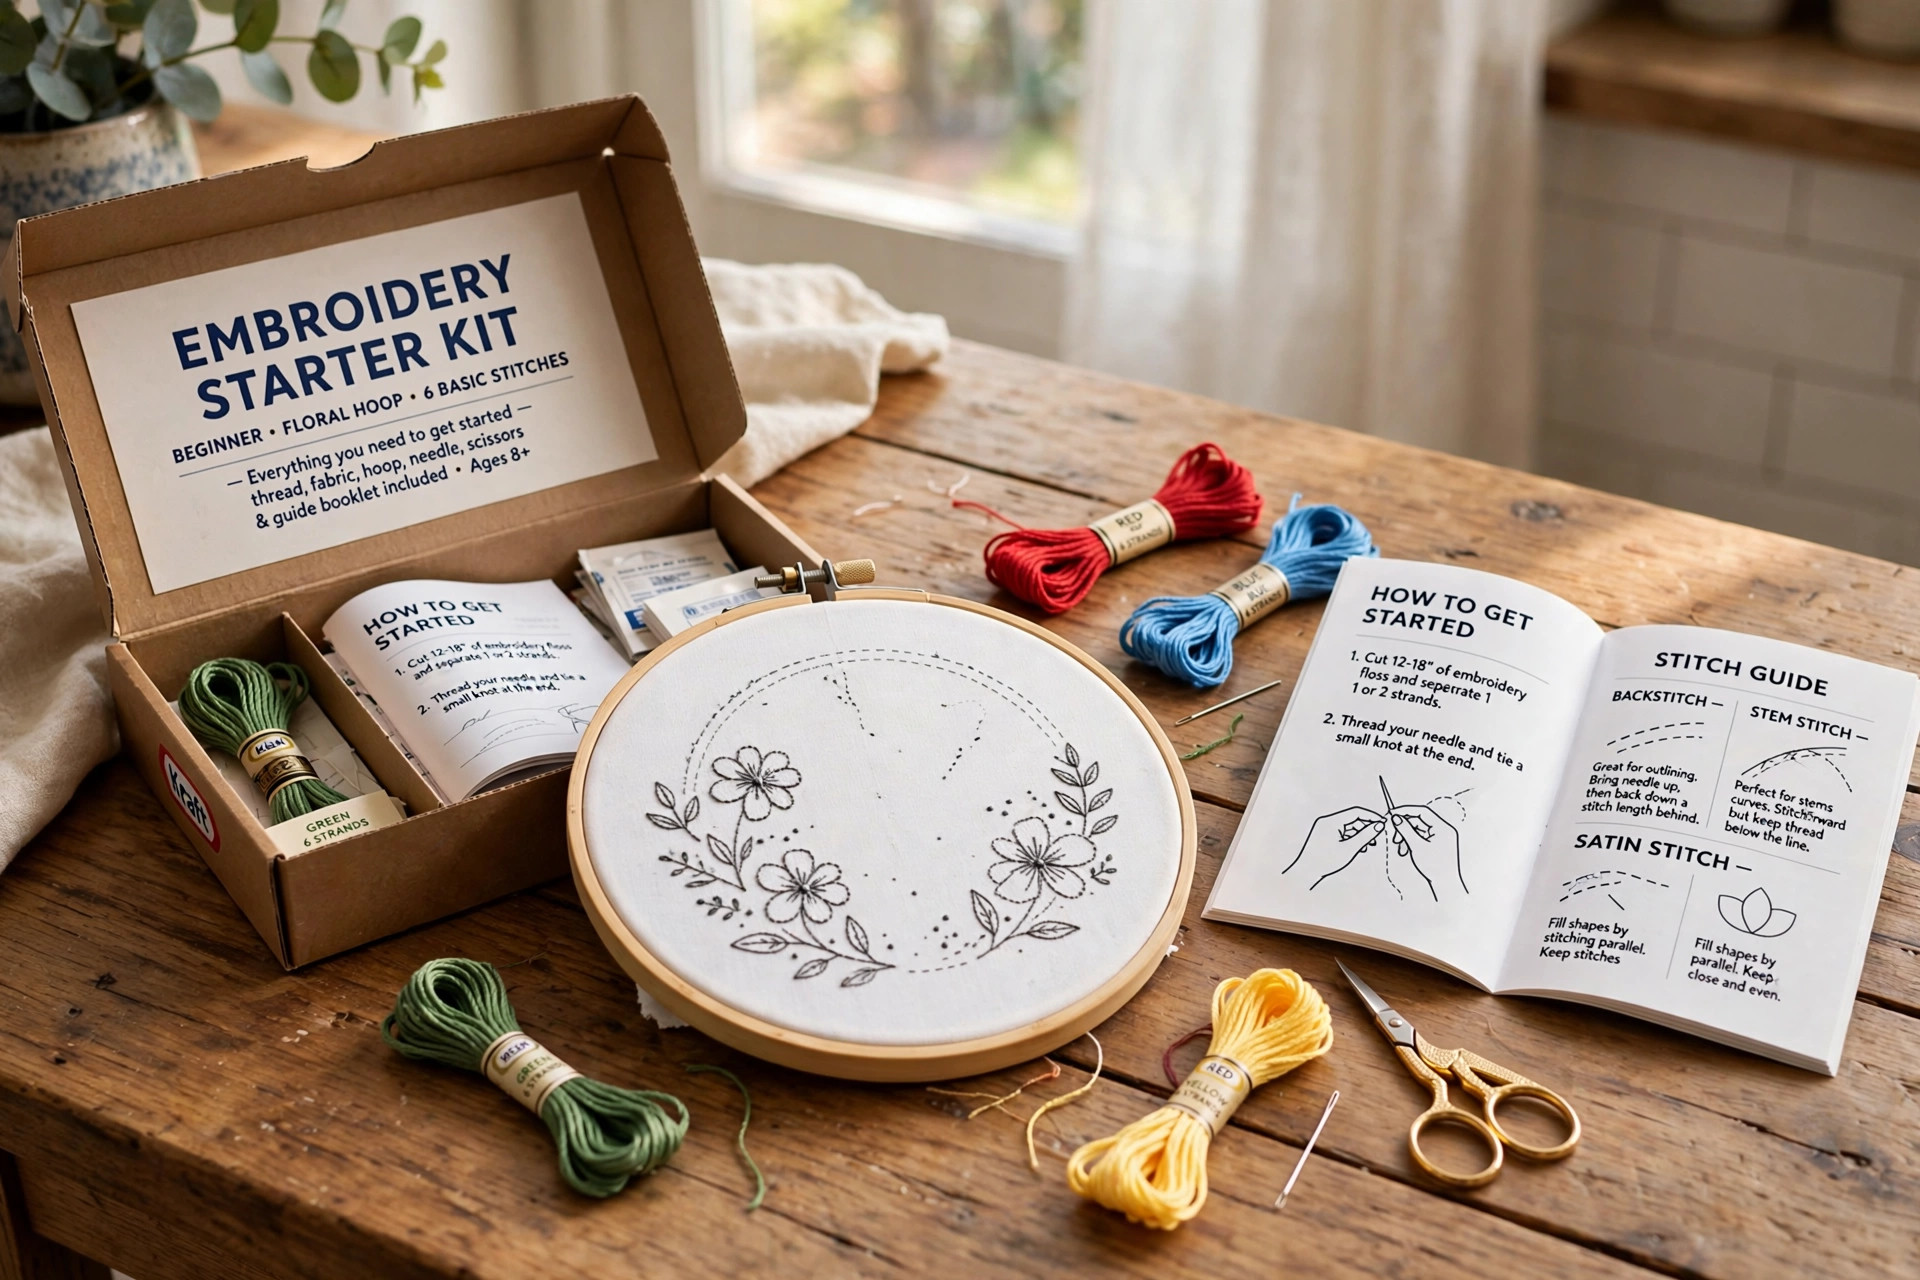

The best embroidery starter kit with hoop patterns is the simplest way to begin hand stitching. It puts the hoop, the fabric, the thread, the needle, and the printed design in one box. New stitchers do not have to guess what to buy or search three shops for supplies. They open the kit, set the hoop on the table, and make the first stitch within the hour. This guide explains what the kits contain, how to tell a good one from a poor one, what they cost, and how to care for the finished work.
Why a Starter Kit Matters
Hand embroidery looks easy from a distance. Up close, the first project raises a dozen small questions. What size hoop should hold the fabric? Which needle fits through tightly woven cloth? How much thread does one flower use? A starter kit answers those questions before they form. Every piece in the box was chosen to work with the other pieces.
For many households, the kit also serves as a gift. A niece who wants to learn a quiet craft receives a box with clear steps. A retiree who wants a calm evening hobby finds printed patterns that remove the fear of drawing. The best embroidery starter kit with hoop patterns takes the mystery out of the craft and leaves only the pleasure of making something by hand.
Kits also teach good habits. The hoop keeps the fabric taut, which teaches steady tension. The printed pattern teaches counting and spacing. The instruction sheet teaches the five or six basic stitches that appear in almost every hand-embroidered piece. Once a beginner masters these, any pattern in the world becomes readable.
What to Look For When You Choose: Best Embroidery Starter Kit with Hoop Patterns
A good kit earns its place on the shelf with four things: the hoop, the cloth, the thread, and the teaching.
The hoop. Most beginner kits include a wooden or bamboo hoop between four and six inches across. A good hoop has a brass screw that tightens smoothly. The wood should feel smooth, with no rough edges that can snag the cloth. Some kits include two hoops, which lets the maker work on two patterns at once. Before you buy, check that the hoop closes with a small gap between the rings. A hoop that closes flat will not grip the fabric well.
The cloth. Look for cotton or a cotton-linen blend with a weave you can see clearly. A weave that is too tight makes needlework hard on the eyes and the fingers. A weave that is too loose lets stitches slip. Many quality kits print the pattern directly on the fabric with ink that washes away. Others provide a paper transfer that irons onto plain cloth. Printed fabric is easier for a true beginner, since the design is already placed and centered.
The thread. The standard embroidery thread is six-strand cotton floss. A good kit supplies full skeins, not short cut lengths, in more colors than the pattern needs. That extra thread forgives mistakes and invites small creative changes. The colors should be labeled or keyed to the pattern chart so the stitcher knows which shade goes where.
The teaching. The instruction booklet matters more than anything else in the box. It should show each stitch with a clear drawing and a few lines of plain text. The best booklets name the stitches used on every part of the pattern. A kit without clear teaching will sit half-finished in a drawer. Many shoppers find it useful to compare teaching quality on the websites of large craft stores and fabric shops before they order.
Also check the needle. A beginner needle should be sharp enough to pass through the cloth but thick enough to hold comfortably. Kits that include a needle threader earn extra credit, since threading the needle is the most common early frustration.
Types of Starter Kits and Pattern Styles
Starter kits fall into several families, and each suits a different taste.
Floral and botanical kits are the most common. They print flowers, leaves, and simple stems on the cloth. These patterns teach the backstitch, the lazy daisy, and the French knot in a natural way. A finished floral hoop also makes a fine piece of wall art.
Sampler kits arrange many small motifs on one piece of cloth: hearts, stars, letters, borders. A sampler teaches many stitches in one project and gives a quick sense of progress, since each small motif finishes in a sitting.
Alphabet and monogram kits print letters and simple frames. These appeal to makers who want to stitch names, dates, or short words for gifts. A finished monogram hoop suits a nursery wall or a wedding gift table.
Seasonal kits follow the calendar: pumpkins for autumn, snowflakes for winter, bunnies for spring. These make good gifts and give beginners a reason to finish by a date on the calendar.
Counting kits include cross-stitch patterns on even-weave cloth. If the counted style appeals to you, a cross stitch kit for beginners adults patterns teaches the counted method step by step, which differs from the printed-pattern method in most embroidery kits.
Some kits also include frames or display hoops so the finished piece can hang on the wall right away. If you plan to frame your work, a best embroidery hoop set for wall art diy makes a strong companion purchase. And for those who later want to move from hand stitching to stitched designs made by machine, an embroidery machine for home business beginners guide explains the next step up.
Cost and Price: What You Should Expect to Pay
In the United States, a best embroidery starter kit with hoop patterns usually costs between fifteen and forty dollars. The price reflects the contents, not the brand name.
Kits under twenty dollars generally include one hoop, printed cloth, thread for the pattern, a needle, and a short instruction sheet. These are fine for a first try, though the thread colors may be few and the instructions brief.
Kits between twenty and thirty dollars often add a second hoop, extra thread colors, a needle threader, and a full-color booklet with stitch diagrams. Many also include a fabric tote or a small storage box for the supplies.
Kits above thirty dollars may include premium details: linen fabric instead of cotton, a finely finished wooden hoop, or a printed pattern by a known designer. These make fine gifts, and the materials feel noticeably nicer in the hand.
Watch for hidden value in the thread count. A kit with twelve full skeins at twenty-five dollars is a better deal than a kit with six cut lengths at twenty dollars. Also compare the hoop size. A six-inch hoop costs the maker of the kit a little more than a four-inch hoop, and the larger size is easier for beginners to hold.
Buy from sellers with clear return policies. A kit with missing thread or a cracked hoop should be easy to exchange. The craft supply aisles and home project centers of large retailers also carry these kits, and their return counters handle defective boxes without argument.
How to Use the Kit: A Simple First Session
Start in good light, with the table cleared and the pattern booklet open beside the hoop. Loosen the hoop screw, lay the cloth over the smaller ring, and press the larger ring down over it. Pull the cloth gently at the edges until it is smooth, then tighten the screw. The cloth should feel tight like the skin of a drum, with no wrinkles in the working area.
Cut a length of thread about eighteen inches long. Longer thread tangles and wears thin as it passes through the cloth. Separate the strands if the pattern calls for fewer than six, and thread the needle. Tie a small knot at the end, or leave the tail to be caught under the first few stitches.
Follow the booklet one stitch at a time. Make the outline stitches first, then fill the shapes. Keep the tension even: not so tight that the cloth puckers, not so loose that the thread loops. If a stitch goes wrong, pull it out gently and try again. Thread is forgiving, and the cloth forgives small holes.
Finish the session by loosening the hoop screw and storing the hoop flat. Do not leave the cloth stretched in the hoop for weeks, since long pressure can crease the fabric.
Helpful technique articles from home improvement guides and craft how-to sites often include stitching basics alongside their project ideas. For stitch diagrams drawn by long-time teachers, the needlework library and the Purl Soho studio publish clear free tutorials, and Craftsy classes offer video lessons for visual learners.
Care and Upkeep of Your Supplies and Finished Work
A little care keeps both the supplies and the finished hoops looking good for years.
Thread storage. Keep floss skeins in a dry drawer, away from sunlight. Sunlight fades the colors on the outer layers of the skein. Many stitchers wind thread onto small cards or bobbins and store the cards in a plastic box with dividers. Label each card with the color number if the kit provides one.
Hoop care. Wooden hoops last for years if kept dry. Wipe them with a dry cloth. If the screw rusts, a small drop of household oil keeps it turning. Sanding blocks and fine paper from project guides show how to smooth a rough wooden edge, should your hoop ever develop a snag.
Washing finished work. If the kit used water-soluble ink for the pattern, soak the finished piece in cool water until the lines disappear, then lay it flat to dry. Use a mild soap and no bleach. Press from the back with a warm iron, with a towel under the stitched side so the stitches do not flatten.
Display. Finished hoops can hang on the wall for years, but direct sun will fade the thread. Choose a spot with indirect light. Dust the cloth lightly with a soft brush once or twice a year.
Framing alternatives. Some makers stretch finished cloth over canvas frames or mount it in shadow boxes. Any method that keeps the cloth flat and out of sunlight will serve.
Safety Notes for the Whole Household
Embroidery is a gentle craft, but a few simple rules keep it safe.
Needles are sharp and small. Keep the kit box closed when children or pets are nearby, and count the needles at the start and end of each session. A magnetic needle holder, sold at most craft counters, keeps needles in one place on the table.
Cut thread ends with small scissors and drop the scraps in a trash bowl, not on the floor. Thread scraps can tangle around pet paws and small fingers.
Take breaks. Stitching for long stretches without rest strains the eyes and the neck. Work in good light, sit upright, and look away from the cloth every twenty minutes. Readers and magnifying lamps help stitchers who find small stitches hard to see.
Store hoops and frames on shelves rather than on the floor where they can be stepped on. A cracked hoop can leave a sharp wooden edge.
Frequently Asked Questions
How long does it take to finish a beginner kit? Most printed-pattern kits take eight to fifteen hours of stitching. A beginner who stitches one hour each evening will usually finish within two weeks. Samplers with many small motifs can take longer because they teach more stitches.
Is hand embroidery hard for someone with no craft experience? The basic stitches are simple, and the pattern does the drawing for you. Most people make neat stitches within the first hour. The printed pattern and the instruction booklet carry the beginner through the early stages. Patience matters more than talent.
What is the difference between embroidery and cross-stitch? In printed-pattern embroidery, the design is already on the cloth, and the stitcher follows the lines with free stitches. In cross-stitch, the cloth is blank even-weave, and the stitcher counts threads to place each small X from a chart. Both crafts use similar thread and needles, but the skills differ. Many stitchers enjoy both.
Can children use an embroidery starter kit? Older children, around age eight and up, can stitch with adult help. Choose a kit with a large simple pattern and thick cloth. Keep needles supervised, and let the child use a needle threader. Short sessions of twenty minutes work best.
How do I fix a mistake? Pull the needle back through the wrong stitch and ease the thread out. If the thread knots, stop pulling, work the knot loose with the needle tip, and start that section fresh. Small mistakes often disappear once the surrounding stitches are in place.
Will the pattern ink wash out? Most beginner kits use water-soluble or heat-disappearing ink. Water-soluble ink washes out in cool water. Heat-disappearing ink fades with a warm iron. Check the kit instructions before you wash, since hot water can set some inks instead of removing them. When in doubt, test on a corner of the cloth.
A Short Final Word
The best embroidery starter kit with hoop patterns is not the most expensive box on the shelf. It is the box that opens, teaches, and finishes. Look for a smooth hoop, clear cloth, full thread skeins, and a booklet that explains each stitch in plain words. Spend an evening or two with the hoop in your hands, and you will know whether the craft suits you. Most people find that it does. The stitches are old and simple, the work is quiet, and the finished hoop on the wall is proof that your hands made something worth keeping.
References
Blick Art Materials. (n.d.). Art and craft supplies. https://www.dickblick.com Bob Vila. (n.d.). Home improvement advice. https://www.bobvila.com Corbet, M. (n.d.). Needle ‘n Thread: Hand embroidery lessons. https://www.marycorbet.com Craftsy. (n.d.). Craft classes and supplies. https://www.craftsy.com Family Handyman. (n.d.). DIY home repair and maintenance. https://www.familyhandyman.com JOANN. (n.d.). Fabric and craft supplies. https://www.joann.com Michaels. (n.d.). Arts and crafts supplies. https://www.michaels.com Purl Soho. (n.d.). Craft studio and tutorials. https://www.purlsoho.com The Home Depot. (n.d.). Home improvement products. https://www.homedepot.com This Old House. (n.d.). Home renovation guidance. https://www.thisoldhouse.com
Was this guide helpful?

About Michael Thompson
The My Garden US editorial team writes practical, in-depth home and garden guides for American homeowners — tested advice, no fluff.
You May Also Like
Best Craft Apron With Pockets for Adults: A Complete Buying Guide
January 29, 2026 0 views
The Best Craft Paper Trimmer for Precise Cuts
May 31, 2026 0 views
Best Craft Light for Sewing and Detailed Work
August 20, 2026 0 views