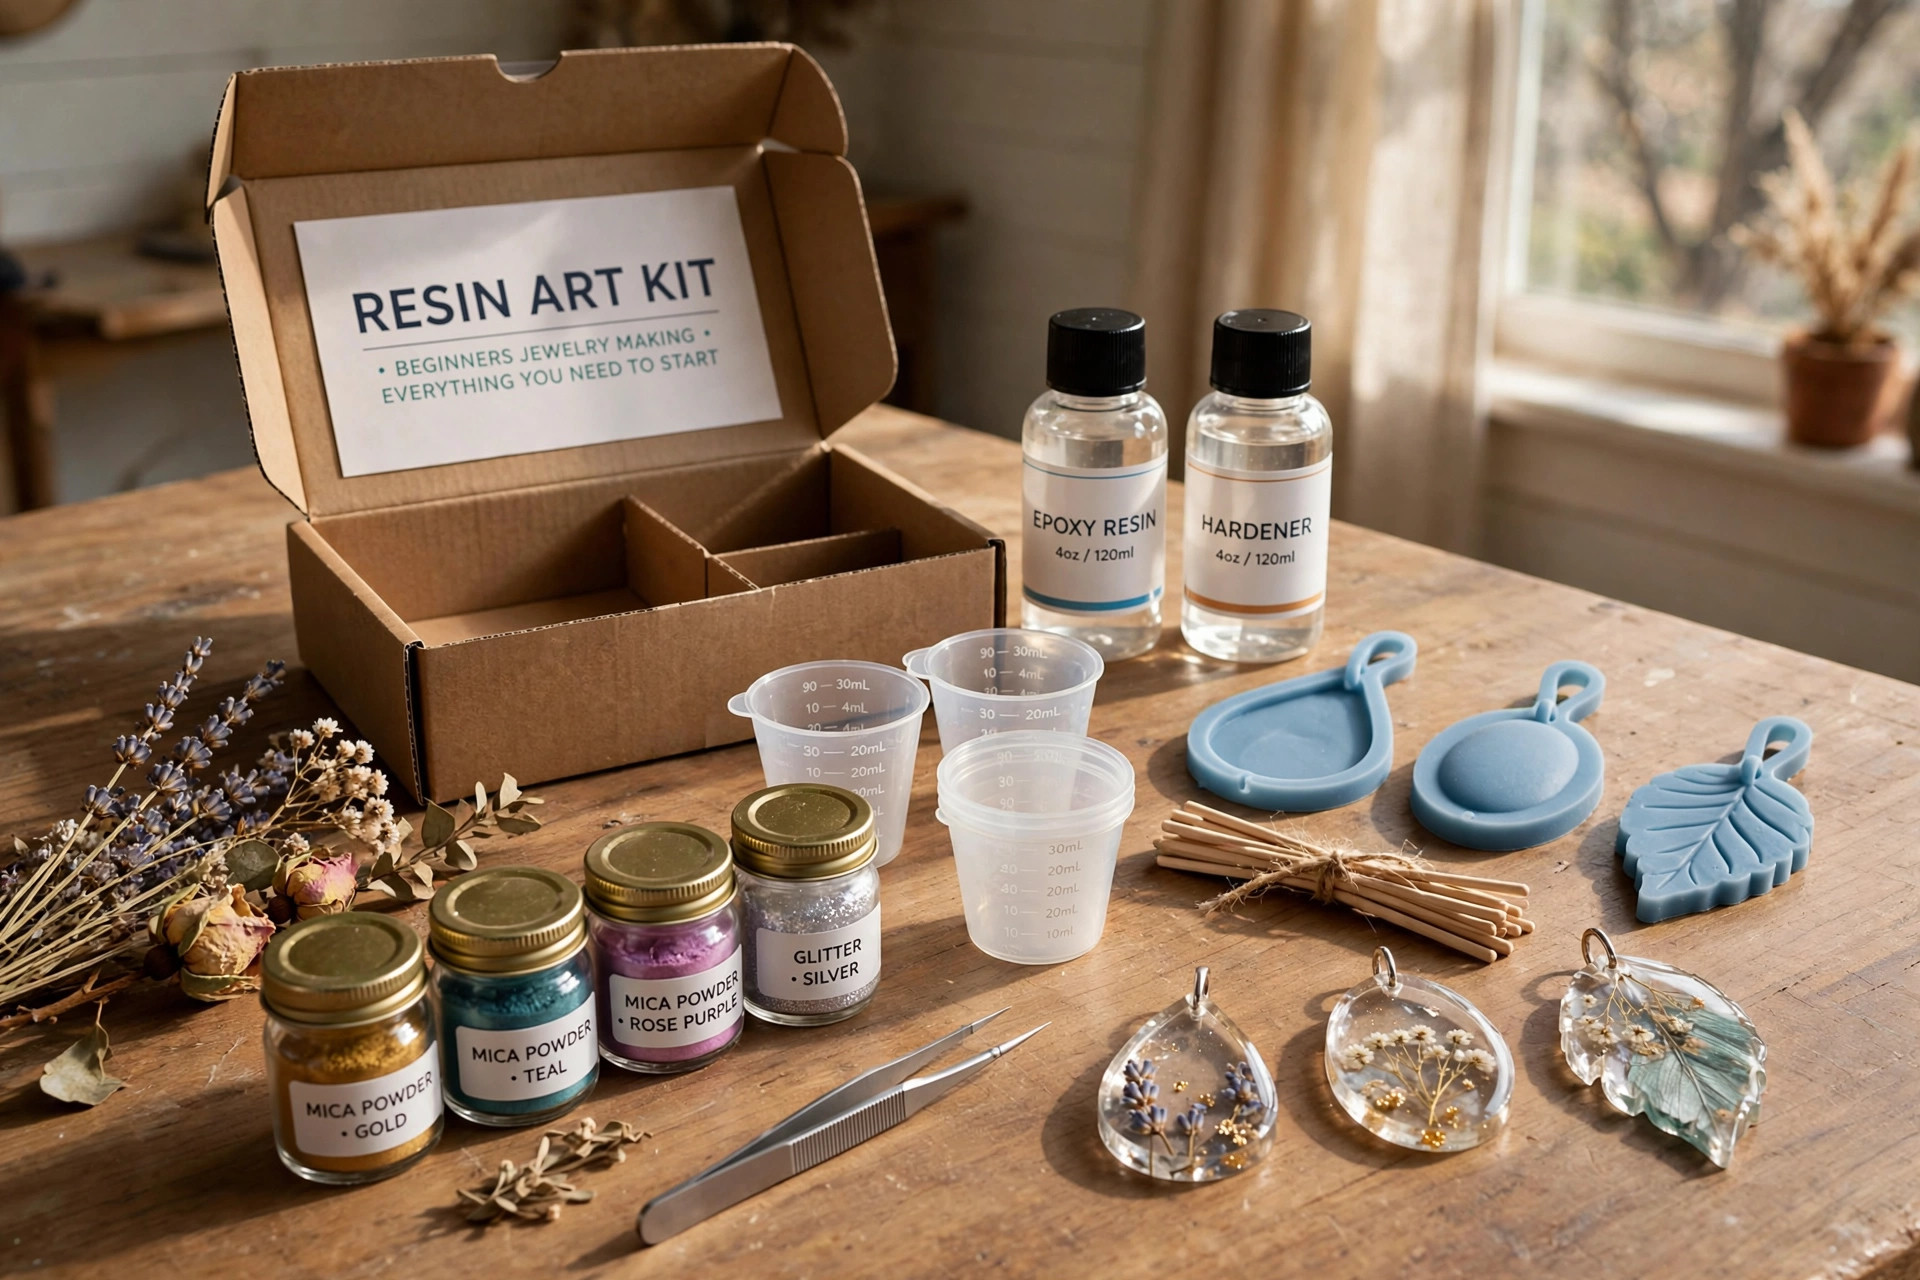

A resin art kit for beginners jewelry making is one of the simplest ways to step into the world of handmade jewelry. Inside the box you will find small bottles of clear liquid resin, a hardener, mixing cups, stirring sticks, silicone molds, and often a few colors or glitter to start with. You pour, you wait, and a day later you hold a pendant that looks like glass. It feels a little like magic the first time, and it is no wonder this craft has filled living rooms and craft tables across the country.
This guide walks through what such a kit includes, how to pick a good one, what it costs, how to stay safe, and how to care for your finished pieces. If you have never worked with resin before, this is the place to start.
Why a Resin Art Kit for Beginners Jewelry Making Matters
Jewelry made with resin has a clean, polished look that once belonged only to professional shops. A beginner kit puts that same finish within reach of anyone with a steady hand and a free afternoon. You do not need a studio, a kiln, or years of training. A flat table and some newspaper are enough.
There are other good reasons to try it. Resin jewelry makes a thoughtful gift because each piece is one of a kind. It can also grow into a small home business. Many crafters sell pendants, earrings, and keychains at local fairs and online shops. Starting with a kit keeps the first steps cheap and simple while you learn whether you enjoy the work.
Perhaps best of all, resin is forgiving. A mistake is rarely a disaster. Most errors can be sanded, trimmed, or simply poured again. That low pressure makes it a fine craft for people who are trying art for the first time. You can learn more about setting up a small craft corner in guides from craft retailers like Michaels and JOANN, which both carry wide selections of beginner supplies.
What to Look for in a Beginner Kit: Resin Art Kit for Beginners Jewelry Making
Not all kits are equal. A good resin art kit for beginners jewelry making should include everything you need for your first few pours, so read the box before you buy. Here are the items that matter most.
Resin and Hardener
The heart of the kit is the resin itself. Most beginner kits use a two-part epoxy resin. You mix part A (the resin) with part B (the hardener) in a set ratio, often one to one. Some kits use UV resin instead, which hardens under a UV lamp in minutes. Epoxy is better for learning because it gives you plenty of working time. Check the labels on supply sites such as Dick Blick to compare resin types and cure times.
Molds
Silicone molds shape your pieces. Beginner kits usually include molds for pendants, cabochons, and sometimes earrings or rings. Silicone is best because cured resin pops out easily. Look for molds with smooth inner walls. Rough molds leave rough pieces, and you will spend extra time sanding.
Mixing and Measuring Tools
Accurate mixing is the difference between a clear pendant and a sticky one. Your kit should include graduated mixing cups, wooden or silicone stirring sticks, and pipettes or syringes for careful pouring. If a kit skips these tools, plan to buy them separately from a hardware or craft store.
Colorants and Add-ons
Pigments, mica powders, alcohol inks, and glitter turn clear resin into something special. A starter kit often includes a small set. You do not need many colors at first. Three or four shades are plenty while you learn how they behave in the resin. Extra inspiration for color work can be found in craft project ideas from Bob Vila and the Family Handyman.
Safety Gear
Gloves and sometimes a respirator mask should be in the box. If they are missing, buy them before you open the resin. Safety gear is not optional with this craft, as the safety section below explains.
Types and Options
Beginner kits come in a few common forms. Knowing the differences helps you pick the right one.
Epoxy resin starter kits are the classic choice. They include two-part epoxy, molds, and basic tools. Cure time is usually 24 to 72 hours. These kits teach real technique and suit anyone patient enough to wait a day for results.
UV resin starter kits cure in minutes under a UV or LED lamp. They are fun for small pieces and quick gifts, but the resin costs more per ounce, and thick pours can cure unevenly. They suit crafters who want fast results.
All-in-one deluxe kits add extras such as dried flowers, gold foil, tweezers, a drill for adding holes, and jewelry findings like chains and earring hooks. These cost more, but they remove the need for a second shopping trip. For a sense of what a full craft supply aisle looks like, browse the craft departments at The Home Depot or Walmart.
Refill and upgrade kits skip the tools and sell only resin and colorants. They are meant for people who already own molds and cups. Do not buy these as your first kit.
If you enjoy other hands-on crafts, you may also like wood slice ornaments for Christmas crafts DIY, which uses simple tools and natural materials, or best chalk markers for windows and signs for easy decorative projects.
How to Use Your Kit: First Pendant Step by Step
1. Set up your space. Cover the table with plastic or newspaper. Work in a room with fresh air moving through it. Keep paper towels nearby. 2. Put on gloves. Wear nitrile gloves before you touch any bottle. Tie back long hair. 3. Measure carefully. Pour equal parts of resin and hardener into a graduated cup, following the ratio on the box exactly. 4. Stir slowly. Mix for the time the instructions give, usually three to five minutes. Scrape the sides and bottom of the cup. Stir slowly to keep bubbles out. 5. Add color. Stir in a drop of pigment or a pinch of mica powder. Less is more on your first try. 6. Pour into the mold. Pour a thin stream close to the mold to avoid trapping air. Fill each cavity about three quarters full. 7. Pop the bubbles. Warm the surface gently with a heat gun on low, or pass a lighter flame quickly over the top. Watch a tutorial from a trusted crafter before trying this. 8. Wait. Cover the mold with a box to keep dust out and let it cure for the full time on the label. Do not touch it early. 9. Demold and finish. Push the piece out of the silicone mold. Sand any rough edge with fine sandpaper, then attach a bail or chain.
Your first pendant will not be perfect, and that is fine. The second one will be better, and the fifth will surprise you.
Cost and Price
A beginner resin jewelry kit in the United States usually costs between 20 and 60 dollars. Simple epoxy starter kits sit at the low end of that range. Deluxe kits with dried flowers, foil, drills, and findings cost more. UV resin kits often cost 30 to 70 dollars because the resin and lamp add to the price.
Beyond the kit, expect a few small extra costs. Nitrile gloves, extra mixing cups, and sandpaper are cheap but run out fast. A respirator mask costs 20 to 35 dollars and is worth every cent. A heat gun or small torch for bubbles costs 15 to 30 dollars.
Compared with many crafts, resin jewelry is kind to the wallet. Each pendant uses only a few cents of resin. Once you own the tools, the cost per piece drops sharply, which is good news if you plan to sell your work. Price comparisons and seasonal sales at large retailers such as Amazon can help you find a kit that fits your budget.
Care and Upkeep of Your Finished Jewelry
Resin jewelry is strong, but it is not unbreakable. A few habits will keep your pieces clear and bright for years.
Keep finished pieces out of long, direct sunlight. Ultraviolet light can yellow epoxy resin over time. Store pendants and earrings in a box or pouch rather than on a sunny windowsill. Clean pieces with a soft, damp cloth. Harsh cleaners and alcohol can dull the surface. Take resin jewelry off before swimming, showering, or heavy exercise, since chlorine, soap, and sweat can wear the finish.
If a piece loses its shine, a light polish with a plastic polish or a very fine sanding followed by a clear topcoat can bring it back. Small scratches are normal with wear and do not mean the piece is ruined. Treat your handmade jewelry the way you would treat a good watch, and it will last.
Safety
Resin is safe to craft with only when you respect it. Uncured epoxy resin can irritate skin and lungs, and some people develop an allergy after repeated bare-handed contact. Always wear nitrile gloves. Work in a ventilated room or near an open window, and wear a respirator mask rated for organic vapors if you pour often or in large amounts. General guidance on working safely with chemicals at home is available from the EPA.
Keep resin away from children and pets. Store bottles upright in a cool, dark cabinet, out of reach. Never pour leftover resin down the drain. Let small amounts cure in the cup and throw the solid in the trash. Clean spills with paper towels while wet, then wash the area with soap and water.
UV resin needs its own caution. The UV lamp can harm eyes and skin, so never look directly at the light and cure pieces under a cover when you can. Read every label on your kit before you begin. The instructions are there to protect you, and they take only a few minutes to read.
Home project safety is a wide subject, and sites like This Old House offer steady, practical advice on keeping a home workshop safe.
Frequently Asked Questions
How long does it take for resin jewelry to harden?
Most two-part epoxy resins need 24 to 72 hours to cure fully, depending on the brand and the thickness of the pour. Thin pendants cure faster than thick paperweights. UV resin hardens in two to five minutes under a proper lamp. Always follow the cure time on your kit label, and wait the full time before wearing or selling a piece.
Why is my resin sticky after the cure time?
Stickiness almost always comes from wrong measuring or poor mixing. Even a small error in the resin-to-hardener ratio can stop a full cure. Stir for the full time the instructions give, scrape the cup walls, and measure with graduated cups. Cold rooms can also slow curing, so work in a space above 70 degrees Fahrenheit when you can.
How do I avoid bubbles in my pendants?
Stir slowly, pour in a thin stream, and warm the resin slightly before mixing if the room is cool. After pouring, pop surface bubbles with a quick pass of a heat gun or lighter flame. For stubborn bubbles, let the mixed resin rest for five minutes before pouring so trapped air can rise.
Is resin jewelry safe to wear on skin?
Fully cured epoxy resin is generally considered safe for skin contact in jewelry use. Let every piece cure for the full recommended time. If you have very sensitive skin, test a small piece on your wrist first. Stop wearing a piece if it causes any irritation.
What is the difference between epoxy resin and UV resin?
Epoxy resin mixes in two parts and cures over one to three days. It is cheaper per ounce and good for larger pours. UV resin is one part, cures in minutes under a UV lamp, and suits small, thin pieces. Beginners often learn on epoxy first because it is cheaper to practice with.
Can I sell jewelry made from a beginner kit?
Yes. Many small sellers start exactly this way. Once your pieces cure cleanly and consistently, you can sell them at craft fairs, local shops, or online. Check your local rules for small business sales tax, and always label your work honestly as handmade resin jewelry.
A Short Final Word
A resin art kit for beginners jewelry making asks for little and gives back a great deal. For the price of a dinner out, you get a craft that teaches patience, rewards care, and ends with something beautiful you can wear or give away. Start simple, follow the safety steps, and let your first imperfect pendant be the start of something larger. If you enjoy detailed hand work, you might also explore best iron for quilting and sewing crafts for another rewarding hobby.
References
Amazon. (n.d.). Online shopping. https://www.amazon.com Blick Art Materials. (n.d.). Art and craft supplies. https://www.dickblick.com Bob Vila. (n.d.). Home improvement advice. https://www.bobvila.com Family Handyman. (n.d.). DIY home repair and maintenance. https://www.familyhandyman.com JOANN. (n.d.). Fabric and craft supplies. https://www.joann.com Michaels. (n.d.). Arts and crafts supplies. https://www.michaels.com The Home Depot. (n.d.). Home improvement products. https://www.homedepot.com This Old House. (n.d.). Home renovation guidance. https://www.thisoldhouse.com U.S. Environmental Protection Agency. (n.d.). Protecting human health and the environment. https://www.epa.gov Walmart. (n.d.). Everyday low prices. https://www.walmart.com
Was this guide helpful?

About Sarah Mitchell
The My Garden US editorial team writes practical, in-depth home and garden guides for American homeowners — tested advice, no fluff.
You May Also Like
Cross Stitch Fabric Aida Cloth for Beginners: A Plain Guide to Choosing Well
July 18, 2026 0 views
The Best Craft Paper Pack for Scrapbooking in the USA
August 23, 2026 0 views
Best Jewelry Wire for Wrapping and Beading: A Complete Guide
March 22, 2026 0 views