This garbage disposal installation american homes guide walks through the full job, from the first shopping trip to the first test run. A garbage disposal is the small machine that sits under a kitchen sink and grinds up food scraps so they wash down the drain. It is one of the most useful small appliances in an American kitchen. It cuts down on trash, keeps the kitchen cleaner, and helps plates clear faster.
Many people pay a plumber for this job. Others try it with no plan and end up with leaks under the sink. The truth sits in between. Installing a disposal is a real plumbing job, but it is not beyond a careful homeowner. With the right unit and a few common tools, most people finish in two to three hours.
This guide covers why a disposal matters, what to look for when you buy one, how to put it in, what it costs, how to care for it, and how to stay safe. Read it once before you start.
Why a Disposal Is Worth the Trouble
The kitchen sink handles more abuse than any other spot in the house. Plates come in with scraps, peels, coffee grounds, and grease. Without a disposal, all of that goes into the trash can, where it rots and smells. With a disposal, soft scraps go down the drain with cold water, and the trash stays dry and light.
A disposal also saves the pipes. A working disposal with good water flow sends food out of the house faster than scraps draining slowly into a trap. Less food sitting in the pipes means fewer clogs.
There are limits. A disposal is not a trash can. It handles soft scraps, vegetable peels, fruit rinds, small bones from fish and chicken, and coffee grounds. It does not handle glass, metal, plastic, large bones, grease, or fibrous foods like celery and artichokes. Learn those limits and the machine will serve you for many years.
What to Know Before You Buy: Garbage Disposal Installation American Homes Guide
Buying the right unit is half the job. These three points shape the choice.
Power and Size
Disposals run from one third to one horsepower. A one third horsepower unit suits a small household that cooks little, but it jams more often. A half horsepower unit is the common middle ground for a family kitchen. A three quarter horsepower unit handles daily cooking with ease. A full one horsepower unit is for serious cooks, but it costs more and takes more space under the sink.
Feed Type
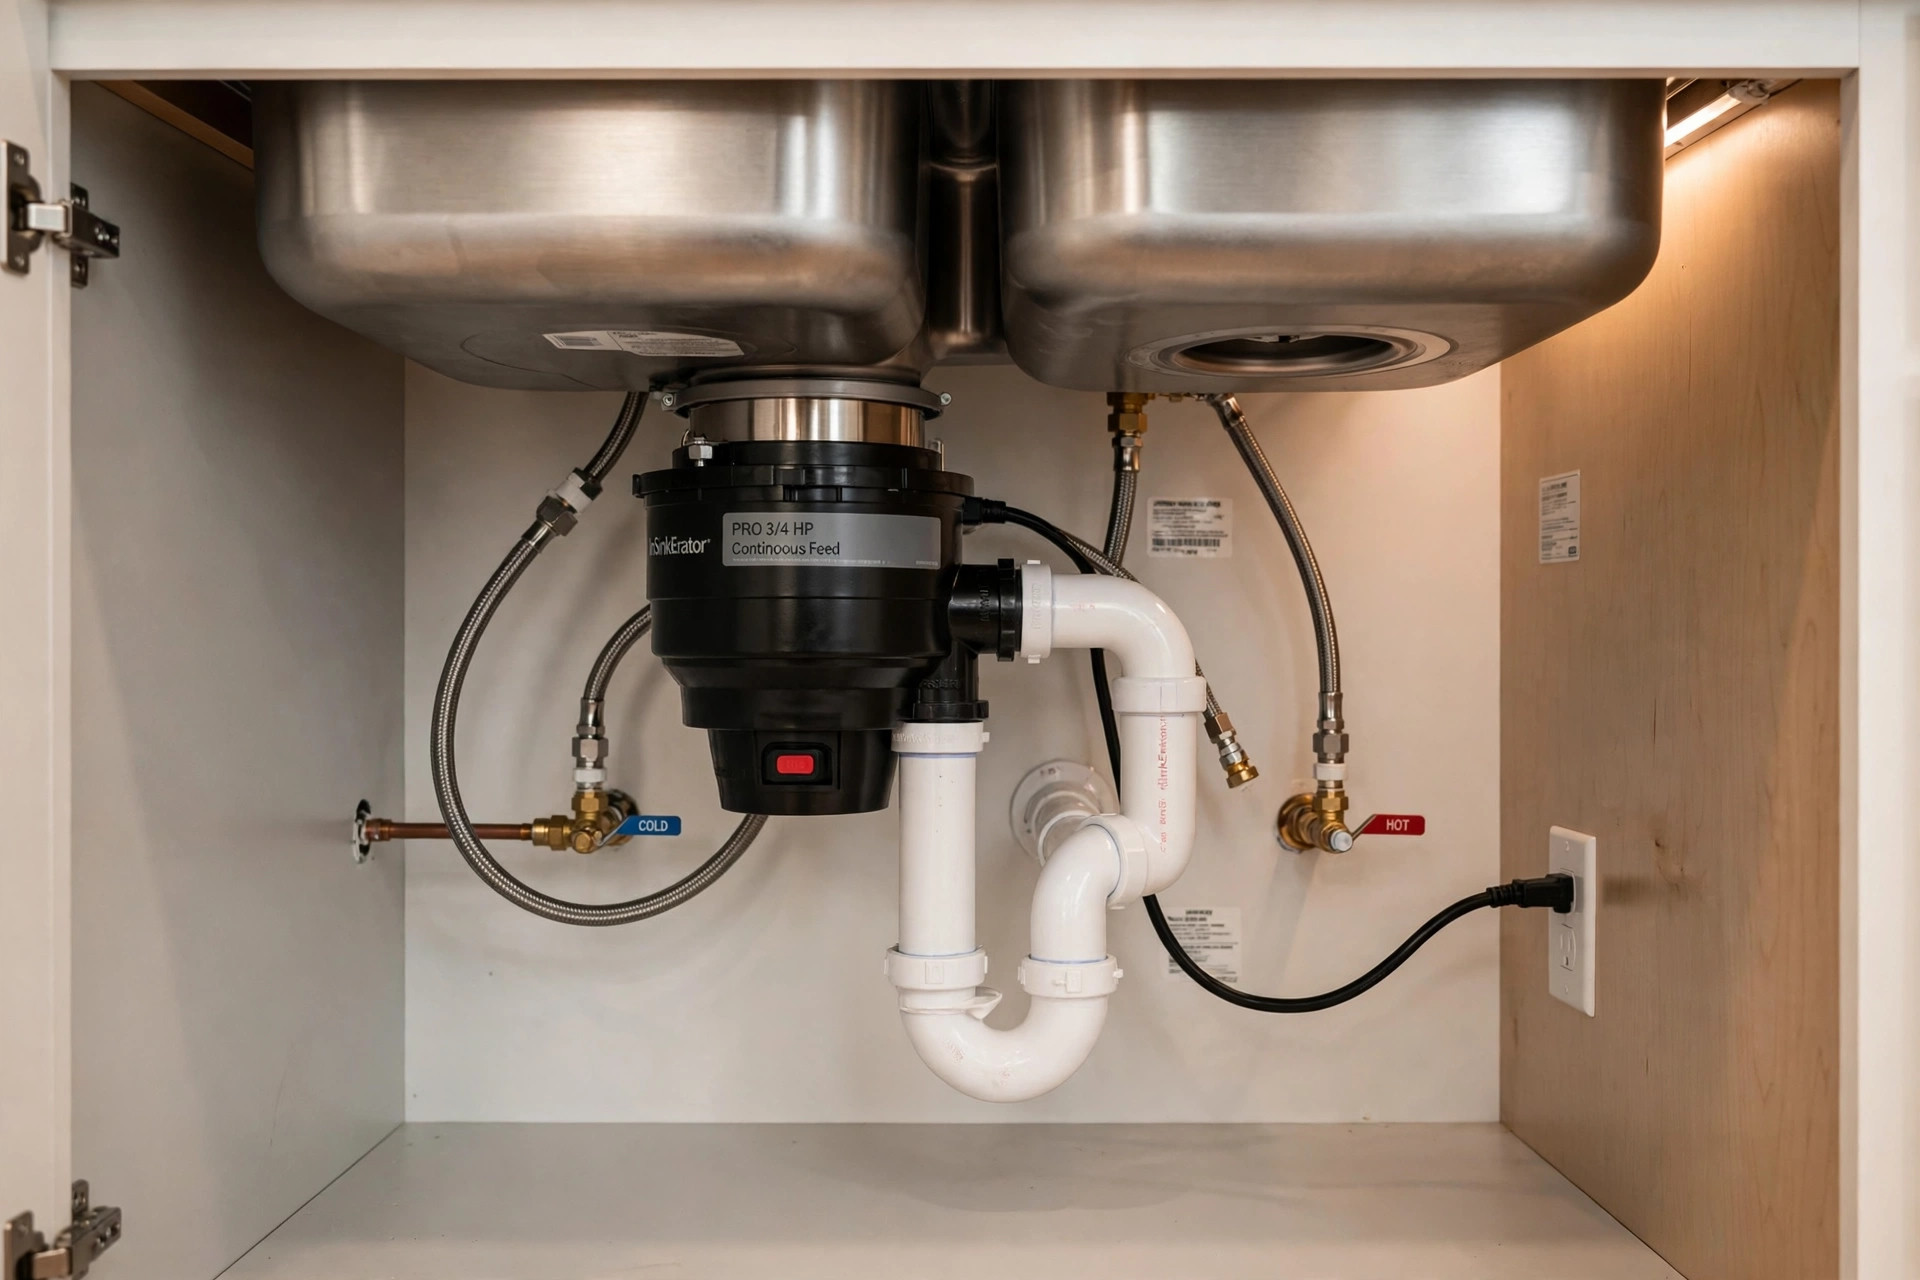
Continuous feed disposals are the standard in American homes. You flip a wall switch and feed scraps in while cold water runs. Batch feed disposals only run when you place a stopper lid on the drain. They are safer around small children, but slower and more costly. Most buyers choose continuous feed.
Septic Systems
If your home runs on a septic tank, read the septic rules before you buy. Some local codes limit disposals because extra food waste adds load to the tank. Check first and save yourself a headache.
How to Choose the Right Unit
Walk into a store or browse a big retailer site like the ones run by Home Depot and Lowe’s, and you will see many brands. The big appliance makers, including Whirlpool, GE Appliances, and Bosch, all sell disposals. Here is how to narrow the field.
First, match the unit to the sink. Most disposals fit a standard three and a half inch sink drain opening. If you have an undermount stainless steel sink, the fit is the same, but check the depth of the sink bowl. Deep farmhouse sinks and shallow units can clash, so measure from the drain flange to the cabinet floor before you buy.
Second, think about noise. Cheap units roar. Better units have sound shields and insulated housings. If your kitchen opens to the living room, paying more for a quiet unit is money well spent. Review sites like Consumer Reports and the how-to site Bob Vila often compare noise between models.
Third, look at the warranty. Good units carry warranties of five to eight years. The warranty length is a quiet signal of build quality. A company that trusts its motor gives you more years.
Fourth, check the electrical setup. Most disposals plug into a standard outlet under the sink, and many kitchens already have a switched outlet there. Make sure the unit you buy matches the wiring you have, or be ready to add a power cord kit.
Fifth, consider the dishwasher link. Most disposals have a port on the side where the dishwasher drains. The knockout plug inside a new disposal must be removed before the dishwasher hose connects. This is a small step that many first time installers forget.
Home project guides like those on This Old House and The Spruce walk through these choices with photos.
Tools and Parts You Will Need
Gather everything before you crawl under the sink. You will need a bucket, a pipe wrench or large pliers, a screwdriver set, plumber’s putty, Teflon tape, a wire stripper, and a flashlight. Keep old towels nearby because water always spills during plumbing work.
The disposal kit usually includes the unit, a mounting assembly with a sink flange, a splash guard, a discharge tube, and wire nuts. Buy plumber’s putty and Teflon tape separately if the kit does not include them. If you are replacing an old unit, the existing mounting hardware may still be in good shape, but many installers prefer to start fresh with the new parts.
Installing the Disposal Step by Step
Work slowly and keep the power off until the very end. These steps follow the standard method used in American homes.
First, turn off the power at the breaker. Do not trust the wall switch alone. Tape a note on the box so nobody flips it back while you work. Put the bucket under the sink and disconnect the old drain pipes and old disposal if one is present.
Second, remove the old sink flange if you are replacing a unit. Scrape away the old putty with a plastic scraper and clean the rim until it is smooth. Roll a rope of fresh plumber’s putty about the thickness of a pencil and press it around the underside of the new flange. Set the flange into the drain hole from above and press it down firm.
Third, mount the support ring from below. Slide the fiber gasket, backup ring, and mounting ring up onto the flange in order, then tighten the three screws evenly, a little at a time, going around in a circle. Even pressure keeps the flange seated flat. Wipe away the putty that squeezes out above the sink.
Fourth, wire the disposal before you hang it. Remove the cover plate on the bottom of the unit and feed the power cord or house wires through the clamp. Connect white to white and black to black with wire nuts, and connect the ground wire to the green ground screw. Then replace the cover plate.
Fifth, hang the unit on the mounting ring. Lift the disposal and twist it onto the assembly until it locks, then tighten the ring to hold it firm. Rest the unit on a stack of books if your arms tire.
Sixth, connect the drain. Attach the discharge tube to the side of the disposal with the gasket and screws. Line it up with the drain trap and tighten the slip nuts by hand, then a quarter turn with pliers. Connect the dishwasher hose to the side port after knocking out the plug inside the port, and clamp the hose tight.
Seventh, check the splash guard. It sits in the top of the drain opening inside the sink. Press it into place so it seals all the way around. A loose splash guard lets water and scraps bounce back up.
Eighth, restore the power and test. Flip the breaker on. Run cold water into the sink, flip the wall switch, and listen. The unit should hum smoothly with no rattling. Feed a few soft scraps and watch under the sink for drips. If you find a leak, tighten that joint a bit more and test again.
The whole job takes most people two to three hours. Guides on appliance basics from ENERGY STAR remind homeowners that proper installation keeps appliances running at their best, and a disposal is no exception.
What It Costs
A decent disposal costs between seventy five and two hundred fifty dollars. Basic units sit at the low end. Quiet three quarter horsepower units with long warranties sit at the high end. Putty, tape, and small parts add ten to twenty dollars.
If you hire a plumber, labor adds one hundred fifty to three hundred dollars in most American markets. Doing it yourself saves the labor cost, and the savings buy a much better unit. Many homeowners find the saved money pays for the upgrade from a noisy basic model to a quiet mid range one.
Running costs are tiny. A disposal uses a few cents of electricity per month in a normal home. Compared to the trash bags and deodorizers you no longer buy, the disposal pays for itself in convenience within the first year.
Care and Upkeep
A disposal needs little care. Always run cold water before, during, and after grinding. Cold water keeps fats solid so they wash away instead of coating the pipes. Feed scraps slowly instead of dumping a full plate at once. Keep the machine running for thirty seconds after the grinding sound stops to flush the line clean.
Once a week, grind a handful of ice cubes with cold water running. The ice scours the grinding plate. For odor, cut a lemon into wedges and grind them with cold water. The oils freshen the rubber splash guard where most smells live.
Never pour grease down the disposal. Grease is the number one cause of kitchen drain clogs in American homes. Pour used cooking oil into an old can and throw it in the trash. Also keep fibrous foods out: celery stalks, onion skins, corn husks, and artichoke leaves wrap around the grinding parts and stall the motor.
If the unit hums but does not spin, it is jammed. Turn off the switch and press the red reset button on the bottom of the unit. Many jams clear with the reset alone. If the motor is still stuck, most units have a hex hole underneath where an Allen wrench can turn the grinding plate by hand. Always make sure the power is off before you reach under the unit.
Safety Rules
A disposal has sharp grinding parts and a strong motor. Never put your hand into the drain opening, even when the unit is off. Use tongs or pliers to pull out anything that fell in by accident. Hands never go down the drain.
Keep the wall switch in a spot where you must stand back from the sink to reach it. Teach children that the switch is not a toy. If you have a batch feed unit, the stopper design adds a layer of protection, but the same habits still apply.
Water and electricity meet under the sink, so keep all wiring dry and tight. If you see water dripping onto the outlet or the cord, stop using the disposal and fix the leak before anything else. A small drip becomes a big problem when it meets household current.
Common Questions
How long does a garbage disposal last? Most units last eight to twelve years with normal use. Cheap units may fail sooner. A unit that jams often, leaks from the bottom seal, or needs the reset button every week is telling you its time is up.
Can I install a disposal if I have a double sink? Yes. The disposal mounts under one bowl, usually the one closer to the dishwasher. The other bowl drains normally into the same trap. The plumbing takes a little more planning, but the method is the same.
Do I need an electrician? Not usually. If your sink already has a switched outlet, the wiring job is simple. If there is no outlet under the sink, one must be added, and that is a job for an electrician or a homeowner comfortable with local code.
Will a disposal work with a septic tank? It can, but check your local rules first. Septic systems need regular pumping, and a disposal adds to the load. Some counties require larger tanks or more frequent service when a disposal is present.
Why does my new disposal smell? Smell almost always comes from the rubber splash guard, not the grinding chamber. Scrub the guard with a brush and dish soap, then grind lemon wedges with cold water.
What size disposal do I need for a family of four? A half to three quarter horsepower unit suits most families of four. If you cook most meals at home, lean toward three quarter horsepower. The extra power grinds faster and jams less.
If you are planning a wider kitchen update, you may also want our guides on under sink water filters and dishwasher features, since the disposal shares plumbing and power space with both.
A Final Word
Installing a garbage disposal is one of the most satisfying small projects in an American home: a few tools, a few hours, and a result you use every day. Buy a unit that fits your cooking habits, mount it with care, keep the power off until the end, and test for leaks before you call it done. Follow the care habits in this guide and your disposal will hum along quietly for a decade.
References
Bob Vila. (n.d.). Home improvement advice. https://www.bobvila.com Bosch. (n.d.). Home appliances. https://www.bosch-home.com Consumer Reports. (n.d.). Product reviews and ratings. https://www.consumerreports.org ENERGY STAR. (n.d.). Energy efficient products. https://www.energystar.gov GE Appliances. (n.d.). Kitchen and home appliances. https://www.geappliances.com Lowe’s. (n.d.). Home improvement products. https://www.lowes.com The Home Depot. (n.d.). Home improvement products. https://www.homedepot.com The Spruce. (n.d.). Home and garden advice. https://www.thespruce.com This Old House. (n.d.). Home renovation guidance. https://www.thisoldhouse.com Whirlpool. (n.d.). Home appliances. https://www.whirlpool.com
Was this guide helpful?

About David Wilson
The My Garden US editorial team writes practical, in-depth home and garden guides for American homeowners — tested advice, no fluff.