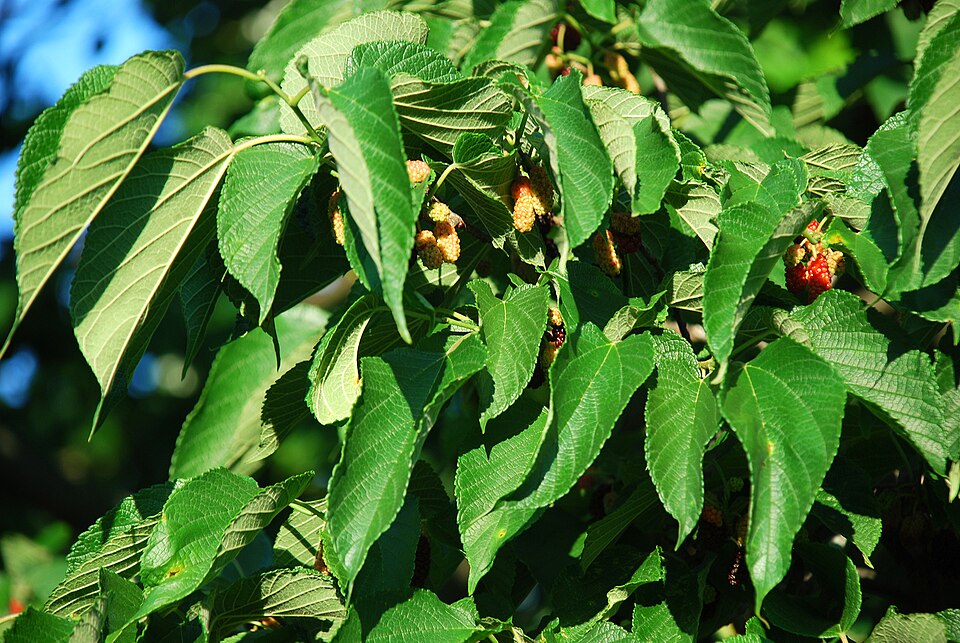


Photo: Wikimedia Commons
Mulberries are the easiest tree fruit in America — faster to bear than almost any other tree, tolerant of poor soil, nearly pest-free, and generous to a fault. A mature tree can drop gallons of sweet, blackberry-like fruit. That generosity is also the warning: mulberries stain everything purple, from patios to cars to the mouths of children, so siting is the whole game. Learning how to grow mulberries is mostly about choosing the right spot and the right cultivar, then getting out of the tree’s way. The USDA PLANTS entry for Morus rubra confirms its tough native character. This guide covers cultivars, siting away from anything stainable, planting, pruning, and the sheet-and-shake harvest. For a quick botanical overview, see the USDA PLANTS entry for Morus rubra.
Choosing a Variety
Choose a named fruiting cultivar rather than a seedling — seedlings vary wildly and some are male (no fruit). Illinois Everbearing is the classic: large, sweet berries over a long season. For small yards, dwarf everbearing types stay compact enough for large containers. White mulberries fruit too, with honey-sweet pale berries that do not stain — worth considering near paths. The Old Farmer’s Almanac guide to mulberries notes that most are self-fertile, so one tree is enough. Buy a grafted or cutting-grown tree from a nursery; it will fruit years sooner than a seedling.
When and How to Plant
Timing your sowing
Mulberry is almost always planted from nursery stock, bare-root plants, or divisions rather than seed. Set plants out around your last spring frost when the soil is workable and warming. Plant at the same depth the plant grew in its pot, firm the soil gently, and water it in well.
Spacing, depth, and days to harvest
The first season is mostly about roots and establishment; the real payoff begins in the second season, so plant with patience.
Set plants out on an overcast day if you can; it spares them transplant shock. Water deeply at planting, then mulch — that first deep drink connects roots to soil and starts establishment.
Frost-date charts from a ZIP-code planting calendar help if you are new to reading your zone.
Soil and Sun
Light needs
Sun is non-negotiable: aim for a spot that stays lit from mid-morning on. Shade-grown plants disappoint.
Building good soil
The soil recipe is simple: average, well-drained soil. A generous digging-in of compost at planting time fixes most imperfect soils.
It is rated for zones 4 to 9. Outside that range, treat it as an annual or grow it in containers you can move with the seasons.
Top the bed with compost and mulch at planting time. As the mulch decays it feeds the soil life that feeds your plants — the cheapest fertilizer program there is.
Soil testing labs listed through the University of Minnesota Extension can confirm your pH before you plant.
Watering and Feeding
Watering routine
Once settled, it sips rather than gulps. Water new plantings regularly, then back off — soggy soil kills more of these than drought ever does.
Feeding
No feeding needed; compost mulch in spring is plenty. Feed lightly. A side-dress of compost mid-season is plenty for most soils; heavy chemical feeding pushes soft, pest-prone growth.
Let the plants tell you when they are thirsty: dull, grayish leaves and soil dry an inch down mean water now. A deep weekly soaking grows deeper roots than daily sprinkles ever will.
Irrigation basics from Clemson’s Home & Garden Information Center apply to all of these schedules.
Care Through the Season
Through the season, care is almost nil: water through the first year and in drought, mulch each spring, and that is the list. Prune in winter to shape and control size — trees bleed heavily if pruned while growing, so keep the shears away in summer. Few pests trouble them; birds are the main competition, so net a portion of the crop or simply plant enough to share. Clemson’s Home & Garden Information Center covers basic fruit-tree pruning cuts that apply. Do not plant near patios, paths, driveways, or parked cars: falling fruit stains everything, and purple bird droppings under a fruiting tree are a fact of life. Give the tree twenty to thirty feet of room; it grows fast and wide.
Companions and Placement
Grow mulberries with Fig, Elderberry, and Raspberry in a dedicated fruit area with full sun and room to work around each plant. Pruning is the recurring job in any fruit planting — learn the cuts for each type and do them yearly, since neglected wood means neglected crops. Keep the patch weeded and mulched; grass competing at the roots steals water and nutrients. Plan for birds from the start with netting or a shared-harvest mindset. Harvest often and process promptly; fruit waits for no one.
Harvest
Harvest when berries are fully dark, plump, and drop at a touch — unripe berries can irritate the stomach, so wait for dead ripe. The easiest method: lay a sheet under the branches and shake them; ripe berries rain down, a technique the Missouri Botanical Garden plant finder notes as traditional. Eat fresh, freeze on trays, or cook into jam and pies. Everbearing types fruit over months rather than weeks, stretching the season wonderfully. A mature tree produces far more than a family can eat fresh — freeze the surplus and thank the tree all winter.
Troubleshooting
No fruit on a young tree is normal — seedlings take years, which is why named cultivars are worth buying. A seedling that never fruits may be male; replace it with a grafted female. In zones 10 and warmer, fruit quality drops and growth turns rank; mulberry is best in zones 4 through 9, as the USDA National Agricultural Library‘s resources confirm. Popcorn disease (swollen, white unripe fruits) is cosmetic; pick them off. If the tree is swallowing the yard, winter-prune harder — mulberries tolerate heavy pruning and rebound vigorously.
Through the Seasons
Spring
Spring is the busiest fruit season: prune before bud break, top-dress with compost, and mulch the root zones. Set out new plants early so roots establish before heat. Hang bird netting before fruit colors — once birds find the crop, netting is a rescue, not a plan.
Summer
Summer means water, netting, and harvest. Keep fruiting plants evenly watered — drought during fruit swell costs size and flavor. Pick at peak ripeness and process promptly; fruit waits for no one. After harvest, prune out spent wood where the type calls for it, and keep up with weeds.
Fall and Winter
In fall, clean up fallen fruit to break pest cycles, and do the dormant pruning each type needs. Mulch root zones after the ground cools. Winter is for planning and ordering — new bushes planted in early spring establish fastest. Sharpen pruners; spring comes fast.
Quick Answers
How long until I can harvest mulberries?
The first season is about establishment; expect the real harvest to begin in the second season. Perennials reward patience.
Where will mulberries grow?
Zones 4 through 9. Inside that range it is hardy and reliable; outside it, grow as an annual or in containers.
Does mulberries need full sun?
Full sun. Give it the sunniest spot you have; shade-grown plants disappoint.
What spacing does mulberries need?
About 300 inches apart. Crowding stunts plants and invites disease, so give each one its room — the harvest is bigger, not smaller, for the space.
Using the Harvest
Eat mulberries fresh and dead ripe, stained fingers and all — that is the proper way. They cook into jam and pies with blackberry-like depth, freeze perfectly on trays, and make a remarkable sorbet. A tree’s worth of fruit means gallons; freeze the surplus in bags for winter baking. Everbearing types stretch fresh eating over months. The sheet-and-shake harvest keeps picking fast and clean. Share with neighbors — a mature mulberry produces more than any family can use, and generosity is the traditional mulberry harvest plan. Ripe berries stain hands, clothes, and everything beneath the tree — harvest in old clothes and lay your sheets down before you shake. Browse more plant profiles at Gardenia.net’s plant profiles for ideas.
Keep Growing
How to grow mulberries: pick a named cultivar, plant it far from anything white, water the first year, prune in winter, shake a sheet in summer. That is fruit-tree growing at its easiest. For planting dates, check your USDA zone planting dates and pair it with other easy fruits — our guides to how to grow figs, how to grow elderberries, and how to grow raspberries share the low-effort orchard.
References
- U.S. Department of Agriculture. (n.d.). Mulberry (Morus rubra) plant profile. https://plants.usda.gov/home
- University of Minnesota Extension. (n.d.). Growing mulberries in home gardens. https://extension.umn.edu/
- Clemson University Cooperative Extension. (n.d.). Home & Garden Information Center. https://hgic.clemson.edu/
- Old Farmer’s Almanac. (n.d.). Growing mulberries in home gardens. https://www.almanac.com/
Was this guide helpful?

About My Garden US
The My Garden US editorial team writes practical, in-depth home and garden guides for American homeowners — tested advice, no fluff.
You May Also Like
How to Grow Delphiniums: Tall Blooms Guide
October 11, 2026 5 views
Onion Sets Planting: Where to Buy Them in the USA
June 20, 2026 1 views
Native Grass Seed Reviews Buying Guide USA: Pick the Right Seed for Your Land
July 11, 2026 1 views