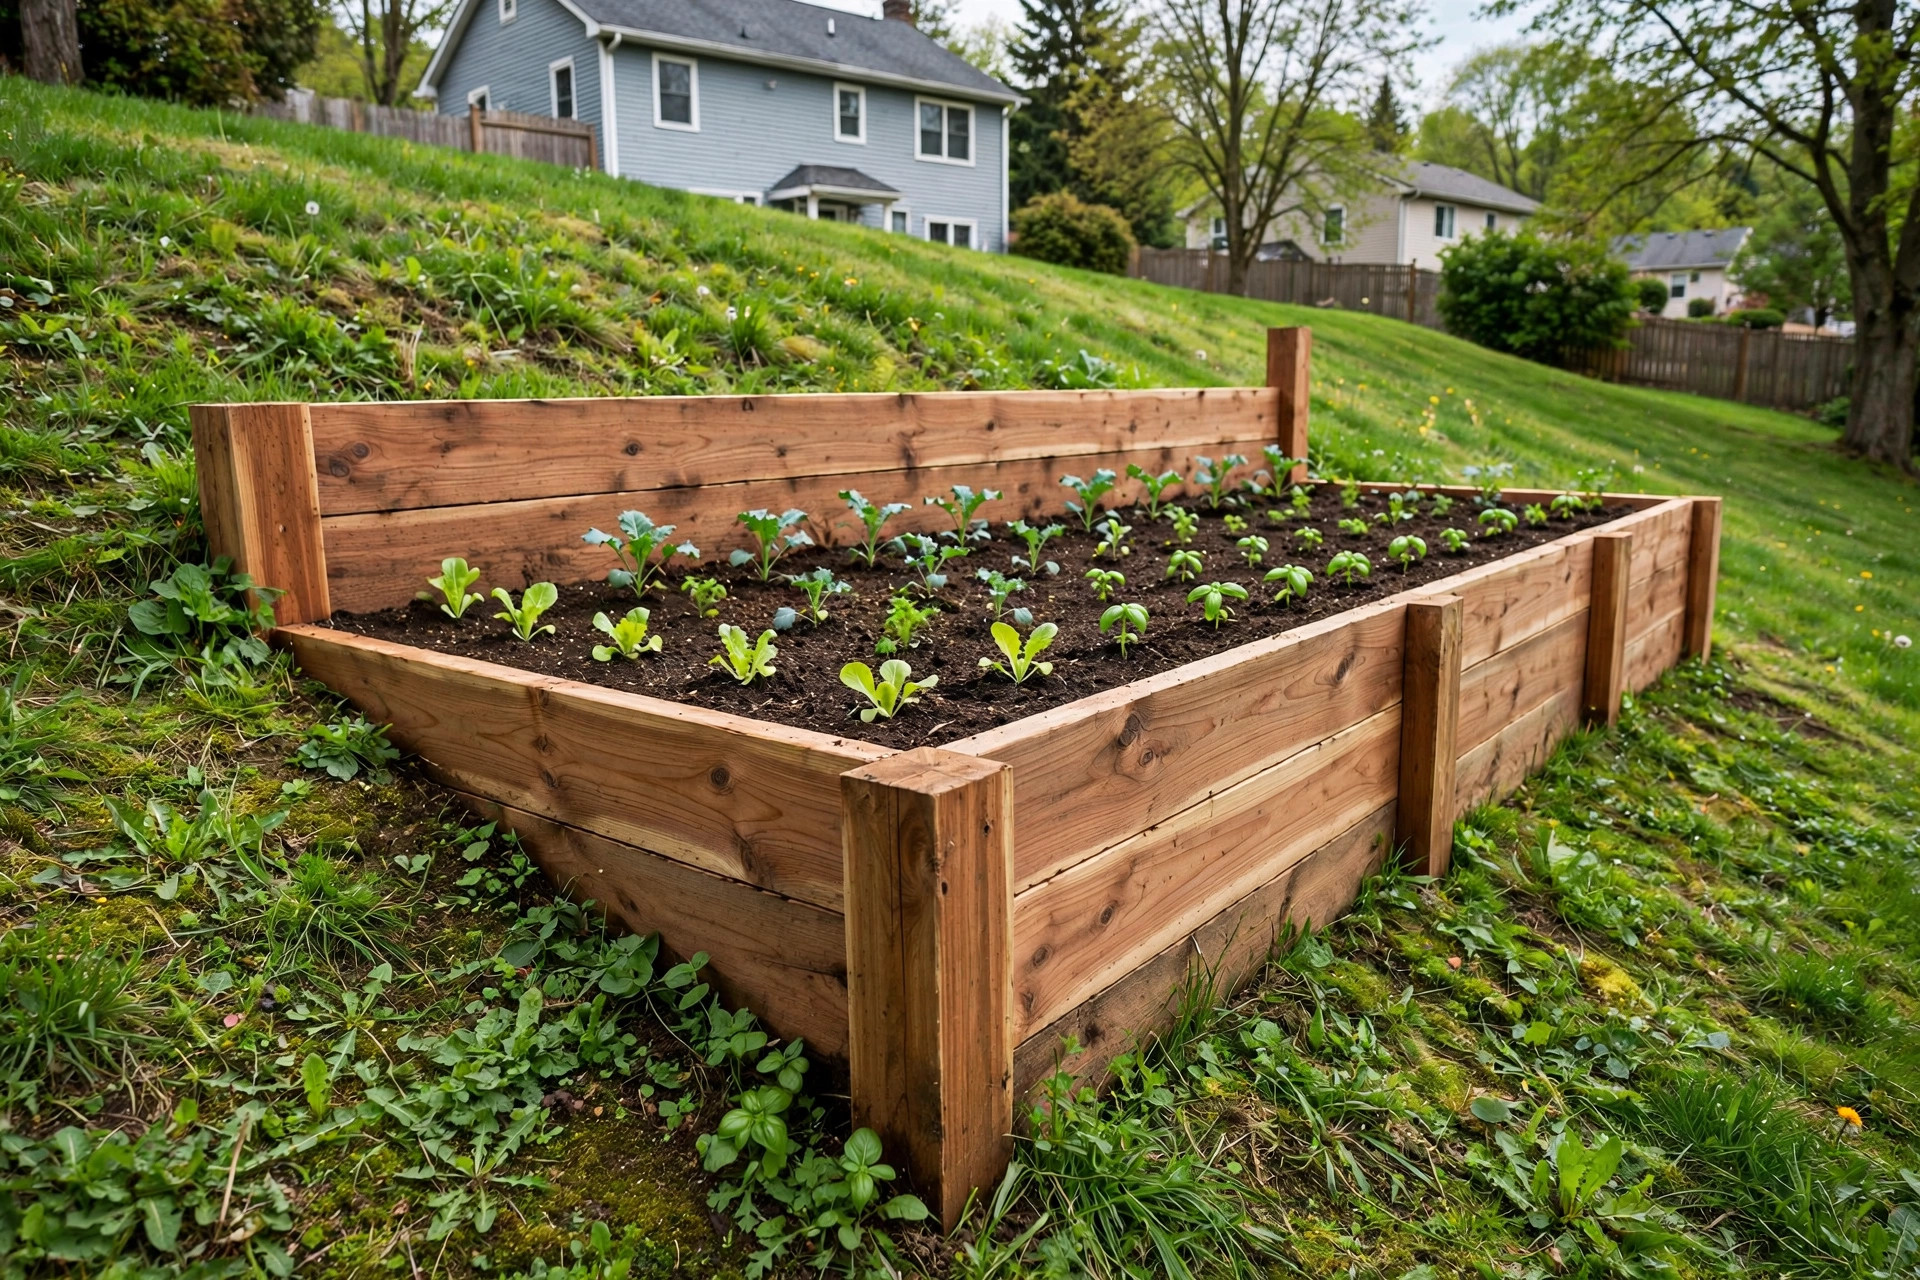

A slope in the yard can feel like lost space. The grass grows, the water runs off, and nothing stays where you put it. Many gardeners give up on slopes and let the weeds win. But a sloped yard can grow fine vegetables and flowers. You only need a raised bed that sits level while the ground falls away below it.
Learning how to build raised bed on slope is a good skill for any home gardener. The job takes one or two days with basic tools. The result is a level bed with rich soil, good drainage, and a flat surface you can reach from all sides. This guide shows the full method in plain steps, from picking the spot to filling the bed with soil.
Why It Matters
A raised bed on flat ground is simple. The frame sits even on the earth and the soil stays put. On a slope the work is harder, but the payoff is greater. A level bed on a slope turns wasted land into garden space.
There are three main gains. First, erosion stops. Bare slopes lose soil every time it rains. A framed bed holds the soil in place. Second, watering becomes easier. Water runs off a slope fast, but a level bed catches it and lets it soak in. Third, the bed warms up in spring. Cold air sinks to the bottom of slopes, so a raised bed on a slope often gets an early start on the season.
There is one thing to watch. A bed built wrong on a slope can lean or slide downhill after a few heavy rains. The secret is in the base. Cut the frame into the hill, brace it well, and anchor it deep. A bed built this way can last ten years or more.
Planning the Bed: How to Build Raised Bed on Slope
Before you cut any wood, take time to plan. Good planning saves work later.
Picking the Spot
Walk the slope after a rain. Watch where the water goes. Avoid the low spots where water collects. Pick a place with at least six hours of sun a day. Most vegetables need full sun. Keep the bed away from large trees, since tree roots will steal water and food from your plants.
Check the steepness of the slope. A gentle slope of ten to twenty percent is easy to work with. A steep slope over thirty percent needs extra care, terracing, and deeper anchors. If the hill is very steep, think about building two or three small beds that step down the hill instead of one long bed.
Sizing the Bed
Keep the bed narrow enough to reach across. Four feet wide is the usual limit, since most people can reach two feet from each side. The length can be as long as you like. Eight feet is common. On a slope, shorter beds are easier to level, so beds of six to eight feet work best.
The height matters more on a slope. On the uphill side the bed may only be six inches above the ground. On the downhill side it may be eighteen inches or more. Plan the tall side first, since it sets the amount of lumber you need.
Tools and Materials
Gather everything before you start. Running to the store mid-project wastes a good day.
Tools You Will Need
– A shovel and a spade – A rake – A tape measure – A four-foot level – A saw (circular saw or hand saw) – A power drill with bits – A wheelbarrow – A tamper or the back of the shovel for packing soil – A garden hose for watering the soil in
For cutting and digging, a good pair of best garden gloves for men large keeps your hands safe and gives you a firm grip on tools and lumber.
Materials You Will Need
– Two-by-eight or two-by-ten lumber, untreated cedar or redwood if you can afford it – Four-by-four posts for the corner braces – Three-inch exterior screws – Landscape fabric (optional, for the bottom) – Gravel or crushed stone for drainage – Good garden soil and compost to fill the bed
Cedar and redwood resist rot without chemicals. Pressure-treated lumber lasts longer, but many gardeners prefer untreated wood for beds that grow food. Unbiased product tests from Consumer Reports can help you compare lumber and kit materials before you buy. For more ideas on garden tools and supplies, the guides at The Home Depot and Lowe’s cover the basics well.
How to Build a Raised Bed on a Slope, Step by Step
This is the heart of the job. Work slowly and check the level often.
Step 1: Mark the Outline
Lay out the bed with stakes and string. Put stakes at the four corners. Stretch string between them to mark the frame. Step back and look at the shape. Make sure the long side runs across the slope, not up and down it. A bed that runs across the slope is much easier to level and holds water better.
Step 2: Cut Into the Uphill Side
This is the key step in how to build raised bed on slope projects. Use the shovel to cut a flat shelf into the uphill side of the marked area. Dig out enough earth so the top of your lumber will sit level. The shelf does not need to be perfect. It needs to be wide enough for the frame and roughly flat.
Pile the dug soil to the side. You can use it later to fill low spots or to shape the ground around the finished bed.
Step 3: Set the Corner Posts
Cut four four-by-four posts, one for each corner. Each post should be long enough to go at least twelve inches into the ground and still reach the top of the frame. On the downhill side, the posts will be longer since the frame sits higher above the ground there.
Drive the posts into the ground at the four corners. Use the level to check that each post stands straight up and down. Pack the soil tight around each post with the tamper. For extra strength on steeper slopes, drive a second post at the middle of the long downhill side.
Many gardeners read tested advice from Family Handyman and Bob Vila before they start a project like this, and both sites have solid notes on bracing and anchoring outdoor builds.
Step 4: Attach the Frame Boards
Start with the uphill side. Screw the first board to the uphill posts. The top edge of the board should sit at your planned bed height. Use at least two screws per post.
Next, attach the downhill board. This board will sit higher above the ground, since the slope falls away. Hold it level with the uphill board using the four-foot level. You may need to hold it with one hand and drive screws with the other, so ask a helper if one is near.
Then attach the two end boards. Check the whole frame with the level from every side. The frame should be level across and level end to end. If one corner is off, loosen the screws, adjust, and fix it again. A level frame now means a bed that lasts.
Step 5: Add Bracing and Stakes
On a slope, bracing is not optional. Drive wooden stakes into the ground along the outside of the long downhill board, one every two or three feet. Screw each stake to the board. These stakes hold the frame against the push of the soil inside.
For beds longer than eight feet, add a cross board inside the frame at the middle. This keeps the long sides from bowing out when the bed is full of wet soil.
Step 6: Line and Fill the Bottom
If weeds are a problem, lay landscape fabric over the cut shelf before you fill the bed. Cut a few slits in the fabric so water can drain through. Add two or three inches of gravel or crushed stone on the downhill side of the bed for drainage. This keeps the bottom from staying too wet.
Good digging tools make the earthwork faster. Trusted tool makers like Fiskars and Corona sell shovels and spades built for this kind of digging, and Gardener’s Supply carries a wide range of raised-bed frames and parts.
Step 7: Fill With Soil
Fill the bed with a mix of good topsoil and compost. A mix of about sixty percent topsoil and forty percent compost works for most plants. Fill to about two inches below the top of the frame. Water the soil well with the hose as you fill. Watering settles the soil and shows you the low spots. Add more soil where it settles.
If you plan to grow from seed, quality seed starting matters. The planting guides at Burpee explain which seeds suit raised beds, and their notes on how to store garden seeds long term are useful once you buy more seed than one season needs.
Types and Options
There is more than one way to build a raised bed on a slope. Pick the style that fits your yard and your budget.
The Cut-In Bed
This is the method described above. You cut into the hill and build the frame level. It uses the least lumber and looks natural. It works best on gentle to moderate slopes.
The Stepped Bed
For steeper slopes, build two or three short beds that step down the hill like stairs. Each bed is level on its own. Leave two or three feet of ground between the beds for a path. This style costs more in lumber but handles steep ground well.
The Terraced Wall Bed
On a steep slope, build a low retaining wall on the downhill side with stone, block, or stacked timber. Then fill behind it with soil. This is the most work, but it creates a flat garden terrace that can grow anything. For walls over two feet tall, check local rules before you build.
Cost and Price
A simple wooden raised bed on a slope costs less than many people expect. Here are rough prices for a four-by-eight-foot bed in the United States.
– Lumber (cedar two-by-eights): 60 to 120 dollars – Four-by-four posts and stakes: 20 to 40 dollars – Screws and hardware: 10 to 20 dollars – Landscape fabric and gravel: 15 to 30 dollars – Soil and compost to fill: 40 to 100 dollars
The total lands between 150 and 300 dollars for one bed. Metal kits run 100 to 250 dollars before soil. Terraced stone walls cost much more, often 500 dollars or more per bed, since the stone and the labor add up.
on lumber, soil, and hardware, big retailers like The Home Depot and Lowe’s list current prices online, and The Spruce publishes budget guides for raised-bed projects.
Care and Upkeep
A raised bed on a slope needs a little care each year to stay strong and level.
Check the frame every spring. Look for loose screws, leaning posts, and boards that have started to rot. Tighten screws and replace bad boards before the planting season starts.
Watch the soil level. Soil in a raised bed settles over time, and on a slope the settling can be uneven. Top up with compost each spring to bring the level back up. Two inches of fresh compost a year feeds the soil and keeps the bed full.
Mulch the paths around the bed. Bare dirt paths on a slope wash away in rain. Wood chips, straw, or gravel keep the paths firm and cut down on mud.
In late fall, pull out dead plants and add a layer of mulch or a cover crop. This protects the soil from winter rain and keeps it in the bed, not down the hill. For watering setups that suit a small bed, see drip line for container plants reviews.
Safety
Building on a slope adds a few risks. Take them seriously.
Wear gloves, eye protection, and sturdy boots. The digging and sawing in this project can hurt bare hands and feet. Keep the work area clear of loose tools so no one trips on the slope.
Never stack loose stone or block higher than two feet without checking local building rules. Tall walls need proper footings and drainage, or they can fail. When in doubt, call a local landscaper for advice on the wall part of the job.
Dig safe. Before you dig deep into a slope, call 811 in the United States to mark buried utility lines. It is a free call, and it keeps you from hitting gas, water, or power lines.
Lift with care. Bags of soil and stone are heavy. Lift with your legs, take breaks, and move heavy loads with the wheelbarrow instead of carrying them.
Frequently Asked Questions
How deep should a raised bed on a slope be?
Six to twelve inches of soil depth is enough for most vegetables and flowers. Root crops like carrots need at least twelve inches. On a slope, the downhill side of the bed is naturally deeper, which is fine. What matters most is that the soil surface is level.
Can I build a raised bed on a steep slope?
Yes, but use the stepped method. Build two or three short level beds that step down the hill. Keep each bed well braced, and make the corner posts longer so they anchor deep. On very steep ground, a terraced wall built by a professional is the safest choice.
Do I need to level the ground first?
You do not need the whole slope level. You only need a flat shelf where the frame sits. Cut the shelf into the uphill side, set the frame level, and let the downhill side of the frame stand tall above the ground. The shelf and the level frame do the work.
What is the best wood for a raised bed on a slope?
Cedar and redwood are the best common choices. They resist rot and insects for many years without chemical treatment. Untreated pine is cheaper but may rot in three to five years in wet soil. Avoid old railroad ties, since they can leak chemicals into the soil.
How do I stop soil from washing out of the bed?
Three things help. First, brace the frame well so it stays tight. Second, line the inside of the frame with landscape fabric to hold the soil while letting water pass. Third, mulch the soil surface. A two-inch layer of straw or wood chips breaks the force of rain and keeps soil in place.
How long does it take to build a raised bed on a slope?
A simple four-by-eight-foot bed takes most of a day for one person, or half a day with a helper. The digging takes the longest. Stepped beds and terraced walls take a full weekend or more, since there is more digging and more bracing.
A Short Final Word
A slope is not a problem to fight. It is a chance to build a garden with good sun, good air flow, and soil that drains well. The work takes a day and some honest digging. Cut the shelf, set the frame level, brace it deep, and fill it with good soil. Then plant, water, and enjoy. The hill that once grew only weeds can now grow dinner.
References
Bob Vila. (n.d.). Home improvement advice. https://www.bobvila.com Burpee. (n.d.). Seeds, plants, and gardening supplies. https://www.burpee.com Consumer Reports. (n.d.). Product reviews and ratings. https://www.consumerreports.org Corona Tools. (n.d.). Garden and landscape tools. https://www.corona-tools.com Family Handyman. (n.d.). DIY home repair and maintenance. https://www.familyhandyman.com Fiskars. (n.d.). Garden and cutting tools. https://www.fiskars.com Gardener’s Supply Company. (n.d.). Gardening tools and supplies. https://www.gardeners.com Lowe’s. (n.d.). Home improvement products. https://www.lowes.com The Home Depot. (n.d.). Home improvement products. https://www.homedepot.com The Spruce. (n.d.). Home and garden advice. https://www.thespruce.com
Was this guide helpful?

About David Wilson
The My Garden US editorial team writes practical, in-depth home and garden guides for American homeowners — tested advice, no fluff.
You May Also Like

Drip Irrigation Kit for Raised Beds: How to Choose, Install, and Care for One
August 29, 2026 0 views
How to Divide Perennials in Fall
January 24, 2026 0 views
Best Garden Soil Test Kit Reviews: What Your Garden Soil Is Telling You
April 12, 2026 1 views