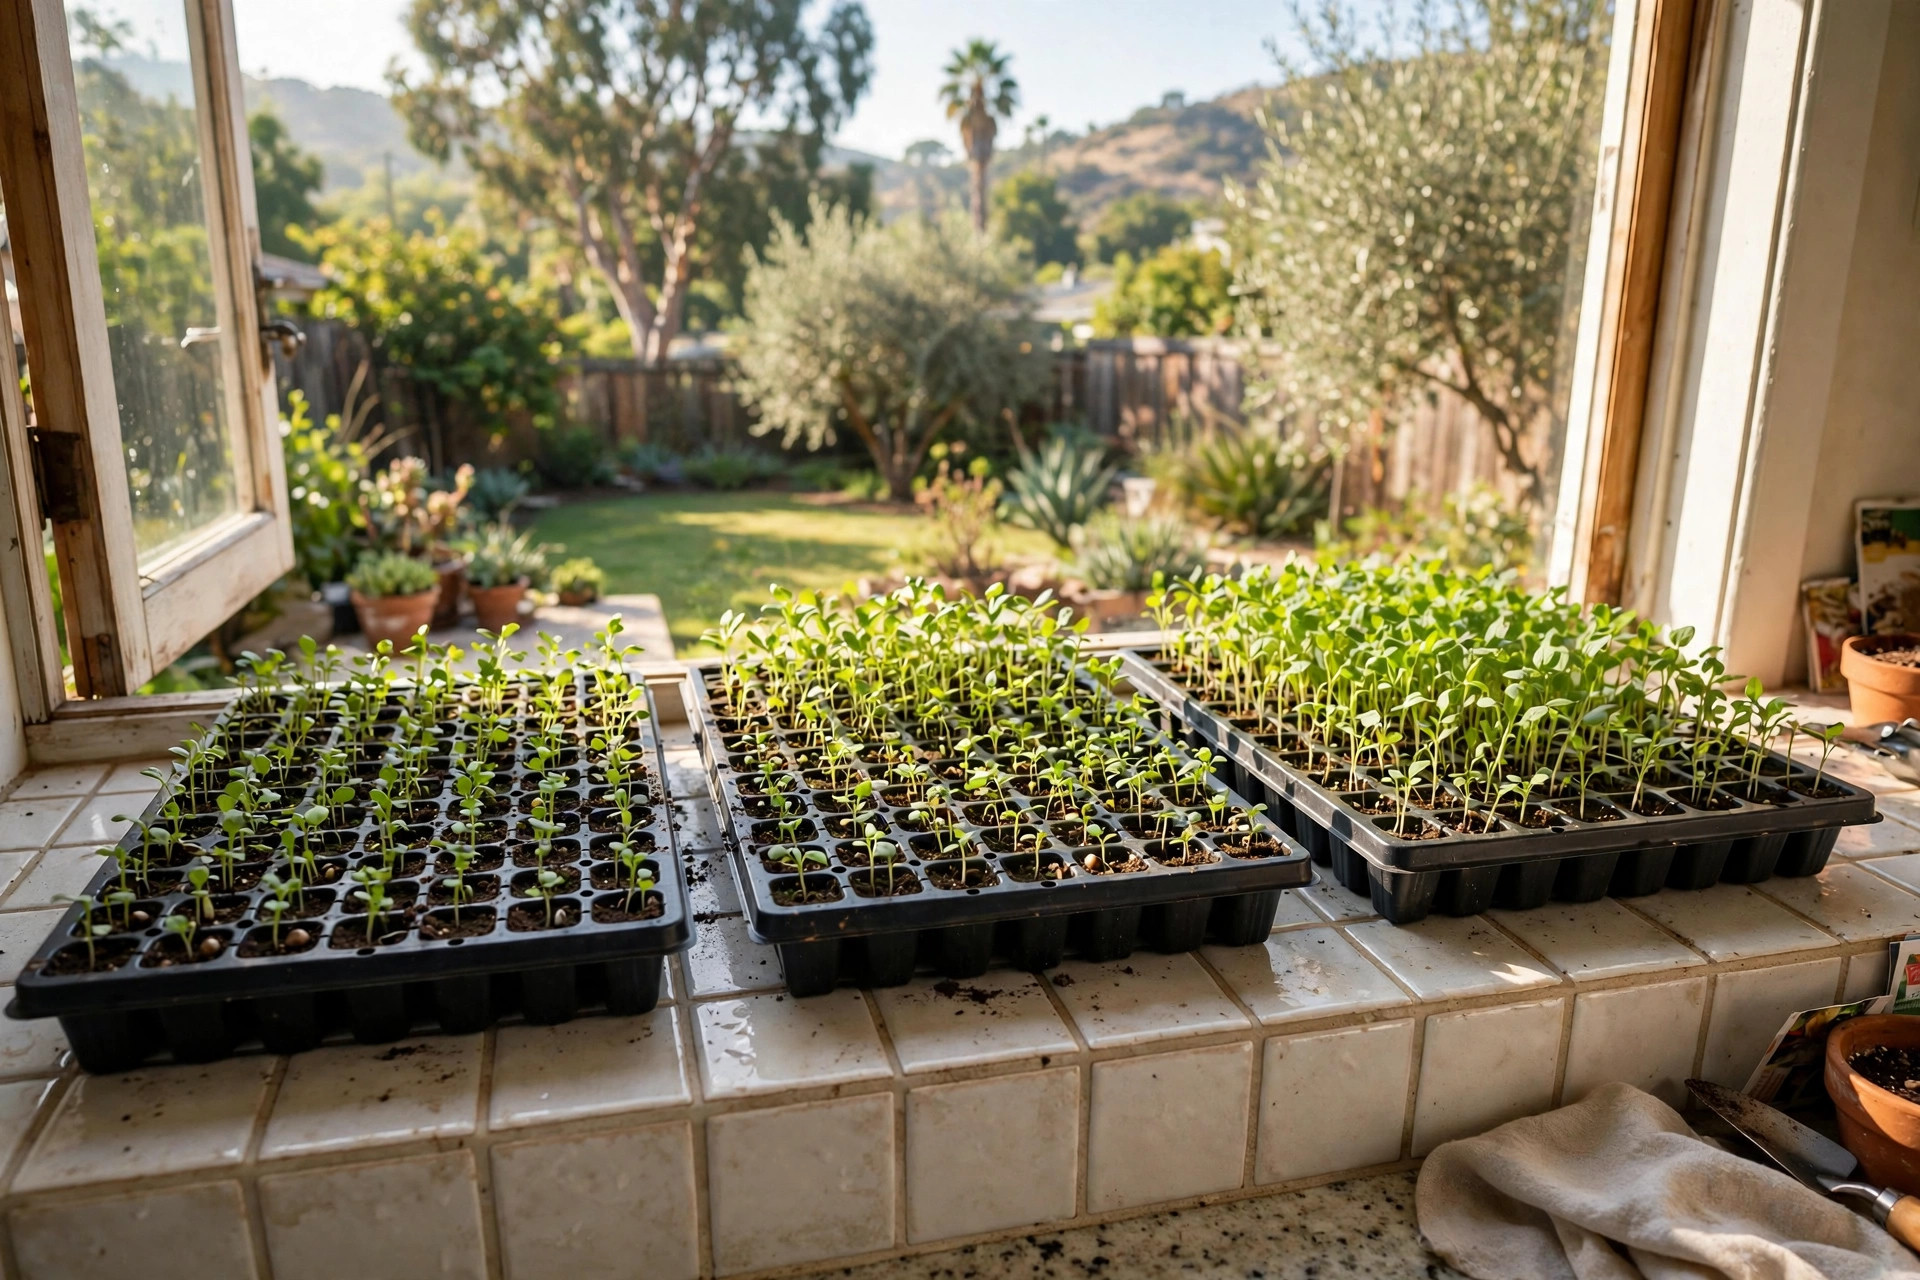

Gardeners in California face a happy problem. The growing season runs long, the winters stay mild, and the sun gives many hours of light each year. Yet even here, the season still has limits. Tender crops cannot meet a cold night. Slow seeds need a head start. This is where seed starting trays california homes usa prove their worth. A simple tray lets a home gardener start tomatoes, peppers, herbs, and flowers weeks before the ground is ready. It turns a windowsill or a patio bench into a small nursery.
This guide explains why trays matter in the California climate. It shows what to look for when you buy. It covers types, costs, daily care, and safety. It also answers common questions in plain language.
Why Seed Starting Trays Matter in California Homes
California is not one climate. The coast stays cool and damp. The Central Valley bakes in summer and cools in winter. The desert south swings from heat to chill. A seed starting tray gives you control across all these zones.
Seeds started indoors avoid the worst of the outdoor swing. A cold snap in March will not kill a tray on a warm kitchen shelf. A dry Santa Ana wind will not dry out cells kept under a humidity dome. The tray holds moisture and warmth steady. The gardener holds the schedule.
There is also the matter of time. Many warm-season crops need 90 to 120 days from seed to harvest. Tomatoes, peppers, eggplant, and squash all ask for a long runway. If you wait until the soil warms in May, you lose weeks. A tray started in late February or early March puts those weeks back. Cool-season crops work the other way. In mild coastal areas, lettuce, broccoli, and peas can start in trays in fall and move out while winter stays gentle.
Cost matters too. A packet of seed costs a few dollars and holds a hundred seeds. The same money at a nursery buys six plants. Trays let you raise your own plants for pennies each. For a family garden of forty or fifty plants, the savings add up fast.
Space is another reason. A standard tray covers about two square feet. On that small patch, you can raise 36, 50, or 72 seedlings. Few homes lack room for two square feet. The seed starting tray turns small spaces into real gardens.
What to Look For When You Choose a Tray: Seed Starting Trays California Homes Usa
Not all trays are equal. A good choice lasts for years and gives every seed a fair start. A poor choice cracks, leaks, or holds too much water. The points below walk through what counts.
Cell Size and Depth
Cell size is the single most important choice. Small cells, around one inch across, suit tiny seeds like basil, thyme, and petunias. They use little soil and fit many plants per tray. Their weakness is time. Seedlings outgrow small cells fast. They need to move out or move up within a few weeks.
Medium cells, about two inches across, suit most vegetables. Tomatoes, peppers, cucumbers, and marigolds all do well here. They give roots room to grow for four to six weeks. This size is the workhorse of the home garden.
Large cells or single pots, three inches or more across, suit plants that hate root disturbance. Squash, melons, and sweet corn prefer to start big and move out once. Some gardeners skip cells for these crops and plant straight into peat pots for seedlings that go into the ground whole.
Material Strength
Most trays are plastic. Thick plastic costs more but lasts five to ten seasons. Thin plastic may crack in one season. It still works for a first try. Paper-based fiber trays and pressed peat trays break down in the soil. They suit crops with tender roots but cannot be reused. Wooden flats are the old standard. They last for years and hold soil well, but they are heavy and need drainage holes drilled.
Drainage and Water Control
Every cell needs a drain hole. Without one, water pools at the bottom. Roots rot. A tray with a solid bottom needs holes drilled before use. Better trays come with holes molded in.
Many kits add a watertight bottom tray and a clear dome lid. The bottom tray catches water and feeds it up from below. The dome holds in warmth and damp air. This setup costs more, but it makes watering easy and speeds germination. In dry California interiors, a dome can be the difference between success and failure.
Heat and Light Fit
Seeds do not need light to sprout. They need warmth. Most vegetable seeds sprout fastest between 70 and 80 degrees. A cool house slows them. A heat mat made for seed trays fixes this. It slides under the tray and warms the soil to a steady level. After sprouts appear, light takes over. A tray should fit under your light setup, whether that is a south-facing window or a pair of shop lights on a shelf.
Before you buy, check the seed starting tray buying guide to compare cell counts, depths, and kit features side by side. Knowing the standard sizes saves you from buying a tray that does not fit your shelf or your mat.
Types of Seed Starting Trays
Walk into a garden center in February and you will see a wall of options. Most fall into a few families.
Standard cell trays come in 36, 50, 72, 98, and 128 cells. The 72-cell tray is the most common for home use. Cells are square or round, about one and a half inches wide. These trays stack neatly and fit standard heat mats and domes. They suit herbs, flowers, and small vegetables.
Large-cell trays, often called inserts with 18 or 24 cells, suit tomatoes, peppers, and brassicas. Each cell holds more soil. Seedlings can grow longer before transplanting. These are a strong pick for California gardeners who start heat-loving crops early.
Jumbo plug trays and strip trays suit commercial growers. They are overkill for most homes. Their cells are tiny and numerous, made for machine planting.
Soil blockers skip plastic entirely. The tool presses damp seed mix into firm blocks, each with a hole for a seed. Blocks transplant with zero waste. They take practice to make well.
Peat pellets are compressed discs that swell in water. They suit single seeds and small plants. They dry out fast in warm rooms, so they need watching.
Choosing the Right Tray for a California Home
Match the tray to your zone and your crops. California garden zones run from 8a in mountain towns to 11a along the warmest coast. Your zone sets your last frost date and your first planting date. On the warm coast and in the south, start warm-season crops in trays in late January or February and move them out in March or April. In the Central Valley and inland areas, start indoors in February or March and set plants out in April when nights stay above 50 degrees. In mountain and high desert areas, start indoors in March or April and harden seedlings off slowly before they meet cold nights.
Light in California Homes
A south-facing window is the classic spot. But even strong window light is weaker than outdoor sun. Seedlings can stretch tall and weak if they chase light from one side. Turn the tray a quarter turn each day to keep growth even.
Many serious gardeners use a simple shop light hung on chains over a shelf. Two cool white tubes, hung two inches above the seedlings, give excellent results. Raise the light as plants grow. This setup costs little and fits in a garage or spare room.
Water Quality and Soil
California tap water runs hard in many areas. Mineral salts can build up in tray cells over a season. Use clean water for seedlings when you can. Rainwater, collected in winter, is ideal. If you reuse trays, wash them with a mild bleach rinse between seasons to kill disease.
Seed starting mix, not garden soil, belongs in trays. Garden soil packs too tight in small cells and carries weed seeds and disease. A bagged seed starting mix is light, clean, and holds moisture well. Trusted seed and garden suppliers, such as the catalog at Burpee and the seed house at Park Seed, stock mixes suited to tray work.
Cost and Price
Seed starting is one of the cheapest parts of gardening. Here are honest price ranges seen across USA garden centers and mail-order catalogs.
A basic thin plastic 72-cell tray costs about 3 to 6 dollars. A heavy-duty version costs 8 to 15 dollars and lasts many seasons. A full kit with tray, watertight base, and humidity dome runs 12 to 25 dollars. Heat mats cost 20 to 40 dollars. A bag of seed starting mix runs 6 to 12 dollars and fills several trays.
Do the math on a simple setup. Two heavy-duty trays, one dome, and one bag of mix cost about 40 dollars. Those two trays can raise 144 seedlings. A nursery charges 3 to 5 dollars per transplant. Growing your own saves hundreds of dollars in a single spring.
Watch for sales in late winter. Garden centers clear shelf space in January and February, and tray kits often drop in price. The seed experts at Gurney’s and the nursery growers at Monrovia both list tray supplies alongside their seed catalogs, which makes it easy to order everything in one box.
Budget gardeners can start even cheaper. Washed yogurt cups with punched drain holes work as single pots. A clear plastic storage lid works as a dome. The plants do not care how much you paid.
Care and Upkeep of Trays
Good habits turn a tray into a season of strong plants. Poor habits turn it into a tray of dead stems. The rules are simple and few.
Watering
Keep the mix damp, not wet. Water from the bottom when you can. Set the tray in an inch of water and let the cells drink for 20 minutes, then drain. Bottom watering keeps the surface dry and cuts down on mold and fungus gnats.
Check trays daily. Small cells dry fast in a warm house. In the dry air of a California winter, a tray on a heat mat may need water twice a day. Lift a corner of the tray to feel its weight. A light tray needs water. A heavy one does not.
Air and Temperature
Once seeds sprout, remove the dome. Fresh air stops damping-off, the fungus that kills seedlings at the soil line. A small fan on low, set a few feet away, gives gentle air movement. This builds strong stems. Keep the room between 60 and 70 degrees after sprouting. Warm is for seeds. Cool is for seedlings.
Feeding
Seed mix holds little food. Once seedlings grow their second set of true leaves, feed them lightly with half-strength liquid fertilizer once a week. Strong feeding burns tender roots.
Thinning and Transplanting
If two seeds sprout in one cell, keep the stronger one. Snip the weaker at soil level. Do not pull it. Pulling tears the roots of the survivor.
Move seedlings to the garden when they have sturdy stems and several true leaves. Harden them first. Set the tray outside in shade for a few hours, then longer each day for a week. Plant out on a cloudy day or in late afternoon to ease the shock.
Gardeners raising heirloom vegetable seeds should give these old varieties extra care at transplant time. Many heirlooms grow slower than modern hybrids, but they reward patience with flavor.
Safety in the Home Seed Starting Area
Seed starting is safe work, but a few cautions keep it that way.
Heat mats draw electricity. Plug them into a grounded outlet and keep cords dry. Never let a mat sit in standing water.
Grow lights get warm. Hang them with chains, not string, and keep them clear of curtains or paper. LED shop lights run cooler than old tube lights and suit home use well.
Seed starting mix can carry fine dust. Pour it slowly and work in a ventilated spot. People with breathing trouble should wear a simple dust mask when filling trays.
Fertilizers and pest sprays belong out of reach of children and pets. Even organic products can upset a stomach. Store them in a locked cabinet if small hands can reach the shelf.
Trays left on a sunny windowsill can warp in strong heat. A tray that sits against hot glass in a desert afternoon may bend. Move trays back a few inches or shade the glass during the hottest hours.
Frequently Asked Questions
When should I start seeds indoors in California?
It depends on your zone. Warm coastal and southern areas can start warm-season crops in late January or February. Central Valley and inland gardeners start in February or March. Mountain areas start in March or April. Cool-season crops start in late summer for fall planting in mild zones. Check a planting calendar for your zip code, such as the regional guides at The Old Farmer’s Almanac, to pin down your dates.
How many seeds go in each cell?
One or two. Two gives insurance against a seed that never sprouts. Thin to one seedling per cell once they stand. Crowded cells grow weak plants that fight for light and water.
Why are my seedlings tall and floppy?
They need more light. Move them closer to the light source or add a shop light above them. Keep the light two to four inches above the tops. Turn trays daily if you use a window. A gentle fan also builds sturdier stems.
Can I reuse seed starting trays?
Yes, if they are sturdy plastic. Wash them well between seasons. Scrub off old soil, soak in a mild bleach solution, rinse clean, and dry in the sun. Thin disposable trays usually crack before a second use.
Do I need a heat mat in California?
Not always. A warm spot on top of a refrigerator may be enough. But a mat gives steady, even warmth that a room corner cannot match. In cool coastal homes, a mat speeds germination by days or weeks.
What is the easiest crop to start in trays?
Basil, lettuce, and marigolds forgive almost every beginner mistake. They sprout fast and grow strong. Tomatoes are nearly as easy and reward the effort well. Save slow or fussy crops, like rosemary or lisianthus, for your second season.
A Short Final Word
A seed starting tray is a small tool with a large return. It costs little, takes up little room, and puts weeks back into a California growing season. Pick sturdy trays in the right cell size. Fill them with clean mix. Give them warmth, then light, then steady water. The seedlings will do the rest. Come spring, you will set out plants you raised yourself, at a fraction of the store price, exactly on your own schedule.
For deeper reading on seed selection, sowing depth, and variety performance in home gardens, the growing guides at Gardening Know How and The Spruce offer plain, tested advice. The trial gardens at Proven Winners show how new varieties perform in real beds, while the plant finder at White Flower Farm helps match plants to your zone. For the science behind planting dates and soil, the research arm of the USDA at NIFA publishes plain-language summaries worth a read.
References
Burpee. (n.d.). Seeds, plants, and gardening supplies. https://www.burpee.com Gardening Know How. (n.d.). Gardening guides and plant care. https://www.gardeningknowhow.com Gurney’s Seed & Nursery Co. (n.d.). Seeds, plants, and garden supplies. https://www.gurneys.com Monrovia. (n.d.). Plants for home gardens. https://www.monrovia.com National Institute of Food and Agriculture. (n.d.). Agricultural research and extension. https://www.nifa.usda.gov Park Seed. (n.d.). Seeds, plants, and gardening supplies. https://www.parkseed.com Proven Winners. (n.d.). Plants and gardening inspiration. https://www.provenwinners.com The Old Farmer’s Almanac. (n.d.). Gardening calendars and advice. https://www.almanac.com The Spruce. (n.d.). Home and garden advice. https://www.thespruce.com White Flower Farm. (n.d.). Plants, bulbs, and garden supplies. https://www.whiteflowerfarm.com
Was this guide helpful?

About Sarah Mitchell
The My Garden US editorial team writes practical, in-depth home and garden guides for American homeowners — tested advice, no fluff.
You May Also Like
Pothos Plants Bulk Deals Near Me: A Plain Guide to Buying Well
July 9, 2026 0 views
Wildflower Seed Mixes American Homes Guide: Planting Wild Beauty Around Your House
June 24, 2026 0 views
Dahlia Bulbs Bulk American Homes Guide: Plant Big and Bloom Bright
June 15, 2026 0 views