

Photo: Wikimedia Commons
Homegrown potatoes taste like a different vegetable from store ones — creamy, earthy, and impossibly fresh, especially the thin-skinned new potatoes you steal from under the plants in early summer. Potatoes are also one of the most productive crops per square foot, and they grow in the cool shoulder seasons when little else is happening. The rules are few but firm: certified seed potatoes, cool weather, and hilling — every tuber that sees sunlight turns green and poisonous. Learning how to grow potatoes is mostly learning to hill. The USDA PLANTS entry for Solanum tuberosum confirms its cool-season nature. This guide covers seed selection, planting, hilling, beetle patrol, and the harvest cure. For a quick botanical overview, see the USDA PLANTS entry for Solanum tuberosum.
Choosing a Variety
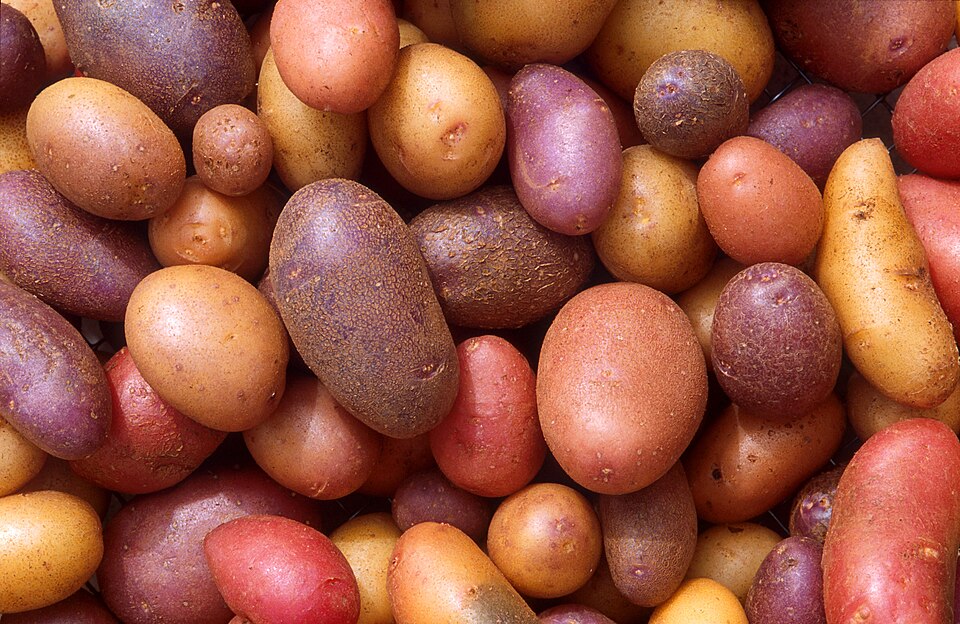
Always plant certified disease-free seed potatoes — never grocery-store potatoes, which carry blight and viruses. Cut large tubers into pieces with two to three eyes each and let the cuts dry a day or two before planting; small egg-sized tubers go in whole. For new potatoes, choose early types like Yukon Gold or Red Norland; for storage, late russets and fingerlings. The Old Farmer’s Almanac guide to potatoes lists varieties by maturity and use. Blue and purple types add novelty and antioxidants. Buy seed potatoes early — popular varieties sell out by planting time.
When and How to Plant
Timing your sowing
Potato goes straight into the ground where it will grow — it does best sown in place. Sow about 3 weeks before your last spring frost, plant a few weeks before the last spring frost — potatoes like cool soil. Sow 4 inches deep, then thin or space seedlings to about 12 inches apart. Crowded plants stay small and invite disease, so give them the room the packet calls for.
Spacing, depth, and days to harvest
From sowing to harvest takes roughly 70 to 120 days, so you can count forward from your planting date and know about when to start watching.
A soil thermometer is a gardener’s best ten dollars: it removes all guesswork about whether the ground is ready. Sow in the morning so seeds settle into warming soil, and mark the row — bare soil all looks alike a week later.
Frost-date charts from a ZIP-code planting calendar help if you are new to reading your zone.
Soil and Sun
Light needs
It wants full sun — six to eight hours of direct light a day. Less than that and growth turns leggy and yields fall off.
Building good soil
Plant in loose, slightly acidic soil. If your ground is heavy clay, plant a little high and mulch well; if it is sand, compost is your best friend.
It is rated for zones 3 to 10. Outside that range, treat it as an annual or grow it in containers you can move with the seasons.
Mulch after planting with two to three inches of straw, shredded leaves, or bark. Mulch holds moisture, smothers weeds, and feeds the soil as it breaks down — it is the single easiest upgrade to any planting.
Soil testing labs listed through the University of Minnesota Extension can confirm your pH before you plant.
Watering and Feeding
Watering routine
Aim for steady moisture: water when the top inch of soil dries out, and mulch to keep it from swinging between soaked and parched.
Feeding
Work compost in at planting; avoid fresh manure, which encourages scab. Side-dress lightly as plants grow. Go light on fertilizer. Compost worked in at planting plus a mid-season mulch feeding will carry it; overfeeding causes more problems than it solves.
Morning watering is the rule: leaves dry fast in rising sun, denying fungal diseases the damp nights they love. Drip irrigation or a soaker hose waters roots without wetting leaves at all.
Irrigation basics from Clemson’s Home & Garden Information Center apply to all of these schedules.
Care Through the Season
Through the season, hill soil or straw up around the stems as plants grow, keeping every developing tuber in darkness — light exposure creates green, bitter solanine, and hilling is not optional. Water evenly; drought followed by deluge cracks tubers. Watch for Colorado potato beetles: handpick the striped adults, crush the orange egg masses on leaf undersides, and pick the humpbacked larvae. Row cover from planting prevents most beetle damage. For late blight, certified seed and yearly rotation are the best defenses; the University of Minnesota Extension has blight identification guides for Northern growers. Mulch with straw to hold moisture and make hilling easy.
Companions and Placement
Good neighbors for potatoes include Sweet Corn, Tomato, and Onion, which thrive in the same conditions and harvest windows. Plan the bed as a rotation, not a fixed map: nightshades one year, roots the next, legumes after that, with compost between each turn. Interplanting flowers like marigolds or nasturtiums among the rows invites pollinators and confuses pests. Leave room to walk and work — beds you cannot reach do not get weeded, watered, or harvested. A four-foot-wide bed reachable from both sides is the most practical size ever devised.
Harvest
For new potatoes, reach gently under the plants after flowering and steal a few — the plants keep growing. Dig the main crop when the tops yellow and die back; wait two weeks after die-back for skins to set. Lift carefully with a fork to avoid spearing tubers. Cure a week in a dark, airy spot, then store cool and completely dark — light turns stored potatoes green, as the Missouri Botanical Garden plant finder warns. Ideal storage is just above refrigerator temperature with high humidity; a cool basement in paper sacks works. Eat any nicked or green tubers? No — compost the green ones; solanine is not worth the risk.
Troubleshooting
Green tubers mean light exposure — hill more generously and mulch thicker. Hollow or cracked tubers trace to uneven watering; keep moisture steady. Blackened, collapsed foliage is late blight: destroy (do not compost) affected plants and rotate crops; the USDA National Agricultural Library indexes extension blight bulletins. Scabby skins come from alkaline soil or fresh manure — keep pH slightly acid and use finished compost. If beetles overwhelm you, row cover next year from day one. Small yields in hot climates are heat shutting down tuber formation; in warm zones, plant for a winter harvest instead.
Through the Seasons
Spring
In spring, the work is soil and timing. Work compost into the bed as soon as the ground can be turned, and sow or transplant on the schedule above — potatoes planted at the right moment outgrow everything planted late. A floating row cover over new sowings adds a few degrees of warmth and keeps flea beetles off; pull it once plants flower so pollinators can reach them.
Summer
Summer is maintenance season: water deeply through dry spells, weed before weeds set seed, and watch for the pests listed above. For potatoes, the harvest window is the busy season — pick often, because timely picking keeps plants producing. A mid-season side-dress of compost keeps heavy feeders happy. In heat waves, an extra evening watering saves stressed plants.
Fall and Winter
In fall, pull spent plants, compost the healthy foliage, and sow a cover crop or mulch the empty bed — bare winter soil loses nutrients to rain. Clean and oil tools before storing, and jot down what worked; next spring’s planting plan starts with this fall’s notes.
Quick Answers
How long does potatoes take to grow?
About 70 to 120 days from sowing to harvest under good conditions — count forward from your planting date to know when to start watching.
What zones can I grow potatoes in?
Zones 3 through 10. Inside that range it is hardy and reliable; outside it, grow as an annual or in containers.
How much sun does potatoes need?
Full sun. Give it the sunniest spot you have; shade-grown plants disappoint.
How far apart should I plant potatoes?
About 12 inches apart. Crowding stunts plants and invites disease, so give each one its room — the harvest is bigger, not smaller, for the space.
Using the Harvest
New potatoes — dug small after flowering, boiled and buttered — are the gardener’s private luxury; never let them all grow up. Full-size potatoes store for months in a cool, dark place; check the sack monthly and remove any soft ones. Match type to cooking: waxy reds for salads, russets for baking and frying, Yukon Golds for mashing. Homegrown potatoes need no peeling when young — just scrub. Cure before storing, keep them dark to prevent greening, and never store with onions, which hasten sprouting. A 4-by-8 bed feeds a family for months. Browse more plant profiles at Gardenia.net’s plant profiles for ideas.
Keep Growing
How to grow potatoes: certified seed, cool planting, relentless hilling, even water, beetle patrol, cure in the dark. Master hilling and the rest follows. For planting dates, check your USDA zone planting dates and rotate with their garden companions — our guides to how to grow sweet corn, how to grow tomatoes, and how to grow onions follow potatoes well in rotation.
References
- Old Farmer’s Almanac. (n.d.). Growing potatoes in home gardens. https://www.almanac.com/
- U.S. Department of Agriculture. (n.d.). Potato (Solanum tuberosum) plant profile. https://plants.usda.gov/home
- University of Minnesota Extension. (n.d.). Growing potatoes in home gardens. https://extension.umn.edu/
- Clemson University Cooperative Extension. (n.d.). Home & Garden Information Center. https://hgic.clemson.edu/
Was this guide helpful?

About My Garden US
The My Garden US editorial team writes practical, in-depth home and garden guides for American homeowners — tested advice, no fluff.
You May Also Like
Dahlia Bulbs Bulk USA Online Deals: How to Buy More Tubers for Less Money
February 3, 2026 0 views
How to Grow Lima Beans: Heat Guide
October 11, 2026 5 views
Heirloom Vegetable Seeds for Sale USA: A Plain Guide for Home Gardeners
March 9, 2026 2 views